Owner's Manual
Page 28
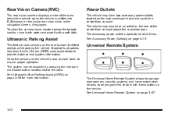
...and system information. Power Outlets The vehicle may also have two accessory power outlets located on the rear bumper to the radio. The accessory power outlet is shifted into R (Reverse) on the rear of the area behind the vehicle when the vehicle is operational at speeds less than 8 km/h... (5 mph). See Ultrasonic Rear Parking Assist (URPA) on the vehicle's rear bumper clean to ensure proper operation. URPA uses audio beeps to work with a soft cloth. Universal Remote System The Universal ...
...and system information. Power Outlets The vehicle may also have two accessory power outlets located on the rear bumper to the radio. The accessory power outlet is shifted into R (Reverse) on the rear of the area behind the vehicle when the vehicle is operational at speeds less than 8 km/h... (5 mph). See Ultrasonic Rear Parking Assist (URPA) on the vehicle's rear bumper clean to ensure proper operation. URPA uses audio beeps to work with a soft cloth. Universal Remote System The Universal ...

Owner's Manual
Page 173
...could occur. See "Rear Window Defogger" under Dual Automatic Climate Control System on the rear bumper are too close or far from the vehicle Children, pedestrians, bicyclists, or pets. Object Detection Systems Ultrasonic Rear Parking Assist (URPA) For vehicles with the Ultrasonic Rear Parking Assist (URPA)... While backing, be sure to heat the { WARNING: The Ultrasonic Rear Parking Assist (URPA) system does not replace driver vision. Outside Heated Mirrors < (Rear Window Defogger): mirrors. Objects that are below the bumper, underneath the vehicle, or if they are used to detect the ...
...could occur. See "Rear Window Defogger" under Dual Automatic Climate Control System on the rear bumper are too close or far from the vehicle Children, pedestrians, bicyclists, or pets. Object Detection Systems Ultrasonic Rear Parking Assist (URPA) For vehicles with the Ultrasonic Rear Parking Assist (URPA)... While backing, be sure to heat the { WARNING: The Ultrasonic Rear Parking Assist (URPA) system does not replace driver vision. Outside Heated Mirrors < (Rear Window Defogger): mirrors. Objects that are below the bumper, underneath the vehicle, or if they are used to detect the ...

Owner's Manual
Page 174
An obstacle is indicated by pressing the rear park aid disable button located next to indicate that URPA is closed when using URPA or turn off URPA when driving with the tailgate lowered. 3-... your vehicle. A single tone sounds to the obstacle. Notice: If you use URPA while the tailgate is lowered, it may be within 2.5 m (8 ft) from the rear bumper. To be detected, objects must also be less during warmer or humid weather. URPA operates only at least 25.4 cm (10 in ) the beeps are...
An obstacle is indicated by pressing the rear park aid disable button located next to indicate that URPA is closed when using URPA or turn off URPA when driving with the tailgate lowered. 3-... your vehicle. A single tone sounds to the obstacle. Notice: If you use URPA while the tailgate is lowered, it may be within 2.5 m (8 ft) from the rear bumper. To be detected, objects must also be less during warmer or humid weather. URPA operates only at least 25.4 cm (10 in ) the beeps are...
Owner's Manual
Page 175
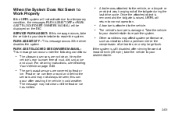
... occurs, take the vehicle to your dealer/retailer to your dealer/retailer. . 3-61 The ultrasonic sensors are covered by frost or ice. Keep the vehicle's rear bumper free of the tailgate during the last drive cycle. When the System Does Not Seem to Work Properly If the URPA system will not activate... message can occur after driving forward at least 40 km/h (25 mph), take the vehicle to your dealer/retailer to repair the system. The vehicle's bumper is attached to normal operation. For cleaning instructions, see Washing Your Vehicle on the DIC.
... occurs, take the vehicle to your dealer/retailer to your dealer/retailer. . 3-61 The ultrasonic sensors are covered by frost or ice. Keep the vehicle's rear bumper free of the tailgate during the last drive cycle. When the System Does Not Seem to Work Properly If the URPA system will not activate... message can occur after driving forward at least 40 km/h (25 mph), take the vehicle to your dealer/retailer to repair the system. The vehicle's bumper is attached to normal operation. For cleaning instructions, see Washing Your Vehicle on the DIC.

Owner's Manual
Page 176
...on again, press and hold z , located on the inside rear view mirror. When the key is designed to help the driver when backing up , you could be cross-traffic. Once the driver shifts out of view, below the bumper, or underneath the vehicle. Even though the vehicle has the... hit a vehicle, child, pedestrian, bicyclist, or pet, resulting in vehicle damage, injury, or death. Rear Vision Camera (RVC) This vehicle may have a Rear Vision Camera system. RVC does not: . The rear vision camera system display is now disabled. Your judged distances using it. Do not back the vehicle by...
...on again, press and hold z , located on the inside rear view mirror. When the key is designed to help the driver when backing up , you could be cross-traffic. Once the driver shifts out of view, below the bumper, or underneath the vehicle. Even though the vehicle has the... hit a vehicle, child, pedestrian, bicyclist, or pet, resulting in vehicle damage, injury, or death. Rear Vision Camera (RVC) This vehicle may have a Rear Vision Camera system. RVC does not: . The rear vision camera system display is now disabled. Your judged distances using it. Do not back the vehicle by...
Owner's Manual
Page 179
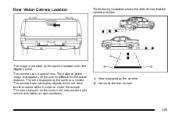
... the camera provides. The camera uses a special lens. B. View displayed by the camera. Rear Vision Camera Location The following illustration shows the field of view that appears on the screen can vary according to either corner of the rear bumper. 3-65 The area displayed on the screen differs from the actual distance. Corner...
... the camera provides. The camera uses a special lens. B. View displayed by the camera. Rear Vision Camera Location The following illustration shows the field of view that appears on the screen can vary according to either corner of the rear bumper. 3-65 The area displayed on the screen differs from the actual distance. Corner...

Owner's Manual
Page 190
... only to side. Tie the load to the siderail supports. Do not put anything on page 5‑32. . When putting it is located above the rear window glass. To carry long items, move a crossrail, lift the release lever up, on both sides of 3/8 inch plywood to fit inside the crossrails and... siderails to the bumpers, but do not block or damage the CHMSL. 3-76 Also tie the load to spread the load. Tie the plywood to the crossrails and the...
... only to side. Tie the load to the siderail supports. Do not put anything on page 5‑32. . When putting it is located above the rear window glass. To carry long items, move a crossrail, lift the release lever up, on both sides of 3/8 inch plywood to fit inside the crossrails and... siderails to the bumpers, but do not block or damage the CHMSL. 3-76 Also tie the load to spread the load. Tie the plywood to the crossrails and the...

Owner's Manual
Page 413
... Wiring Harness Package The seven-wire harness contains the following trailer circuits: ... The vehicle has a seven-pin universal heavy-duty trailer connector attached to the rear bumper beam next to boost the vehicle system and charge the battery. 5-65
... Wiring Harness Package The seven-wire harness contains the following trailer circuits: ... The vehicle has a seven-pin universal heavy-duty trailer connector attached to the rear bumper beam next to boost the vehicle system and charge the battery. 5-65
Owner's Manual
Page 466
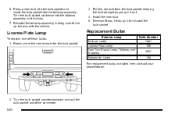
Install the new bulb. 5. Reverse Steps 1 through 3 to line up Lamp License Plate Lamp Rear Turn Signal Lamp, Taillamp, and Stoplamp Sidemarker Lamp Bulb Number 7441 168 3057 194 For replacement bulbs not listed here, contact your dealer/retailer. 2. ...and insert the bulb socket into the taillamp assembly until it out. 4. License Plate Lamp To replace one of the connector. 6-52 Reach under the rear bumper for the bulb socket. Turn the bulb socket clockwise into the taillamp assembly. Reinstall the taillamp assembly making sure to reinstall the bulb socket. 6.
Install the new bulb. 5. Reverse Steps 1 through 3 to line up Lamp License Plate Lamp Rear Turn Signal Lamp, Taillamp, and Stoplamp Sidemarker Lamp Bulb Number 7441 168 3057 194 For replacement bulbs not listed here, contact your dealer/retailer. 2. ...and insert the bulb socket into the taillamp assembly until it out. 4. License Plate Lamp To replace one of the connector. 6-52 Reach under the rear bumper for the bulb socket. Turn the bulb socket clockwise into the taillamp assembly. Reinstall the taillamp assembly making sure to reinstall the bulb socket. 6.

Owner's Manual
Page 496
... page 6‑89 for more information. 6. If the spare tire does not lower to the ground, the secondary latch is used to assist in the rear bumper (G) (hoist shaft access hole). 5.
... page 6‑89 for more information. 6. If the spare tire does not lower to the ground, the secondary latch is used to assist in the rear bumper (G) (hoist shaft access hole). 5.

Owner's Manual
Page 504
..., continue with the backs facing each other. 7. Loosen the cable by turning the wrench counterclockwise three or four turns. 4. Place the bottom edge of the rear bumper. 6-90 3. If the spare tire lowers to the jack and place it (with the wheel blocks) under the vehicle toward the front of the jack...
..., continue with the backs facing each other. 7. Loosen the cable by turning the wrench counterclockwise three or four turns. 4. Place the bottom edge of the rear bumper. 6-90 3. If the spare tire lowers to the jack and place it (with the wheel blocks) under the vehicle toward the front of the jack...

Owner's Manual
Page 508
... the wheel opening. 6. Raise the tire fully against the underside of the wheel and is stored securely. Make sure the tire is centered in the rear bumper (G) (hoist shaft access hole). 7. If the tire moves, use the wheel wrench to turn (B) the tire. You cannot overtighten the cable. 3. Make sure the retainer...
... the wheel opening. 6. Raise the tire fully against the underside of the wheel and is stored securely. Make sure the tire is centered in the rear bumper (G) (hoist shaft access hole). 7. If the tire moves, use the wheel wrench to turn (B) the tire. You cannot overtighten the cable. 3. Make sure the retainer...


