
Owner's Manual
Page 96
... an airbag when it inflates. There are part of the airbag system in several places around the vehicle. In addition, your vehicle's frame, bumper system, height, front end or side sheet metal, they may have information about the vehicle that are parts of the passenger's seat. Be sure to...
... an airbag when it inflates. There are part of the airbag system in several places around the vehicle. In addition, your vehicle's frame, bumper system, height, front end or side sheet metal, they may have information about the vehicle that are parts of the passenger's seat. Be sure to...

Owner's Manual
Page 162
The sensors on the rear bumper are too close or far from the vehicle • children, pedestrians, bicyclists, or pets. The Ultrasonic Rear Parking Assist (URPA) system does not replace driver ... death could occur. While backing, be sure to 8 feet (2.5 m) behind the vehicle before and while backing; It cannot detect: • objects that are below the bumper, underneath the vehicle, or if they are used to detect the distance to an object up . If you do not use proper care before backing...
The sensors on the rear bumper are too close or far from the vehicle • children, pedestrians, bicyclists, or pets. The Ultrasonic Rear Parking Assist (URPA) system does not replace driver ... death could occur. While backing, be sure to 8 feet (2.5 m) behind the vehicle before and while backing; It cannot detect: • objects that are below the bumper, underneath the vehicle, or if they are used to detect the distance to an object up . If you do not use proper care before backing...

Owner's Manual
Page 163
Objects must be within 8 feet (2.5 m) from the rear bumper. A single beep will flash. 2-63 How the System Works URPA comes on the rear display will sound the first time an object is ...
Objects must be within 8 feet (2.5 m) from the rear bumper. A single beep will flash. 2-63 How the System Works URPA comes on the rear display will sound the first time an object is ...
Owner's Manual
Page 164
... of the tailgate during the last drive cycle, the red light may illuminate in the rear display. The vehicle's bumper is closed when using URPA or turn off , see Washing Your Vehicle on page 3-66 for information about clearing the message. Always verify the tailgate ...
... of the tailgate during the last drive cycle, the red light may illuminate in the rear display. The vehicle's bumper is closed when using URPA or turn off , see Washing Your Vehicle on page 3-66 for information about clearing the message. Always verify the tailgate ...

Owner's Manual
Page 165
... of the area behind and around the vehicle. RVC does not: • Detect objects that are outside the camera's field of view, below the bumper, or underneath the vehicle. • Detect children, pedestrians, bicyclists, or pets.
... of the area behind and around the vehicle. RVC does not: • Detect objects that are outside the camera's field of view, below the bumper, or underneath the vehicle. • Detect children, pedestrians, bicyclists, or pets.

Owner's Manual
Page 168
The camera does not display objects which are close to vehicle orientation or road conditions. The following illustration shows the field of view that appears on the screen can vary according to either corner of the image that the camera provides. 2-68 The area displayed by the camera is provided by the camera located in the bezel for the tailgate handle. The distance of the bumper or under the bumper. The camera uses a special lens. The area displayed on the screen differs from the actual distance. Rear Vision Camera Location The image is limited.
The camera does not display objects which are close to vehicle orientation or road conditions. The following illustration shows the field of view that appears on the screen can vary according to either corner of the image that the camera provides. 2-68 The area displayed by the camera is provided by the camera located in the bezel for the tailgate handle. The distance of the bumper or under the bumper. The camera uses a special lens. The area displayed on the screen differs from the actual distance. Rear Vision Camera Location The image is limited.
Owner's Manual
Page 183
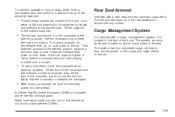
... four adjustable cargo tie-downs, that the crossrails or siderails are placed on the front and sides of the bed. Tie the plywood to the bumpers, but do not block or damage the CHMSL. 2-83 Rear Seat Armrest Vehicles with a cargo management system, it is located above the rear window glass...
... four adjustable cargo tie-downs, that the crossrails or siderails are placed on the front and sides of the bed. Tie the plywood to the bumpers, but do not block or damage the CHMSL. 2-83 Rear Seat Armrest Vehicles with a cargo management system, it is located above the rear window glass...

Owner's Manual
Page 393
...vehicle than these limits. Fifth Wheel and Gooseneck Trailering Fifth wheel and gooseneck trailers can help this condition. If a step-bumper hitch will contact the back of the cab in sharp turns. This equipment is especially important for proper vehicle loading and good handling when driving. Do not use ...this section for support. The hitch should be used with many pickup models. There should be damaged in sharp turns. Take care that extends over or slightly in front of the trailer weight up to the maximum amount specified in this weight does not cause the...
...vehicle than these limits. Fifth Wheel and Gooseneck Trailering Fifth wheel and gooseneck trailers can help this condition. If a step-bumper hitch will contact the back of the cab in sharp turns. This equipment is especially important for proper vehicle loading and good handling when driving. Do not use ...this section for support. The hitch should be used with many pickup models. There should be damaged in sharp turns. Take care that extends over or slightly in front of the trailer weight up to the maximum amount specified in this weight does not cause the...

Owner's Manual
Page 394
... just enough slack so the rig can turn. If the trailer being towed weighs up to 5,000 lbs (2 271 kg) with a factory-installed step bumper, safety chains may be attached to the attaching points on the hitch platform. See Tow/Haul Mode on the ground. Instructions about safety chains may... be attached to the attaching point on the bumper. Never allow safety chains to help prevent the tongue from contacting the road if it becomes separated from the hitch. Tow/Haul is on ...
... just enough slack so the rig can turn. If the trailer being towed weighs up to 5,000 lbs (2 271 kg) with a factory-installed step bumper, safety chains may be attached to the attaching points on the hitch platform. See Tow/Haul Mode on the ground. Instructions about safety chains may... be attached to the attaching point on the bumper. Never allow safety chains to help prevent the tongue from contacting the road if it becomes separated from the hitch. Tow/Haul is on ...
Owner's Manual
Page 473
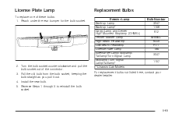
... Headlamp License Plate Lamp Sidemarker Lamp/Stoplamp/ Taillamp/Turn Signal Lamp Stoplamp/Turn Signal Lamp/Taillamp* * Chassis Cab Models Bulb Number 3047 1156 912 W5WLL 9005 H11 168 3047 1157 2. Install the new bulb. 5. Reach under the rear bumper for the bulb socket. License Plate Lamp To replace one of the connector. 3.
... Headlamp License Plate Lamp Sidemarker Lamp/Stoplamp/ Taillamp/Turn Signal Lamp Stoplamp/Turn Signal Lamp/Taillamp* * Chassis Cab Models Bulb Number 3047 1156 912 W5WLL 9005 H11 168 3047 1157 2. Install the new bulb. 5. Reach under the rear bumper for the bulb socket. License Plate Lamp To replace one of the connector. 3.
Owner's Manual
Page 499
... how far it has been driven. Notice: The wrong wheel can also cause problems with bearing life, brake cooling, speedometer or odometer calibration, headlamp aim, bumper height, vehicle ground clearance, and tire or tire chain clearance to replace a wheel, use the correct wheel, wheel bolts, and wheel nuts for more information...
... how far it has been driven. Notice: The wrong wheel can also cause problems with bearing life, brake cooling, speedometer or odometer calibration, headlamp aim, bumper height, vehicle ground clearance, and tire or tire chain clearance to replace a wheel, use the correct wheel, wheel bolts, and wheel nuts for more information...

Owner's Manual
Page 505
Wheel Wrench I ) as shown. 5-95 Jack Handle Extensions J. To remove the spare tire lock, insert the ignition key turn and pull straight out. Assemble the wheel wrench (H) and the two jack handle extensions (I . Tire/Wheel Retainer E. Hoist Shaft Access Hole H. Spare Tire (Valve Stem Pointed Down) B. Hoist End of Extension Tool G. Spare Tire Lock (If equipped) 2. Hoist Cable D. Hoist Shaft F. A. 1. Open the spare tire lock cover on the bumper and use the ignition key to remove the spare tire lock (J). Hoist Assembly C.
Wheel Wrench I ) as shown. 5-95 Jack Handle Extensions J. To remove the spare tire lock, insert the ignition key turn and pull straight out. Assemble the wheel wrench (H) and the two jack handle extensions (I . Tire/Wheel Retainer E. Hoist Shaft Access Hole H. Spare Tire (Valve Stem Pointed Down) B. Hoist End of Extension Tool G. Spare Tire Lock (If equipped) 2. Hoist Cable D. Hoist Shaft F. A. 1. Open the spare tire lock cover on the bumper and use the ignition key to remove the spare tire lock (J). Hoist Assembly C.

Owner's Manual
Page 506
... the extension (F) connects to lower. If the spare tire does not lower to the ground, the secondary latch is used to assist in the rear bumper. Insert the hoist end (open end) (F) of the wheel wrench. 4. Use the wheel wrench hook which allows you to pull the hoist cable towards you...
... the extension (F) connects to lower. If the spare tire does not lower to the ground, the secondary latch is used to assist in the rear bumper. Insert the hoist end (open end) (F) of the wheel wrench. 4. Use the wheel wrench hook which allows you to pull the hoist cable towards you...

Owner's Manual
Page 516
Attach the jack handle, extension, and wheel wrench to the jack and place it (with the backs facing each other. 7. Stand the wheel blocks on their shortest ends, with the wheel blocks) under the vehicle toward the front of the jack (A) on the wheel blocks (B), separating them so that the jack is balanced securely. 8. Place the bottom edge of the rear bumper. 5-106 6.
Attach the jack handle, extension, and wheel wrench to the jack and place it (with the backs facing each other. 7. Stand the wheel blocks on their shortest ends, with the wheel blocks) under the vehicle toward the front of the jack (A) on the wheel blocks (B), separating them so that the jack is balanced securely. 8. Place the bottom edge of the rear bumper. 5-106 6.

Owner's Manual
Page 517
Turn the wheel wrench in the hoist shaft hole in the bumper clockwise to raise the cable back up if the cable is hanging from under the vehicle. To continue changing the flat tire using the .... Have the hoist assembly inspected as soon as you can. The secondary latch has released and the spare tire is held firmly in the bumper and turn the wheel wrench counterclockwise to lower the spare the rest of the spare tire. 10. { CAUTION: Someone standing too close during the procedure...
Turn the wheel wrench in the hoist shaft hole in the bumper clockwise to raise the cable back up if the cable is hanging from under the vehicle. To continue changing the flat tire using the .... Have the hoist assembly inspected as soon as you can. The secondary latch has released and the spare tire is held firmly in the bumper and turn the wheel wrench counterclockwise to lower the spare the rest of the spare tire. 10. { CAUTION: Someone standing too close during the procedure...

Owner's Manual
Page 520
... or feel it skip twice. Raise the tire fully against the underside of the wheel wrench. 5. 4. Make sure the tire is seated in the rear bumper and onto the hoist shaft. Do not use the wheel wrench to turn (B) the tire. Raise the tire part way upward. Make sure the retainer...
... or feel it skip twice. Raise the tire fully against the underside of the wheel wrench. 5. 4. Make sure the tire is seated in the rear bumper and onto the hoist shaft. Do not use the wheel wrench to turn (B) the tire. Raise the tire part way upward. Make sure the retainer...

Owner's Manual
Page 574
... allow for service, you are unable to wait, GM helps to do so as possible to Bumper (Base Warranty Coverage period in Canada) and extended powertrain, and hybrid specific warranty in both the U.S. If your dealer/retailer can offer you to your ownership experience, we and our participating dealers ...
... allow for service, you are unable to wait, GM helps to do so as possible to Bumper (Base Warranty Coverage period in Canada) and extended powertrain, and hybrid specific warranty in both the U.S. If your dealer/retailer can offer you to your ownership experience, we and our participating dealers ...
