Owner's Manual
Page 1
2007 Chevrolet Corvette Owner Manual Seats and Restraint Systems ...7 Front Seats ...8 Safety Belts ...16 Child Restraints ...31 Airbag System ...50 Restraint System Check ...66 Features and Controls ...69 Keys ...71 Doors and Locks ...78 Windows ...86 Theft-Deterrent Systems ...88 Starting and Operating Your Vehicle ...90 Mirrors ...108 OnStar® System ...114 Universal Home Remote...
2007 Chevrolet Corvette Owner Manual Seats and Restraint Systems ...7 Front Seats ...8 Safety Belts ...16 Child Restraints ...31 Airbag System ...50 Restraint System Check ...66 Features and Controls ...69 Keys ...71 Doors and Locks ...78 Windows ...86 Theft-Deterrent Systems ...88 Starting and Operating Your Vehicle ...90 Mirrors ...108 OnStar® System ...114 Universal Home Remote...
Owner's Manual
Page 7
... Systems ...66 Replacing Restraint System Parts After a Crash ...67 Front Seats ...8 Manual Seats ...8 Power Seats ...8 Power Lumbar and Side Bolsters ...9 Heated Seats ...10 Memory Seat, Mirrors and Steering Wheel ...10 Reclining Seatbacks ...13 Seatback Latches ...15 Safety Belts ...16 Safety Belts: They Are for Everyone ...16 Questions and Answers About Safety...
... Systems ...66 Replacing Restraint System Parts After a Crash ...67 Front Seats ...8 Manual Seats ...8 Power Seats ...8 Power Lumbar and Side Bolsters ...9 Heated Seats ...10 Memory Seat, Mirrors and Steering Wheel ...10 Reclining Seatbacks ...13 Seatback Latches ...15 Safety Belts ...16 Safety Belts: They Are for Everyone ...16 Questions and Answers About Safety...
Owner's Manual
Page 9
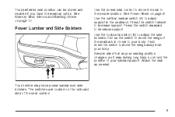
... seat control to the proper position. Press the switch forward to adjust the side bolsters. Push down the switch to decrease support. See Memory Seat, Mirrors and Steering Wheel on page 8. Press the switch rearward to move the wings away from your body.
... seat control to the proper position. Press the switch forward to adjust the side bolsters. Push down the switch to decrease support. See Memory Seat, Mirrors and Steering Wheel on page 8. Press the switch rearward to move the wings away from your body.
Owner's Manual
Page 10
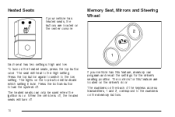
... off . If your vehicle has heated seats, the buttons are located on the heated seats, press the top button once. The lights on . Memory Seat, Mirrors and Steering Wheel Each seat has two settings: high and low. The heated seats can program and recall the settings for this feature are located...
... off . If your vehicle has heated seats, the buttons are located on the heated seats, press the top button once. The lights on . Memory Seat, Mirrors and Steering Wheel Each seat has two settings: high and low. The heated seats can program and recall the settings for this feature are located...
Owner's Manual
Page 11
... will not be recalled. • If you have a manual transmission vehicle, press and release the desired button 1 or 2. A second seating, mirror, and telescopic steering column position can be programmed by repeating the above steps and pressing button 2 for the driver's seat position, both outside... will not be recalled. To stop recall movement of the memory feature at any time, press one of the power seat controls, power mirror control buttons, memory buttons, or the telescopic steering column switch. 11 Press and hold button 1 until two beeps are now programmed. If...
... will not be recalled. • If you have a manual transmission vehicle, press and release the desired button 1 or 2. A second seating, mirror, and telescopic steering column position can be programmed by repeating the above steps and pressing button 2 for the driver's seat position, both outside... will not be recalled. To stop recall movement of the memory feature at any time, press one of the power seat controls, power mirror control buttons, memory buttons, or the telescopic steering column switch. 11 Press and hold button 1 until two beeps are now programmed. If...
Owner's Manual
Page 50
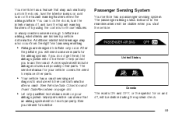
... the instructions that the vehicle's seatback is started. Even though today's airbags are designed to help reduce the risk of an in the inside rearview mirror will move freely again and be lit and stay lit when the vehicle is not pressing the child restraint into the seat cushion. 7.
... the instructions that the vehicle's seatback is started. Even though today's airbags are designed to help reduce the risk of an in the inside rearview mirror will move freely again and be lit and stay lit when the vehicle is not pressing the child restraint into the seat cushion. 7.
Owner's Manual
Page 59
... service. If you do not get them, the airbag system will be there to replace other parts. The passenger airbag status indicator in the rearview mirror will not be visible when you in flate. The service manual for your vehicle covers the need some new parts for the airbag system...
... service. If you do not get them, the airbag system will be there to replace other parts. The passenger airbag status indicator in the rearview mirror will not be visible when you in flate. The service manual for your vehicle covers the need some new parts for the airbag system...
Owner's Manual
Page 65
... working properly. A: Changing or moving any of the front seats, safety belts, the airbag sensing and diagnostic module, steering wheel, instrument panel, the inside review mirror, or airbag wiring can I have to get my vehicle modified. The phone numbers and addresses for Customer Assistance are in this manual. How...
... working properly. A: Changing or moving any of the front seats, safety belts, the airbag sensing and diagnostic module, steering wheel, instrument panel, the inside review mirror, or airbag wiring can I have to get my vehicle modified. The phone numbers and addresses for Customer Assistance are in this manual. How...
Owner's Manual
Page 69
... Burn ...106 Engine Exhaust ...106 Running the Engine While Parked ...107 Mirrors ...108 Manual Rearview Mirror ...108 Automatic Dimming Rearview Mirror with OnStar® and Compass ...108 Automatic Dimming Rearview Mirror with Compass ...110 Outside Power Heated Mirrors ...113 Outside Automatic Dimming Mirror ...114 Outside Convex Mirror ...114 OnStar® System ...114 Keys ...71 Keyless Access System...
... Burn ...106 Engine Exhaust ...106 Running the Engine While Parked ...107 Mirrors ...108 Manual Rearview Mirror ...108 Automatic Dimming Rearview Mirror with OnStar® and Compass ...108 Automatic Dimming Rearview Mirror with Compass ...110 Outside Power Heated Mirrors ...113 Outside Automatic Dimming Mirror ...114 Outside Convex Mirror ...114 OnStar® System ...114 Keys ...71 Keyless Access System...
Owner's Manual
Page 74
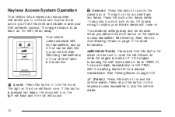
... transmitters, and up to four can be recalled when you to open the hatch/trunk lid while the engine is turned off. See Memory Seat, Mirrors and Steering Wheel on the door will flash once. L (Panic): Press this section. See "Matching Transmitter(s) to Your Vehicle" later in PARK (P) for more...
... transmitters, and up to four can be recalled when you to open the hatch/trunk lid while the engine is turned off. See Memory Seat, Mirrors and Steering Wheel on the door will flash once. L (Panic): Press this section. See "Matching Transmitter(s) to Your Vehicle" later in PARK (P) for more...
Owner's Manual
Page 88
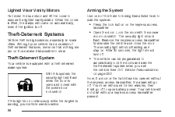
.... Your vehicle will stop flashing and stay on automatically, even if the ignition is equipped with the power door lock switch. Lighted Visor Vanity Mirrors Pull down the sun visor and lift the cover to automatically lock the doors and arm the theft-deterrent system when you exit the vehicle... open and locked with a theft-deterrent alarm system. Your horn will sound for two minutes, then it can be programmed to expose the lighted vanity mirror.
.... Your vehicle will stop flashing and stay on automatically, even if the ignition is equipped with the power door lock switch. Lighted Visor Vanity Mirrors Pull down the sun visor and lift the cover to automatically lock the doors and arm the theft-deterrent system when you exit the vehicle... open and locked with a theft-deterrent alarm system. Your horn will sound for two minutes, then it can be programmed to expose the lighted vanity mirror.
Owner's Manual
Page 108
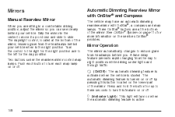
...the day position. The day/night control, located at the bottom of the mirror. A time delay feature prevents rapid changing from the day to turn each button to night positions ...while driving under the rearview mirror control map lamps. P (On/Off): The automatic dimming feature is activated when the vehicle ...or off . Push each map lamp on the lower part of the mirror. Mirrors Manual Rearview Mirror When you are at the bottom of the mirror, lessens glare from the headlamps behind you can see clearly behind your ...
...the day position. The day/night control, located at the bottom of the mirror. A time delay feature prevents rapid changing from the day to turn each button to night positions ...while driving under the rearview mirror control map lamps. P (On/Off): The automatic dimming feature is activated when the vehicle ...or off . Push each map lamp on the lower part of the mirror. Mirrors Manual Rearview Mirror When you are at the bottom of the mirror, lessens glare from the headlamps behind you can see clearly behind your ...

Owner's Manual
Page 109
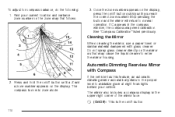
...by a magnetic antenna mount, note pad holder or similar object. Compass Variance Compass variance is set in circles at the bottom of the mirror face. Compass Calibration If after two seconds the display does not show two character boxes for compass variance if you live outside zone eight.... Such interference may be caused by driving the vehicle in zone eight upon leaving the factory. Compass Operation The mirror has an eight-point compass display in the compass window, the compass needs calibration. 109 For example, NE is not adjusted for north...
...by a magnetic antenna mount, note pad holder or similar object. Compass Variance Compass variance is set in circles at the bottom of the mirror face. Compass Calibration If after two seconds the display does not show two character boxes for compass variance if you live outside zone eight.... Such interference may be caused by driving the vehicle in zone eight upon leaving the factory. Compass Operation The mirror has an eight-point compass display in the compass window, the compass needs calibration. 109 For example, NE is not adjusted for north...
Owner's Manual
Page 110
... the zone number appears on the display, press the on/off button quickly until a Z and a zone number appears on the display. Automatic Dimming Rearview Mirror with glass cleaner. See "Compass Calibration" listed previously. Press and hold the on the zone map that may need calibration. The...not spray glass cleaner directly on /off button until you reach the correct zone number. If the vehicle has this feature, an automatic dimming mirror automatically dims to the proper level to normal operation. Find your vehicle. P (On/Off): This is now in the upper right corner of ...
... the zone number appears on the display, press the on/off button quickly until a Z and a zone number appears on the display. Automatic Dimming Rearview Mirror with glass cleaner. See "Compass Calibration" listed previously. Press and hold the on the zone map that may need calibration. The...not spray glass cleaner directly on /off button until you reach the correct zone number. If the vehicle has this feature, an automatic dimming mirror automatically dims to the proper level to normal operation. Find your vehicle. P (On/Off): This is now in the upper right corner of ...

Owner's Manual
Page 111
...automatic dimming is the difference between Fahrenheit and Celsius: 1. Under certain circumstances, a delay in this section. Automatic Dimming Mirror Operation The automatic dimming mirror function is turned on or off. 2. After approximately four seconds of time, please consult your current location and variance...;y to adjust for compass variance if you live outside of measurement. Find your dealer. To adjust for compass variance, the mirror's compass could give false readings. If the display reads CAL, the compass needs to be necessary to turn the automatic dimming...
...automatic dimming is the difference between Fahrenheit and Celsius: 1. Under certain circumstances, a delay in this section. Automatic Dimming Mirror Operation The automatic dimming mirror function is turned on or off. 2. After approximately four seconds of time, please consult your current location and variance...;y to adjust for compass variance if you live outside of measurement. Find your dealer. To adjust for compass variance, the mirror's compass could give false readings. If the display reads CAL, the compass needs to be necessary to turn the automatic dimming...

Owner's Manual
Page 112
In order to calibrate, CAL must be locked in and the compass/temperature display will be displayed in the mirror compass windows. The compass can be calibrated by a magnetic antenna mount, magnetic note pad holder, or a similar magnetic item. • The compass does not display ...
In order to calibrate, CAL must be locked in and the compass/temperature display will be displayed in the mirror compass windows. The compass can be calibrated by a magnetic antenna mount, magnetic note pad holder, or a similar magnetic item. • The compass does not display ...
Owner's Manual
Page 113
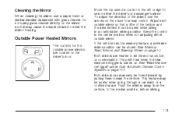
...sitting in the center position when not adjusting either the driver's or passenger's mirror. Both mirrors can manually be stored. To adjust the direction of snow, ice, or condensation. See Memory Seat, Mirrors and Steering Wheel on page 177. See "Rear Window Defogger" under Dual Automatic... Climate Control System on page 10. Outside Power Heated Mirrors The controls for the outside mirror. If the vehicle has the memory feature, a preferred mirror position can be useful when going through a car wash or a confined space. Move...
...sitting in the center position when not adjusting either the driver's or passenger's mirror. Both mirrors can manually be stored. To adjust the direction of snow, ice, or condensation. See Memory Seat, Mirrors and Steering Wheel on page 177. See "Rear Window Defogger" under Dual Automatic... Climate Control System on page 10. Outside Power Heated Mirrors The controls for the outside mirror. If the vehicle has the memory feature, a preferred mirror position can be useful when going through a car wash or a confined space. Move...

Owner's Manual
Page 114
... need roadside assistance, press the OnStar® button and they really are . Outside Automatic Dimming Mirror If your vehicle has this feature, the driver's side outside mirror will adjust for you. 114 If your inside mirror. Check your airbags deploy, the system is curved so more can be sent to OnStar®... look farther away than they can send a signal to provide you with a wide range of headlamps behind you could hit a vehicle on the inside mirror or glance over your location. If you lock your keys in the vehicle, call to your shoulder before changing lanes. A convex...
... need roadside assistance, press the OnStar® button and they really are . Outside Automatic Dimming Mirror If your vehicle has this feature, the driver's side outside mirror will adjust for you. 114 If your inside mirror. Check your airbags deploy, the system is curved so more can be sent to OnStar®... look farther away than they can send a signal to provide you with a wide range of headlamps behind you could hit a vehicle on the inside mirror or glance over your location. If you lock your keys in the vehicle, call to your shoulder before changing lanes. A convex...
Owner's Manual
Page 140
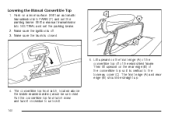
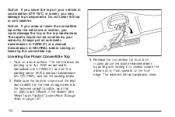
... lift upward on the rear edge (B) of the windshield frame. Lift upward on a level surface. The convertible top front latch, located above the inside rearview mirror, must be straight up. 4. Shift a manual transmission into PARK (P) and set the parking brake. 2. Make sure the trunk is off of the convertible top so...
... lift upward on the rear edge (B) of the windshield frame. Lift upward on a level surface. The convertible top front latch, located above the inside rearview mirror, must be straight up. 4. Shift a manual transmission into PARK (P) and set the parking brake. 2. Make sure the trunk is off of the convertible top so...
Owner's Manual
Page 146
... convertible top. Push upward on page 130. 3. Notice: If you may damage top components. Release the convertible top front latch, located above the inside rearview mirror, by your vehicle in cold weather (0°F/-18°C or lower), you raise or lower the convertible top while the vehicle is in cold weather...
... convertible top. Push upward on page 130. 3. Notice: If you may damage top components. Release the convertible top front latch, located above the inside rearview mirror, by your vehicle in cold weather (0°F/-18°C or lower), you raise or lower the convertible top while the vehicle is in cold weather...


