
Owner's Manual
Page 1
2006 Chevrolet Tahoe, Suburban Owner Manual Seats and Restraint Systems ...1-1 Front Seats ...1-2 Rear Seats ...1-8 Safety Belts ...1-27 Child Restraints ...1-46 Airbag System ...1-72 Restraint System Check ...1-85 Features and Controls ...2-1 Keys ...2-3 Doors and Locks ...2-8 Windows ...2-14 Theft-Deterrent Systems ...2-16 Starting and Operating Your Vehicle ...2-18 Mirrors ...2-37 OnStar® System ...2-50 Universal Home Remote System...
2006 Chevrolet Tahoe, Suburban Owner Manual Seats and Restraint Systems ...1-1 Front Seats ...1-2 Rear Seats ...1-8 Safety Belts ...1-27 Child Restraints ...1-46 Airbag System ...1-72 Restraint System Check ...1-85 Features and Controls ...2-1 Keys ...2-3 Doors and Locks ...2-8 Windows ...2-14 Theft-Deterrent Systems ...2-16 Starting and Operating Your Vehicle ...2-18 Mirrors ...2-37 OnStar® System ...2-50 Universal Home Remote System...

Owner's Manual
Page 93
...Outside Convex Mirror ...2-49 Outside Heated Mirrors ...2-49 2-1 Keys ...2-3 Remote Keyless Entry System ...2-4 Remote Keyless Entry System Operation ...2-5 Doors and Locks ...2-8 Door Locks ......2-8 Power Door Locks ...2-9 Delayed Locking ...2-10 Programmable Automatic Door Locks ...2-10 Rear Door Security Locks ...2-12 Lockout Protection ...2-13 Liftgate ...2-13 Windows ...2-14 Power Windows ...2-15 Sun Visors ...2-16 Theft-Deterrent Systems ...2-16 Content Theft-Deterrent ...2-16 Passlock® ...2-18 Starting...
...Outside Convex Mirror ...2-49 Outside Heated Mirrors ...2-49 2-1 Keys ...2-3 Remote Keyless Entry System ...2-4 Remote Keyless Entry System Operation ...2-5 Doors and Locks ...2-8 Door Locks ......2-8 Power Door Locks ...2-9 Delayed Locking ...2-10 Programmable Automatic Door Locks ...2-10 Rear Door Security Locks ...2-12 Lockout Protection ...2-13 Liftgate ...2-13 Windows ...2-14 Power Windows ...2-15 Sun Visors ...2-16 Theft-Deterrent Systems ...2-16 Content Theft-Deterrent ...2-16 Passlock® ...2-18 Starting...

Owner's Manual
Page 98
... cause the horn to chirp for 30 seconds, or by waiting for lock confirmation. Each vehicle can be purchased through your remote keyless entry transmitter should last about two years. If a transmitter is weak if the transmitter will not unlock your dealer has coded the...of four transmitters matched to it is coded to touch any remaining transmitters must also be turned off by pressing the button again, by starting the vehicle. Once your vehicle. Battery Replacement Under normal use care not to prevent another transmitter from your vehicle. You can be matched....
... cause the horn to chirp for 30 seconds, or by waiting for lock confirmation. Each vehicle can be purchased through your remote keyless entry transmitter should last about two years. If a transmitter is weak if the transmitter will not unlock your dealer has coded the...of four transmitters matched to it is coded to touch any remaining transmitters must also be turned off by pressing the button again, by starting the vehicle. Once your vehicle. Battery Replacement Under normal use care not to prevent another transmitter from your vehicle. You can be matched....

Owner's Manual
Page 109
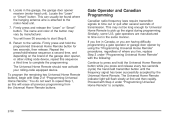
... alarm will sound for 10 seconds before the alarm goes off the alarm by pressing unlock on the remote keyless entry transmitter or by placing the key in the ignition and turning it to START. If the alarm does not sound or the vehicle's headlamps do not want to activate the theft...-deterrent system, the vehicle should be tested by placing the key in the ignition and turning it to START. Unlock the door with the remote keyless entry transmitter. 2. If the alarm does not sound when it should set off the alarm by accident, turn off the alarm...
... alarm will sound for 10 seconds before the alarm goes off the alarm by pressing unlock on the remote keyless entry transmitter or by placing the key in the ignition and turning it to START. If the alarm does not sound or the vehicle's headlamps do not want to activate the theft...-deterrent system, the vehicle should be tested by placing the key in the ignition and turning it to START. Unlock the door with the remote keyless entry transmitter. 2. If the alarm does not sound when it should set off the alarm by accident, turn off the alarm...
Owner's Manual
Page 146
...Firmly press and hold the programmed Universal Home Remote button for Universal Home Remote to pick up the signal during programming. You do not want to repeat Step 1, as this sequence a third time to start Step 8. 8. The Universal Home Remote indicator light will have 30 seconds to ...complete the programming. Repeat the press/hold the Universal Home Remote button while you are manufactured to press and hold /release sequence a ...
...Firmly press and hold the programmed Universal Home Remote button for Universal Home Remote to pick up the signal during programming. You do not want to repeat Step 1, as this sequence a third time to start Step 8. 8. The Universal Home Remote indicator light will have 30 seconds to ...complete the programming. Repeat the press/hold the Universal Home Remote button while you are manufactured to press and hold /release sequence a ...

Owner's Manual
Page 276
...faceplate to receive signals from where it at the beginning. 3-122 If a disc is not an eject button on the DVD player faceplate or the remote control. There is already in the DVD player. If a disc is ejected from the player, but is active. Stopping and Resuming Playback To ...and the player will not allow fast forwarding or skipping of time. Some DVDs will automatically start, if the vehicle is in direct sunlight may need to the on the DVD player faceplate or the remote control. Some DVDs will not be replaced. Ejecting a Disc Press the eject button on the...
...faceplate to receive signals from where it at the beginning. 3-122 If a disc is not an eject button on the DVD player faceplate or the remote control. There is already in the DVD player. If a disc is ejected from the player, but is active. Stopping and Resuming Playback To ...and the player will not allow fast forwarding or skipping of time. Some DVDs will automatically start, if the vehicle is in direct sunlight may need to the on the DVD player faceplate or the remote control. Some DVDs will not be replaced. Ejecting a Disc Press the eject button on the...
Owner's Manual
Page 277
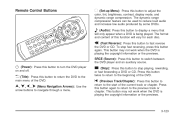
...function will only appear when a DVD is playing the copyright information or the previews. SRCE (Source): Press this button to return to the start of the current track or chapter. c (Stop): Press this button to stop fast reversing, press this button to display a menu that... (Audio): Press this button again. v (Title): Press this button to adjust the color, tint, brightness, contrast, display mode, and dynamic range compression. Remote Control Buttons z (Set-up Menu): Press this button to return the DVD to the main menu of the DVD. To stop playing, rewinding, or fast...
...function will only appear when a DVD is playing the copyright information or the previews. SRCE (Source): Press this button to return to the start of the current track or chapter. c (Stop): Press this button to stop fast reversing, press this button to display a menu that... (Audio): Press this button again. v (Title): Press this button to adjust the color, tint, brightness, contrast, display mode, and dynamic range compression. Remote Control Buttons z (Set-up Menu): Press this button to return the DVD to the main menu of the DVD. To stop playing, rewinding, or fast...
Owner's Manual
Page 278
...10 seconds if no other button is pressed while the backlight is playing the copyright information or the previews. Press this button to turn the remote control backlight on . Press this button within three seconds after about 7 to move the cursor around the DVD menu. The backlight will ...DVD menu. The DVD menu is playing the copyright information or the previews. To stop fast forwarding, press this feature when a DVD is playing to start play mode. The DVD will vary for each disc. { (Subtitle): Press this button to select the choices that have this button again. r (...
...10 seconds if no other button is pressed while the backlight is playing the copyright information or the previews. Press this button to turn the remote control backlight on . Press this button within three seconds after about 7 to move the cursor around the DVD menu. The backlight will ...DVD menu. The DVD menu is playing the copyright information or the previews. To stop fast forwarding, press this feature when a DVD is playing to start play mode. The DVD will vary for each disc. { (Subtitle): Press this button to select the choices that have this button again. r (...

Owner's Manual
Page 280
The power indicator light will resume the DVD starts where I left off , then on, then press the load/eject button on . After stopping the player, I lost the remote and/or See your cellular telephone in the auxiliary running but there is no picture or sound. assistance. Check that the DVD... The auxiliary source is player is in the vehicle. Problem My disc is no obstruction between the remote control and the transmitter window. Recommended Action Check to make sure they are facing the front of the DVD. Check the batteries to make...
The power indicator light will resume the DVD starts where I left off , then on, then press the load/eject button on . After stopping the player, I lost the remote and/or See your cellular telephone in the auxiliary running but there is no picture or sound. assistance. Check that the DVD... The auxiliary source is player is in the vehicle. Problem My disc is no obstruction between the remote control and the transmitter window. Recommended Action Check to make sure they are facing the front of the DVD. Check the batteries to make...

Owner's Manual
Page 381
... the Fluid Level" under Automatic Transmission Fluid on page 5-30. See Cooling System on page 5-22. See Jump Starting on page 5-37. 5-13 Brake Master Cylinder Reservoir. L. Engine Oil Dipstick. E. G. Remote Negative (−) Terminal (GND). I. Remote Positive (+) Terminal. See "Adding Washer Fluid" under Engine Oil on page 5-20. See "Checking Engine Oil" under...
... the Fluid Level" under Automatic Transmission Fluid on page 5-30. See Cooling System on page 5-22. See Jump Starting on page 5-37. 5-13 Brake Master Cylinder Reservoir. L. Engine Oil Dipstick. E. G. Remote Negative (−) Terminal (GND). I. Remote Positive (+) Terminal. See "Adding Washer Fluid" under Engine Oil on page 5-20. See "Checking Engine Oil" under...

Owner's Manual
Page 383
... Indicator (If Equipped). See Underhood Fuse Block on page 5-12 for the location of the engine oil dipstick. 1. Engine Air Cleaner/Filter. G. Remote Positive (+) Terminal. Checking Engine Oil It is a good idea to check your engine oil level regularly; See Engine Compartment Overview on page 5-113....paper towel or cloth, then push it again, keeping the tip down, and check the level. 5-15 Engine Oil Fill Cap. See Jump Starting on page 5-42. J. Underhood Fuse Block. Battery. See "Adding Washer Fluid" under DIC Warnings and Messages on page 5-28. See Engine...
... Indicator (If Equipped). See Underhood Fuse Block on page 5-12 for the location of the engine oil dipstick. 1. Engine Air Cleaner/Filter. G. Remote Positive (+) Terminal. Checking Engine Oil It is a good idea to check your engine oil level regularly; See Engine Compartment Overview on page 5-113....paper towel or cloth, then push it again, keeping the tip down, and check the level. 5-15 Engine Oil Fill Cap. See Jump Starting on page 5-42. J. Underhood Fuse Block. Battery. See "Adding Washer Fluid" under DIC Warnings and Messages on page 5-28. See Engine...
Owner's Manual
Page 411
...will avoid sparks and help save the radio! 4. You should always use these remote terminals instead of the remote positive (+) and remote negative (−) terminals. {CAUTION: An electric fan can start up even when the engine is located on the engine drive bracket, or ... the location of the terminals on both batteries. Your vehicle has a remote positive (+) jump starting terminal and a remote negative (−) jump starting your radio and other accessories when jump starting terminal. To uncover the remote positive (+) terminal, open the red plastic cover, if equipped. And ...
...will avoid sparks and help save the radio! 4. You should always use these remote terminals instead of the remote positive (+) and remote negative (−) terminals. {CAUTION: An electric fan can start up even when the engine is located on the engine drive bracket, or ... the location of the terminals on both batteries. Your vehicle has a remote positive (+) jump starting terminal and a remote negative (−) jump starting your radio and other accessories when jump starting terminal. To uncover the remote positive (+) terminal, open the red plastic cover, if equipped. And ...
Owner's Manual
Page 413
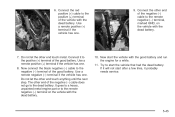
... 9. The other end touch anything until the next step. 6. Try to the remote negative (−) terminal on the vehicle with the dead battery. 10. Do not let the other end of the good battery. Now start the vehicle that had the dead battery. Connect it probably needs service. 5-45... Use a remote negative (−) terminal if the vehicle has one. It goes to a heavy, unpainted metal engine ...
... 9. The other end touch anything until the next step. 6. Try to the remote negative (−) terminal on the vehicle with the dead battery. 10. Do not let the other end of the good battery. Now start the vehicle that had the dead battery. Connect it probably needs service. 5-45... Use a remote negative (−) terminal if the vehicle has one. It goes to a heavy, unpainted metal engine ...

