Owner's Manual
Page 1
2005 Chevrolet Aveo Owner Manual Seats and Restraint Systems ...1-1 Front Seats ...1-2 Rear Seats ...1-6 Safety Belts ...1-10 Child Restraints ...1-28 Airbag System ...1-48 Restraint System Check ...1-54... ...3-35 M Driving Your Vehicle ...4-1 Your Driving, the Road, and Your Vehicle ...4-2 Towing ...4-35 Service and Appearance Care ...5-1 Service ...5-3 Fuel ...5-5 Checking Things Under the Hood ...5-10 Headlamp Aiming ...5-41 Bulb Replacement ...5-41 Windshield Wiper Blade Replacement ...5-47 Tires ...5-48 Appearance Care ...5-70 Vehicle Identification ...5-78 Electrical System ...5-79...
2005 Chevrolet Aveo Owner Manual Seats and Restraint Systems ...1-1 Front Seats ...1-2 Rear Seats ...1-6 Safety Belts ...1-10 Child Restraints ...1-28 Airbag System ...1-48 Restraint System Check ...1-54... ...3-35 M Driving Your Vehicle ...4-1 Your Driving, the Road, and Your Vehicle ...4-2 Towing ...4-35 Service and Appearance Care ...5-1 Service ...5-3 Fuel ...5-5 Checking Things Under the Hood ...5-10 Headlamp Aiming ...5-41 Bulb Replacement ...5-41 Windshield Wiper Blade Replacement ...5-47 Tires ...5-48 Appearance Care ...5-70 Vehicle Identification ...5-78 Electrical System ...5-79...
Owner's Manual
Page 76
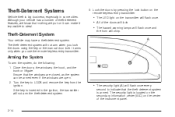
... windows are open. 2. It arms only when you lock the doors using the key or the manual door lock. Close the doors, the windows, the hood, and the trunk or liftgate. Lock the doors by pressing the lock button on the remote keyless entry transmitter. • The LED light on the...
... windows are open. 2. It arms only when you lock the doors using the key or the manual door lock. Close the doors, the windows, the hood, and the trunk or liftgate. Lock the doors by pressing the lock button on the remote keyless entry transmitter. • The LED light on the...
Owner's Manual
Page 82
...-up. Plug it could overheat and cause a fire. Turn off the engine. 2. If you keep it was before to starting your vehicle. Open the hood and unwrap the electrical cord. Also, the wrong kind of trying to list everything here, we ask that particular area. Usually, the coolant heater should...
...-up. Plug it could overheat and cause a fire. Turn off the engine. 2. If you keep it was before to starting your vehicle. Open the hood and unwrap the electrical cord. Also, the wrong kind of trying to list everything here, we ask that particular area. Usually, the coolant heater should...
Owner's Manual
Page 103
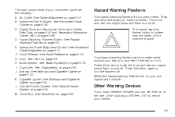
...Clock on page 3-27 and Secondary Information Center (SIC) on page 3-11. See Instrument Panel Brightness on page 3-26. F. See Hood Release on page 3-13. Audio System. Glove Box. Press the button again to make the front and rear turn signal lamps will not... work no matter what position your key is in . Hazard Warning Flashers Button. Instrument Panel Brightness Control. Hood Release. H. Cupholder. Ashtray. M. Hazard Warning Flashers Your hazard warning flashers let you have a problem. K. See Ashtrays and Cigarette Lighter...
...Clock on page 3-27 and Secondary Information Center (SIC) on page 3-11. See Instrument Panel Brightness on page 3-26. F. See Hood Release on page 3-13. Audio System. Glove Box. Press the button again to make the front and rear turn signal lamps will not... work no matter what position your key is in . Hazard Warning Flashers Button. Instrument Panel Brightness Control. Hood Release. H. Cupholder. Ashtray. M. Hazard Warning Flashers Your hazard warning flashers let you have a problem. K. See Ashtrays and Cigarette Lighter...

Owner's Manual
Page 115
... a rear window and outside mirror defogger on to turn off by pressing the button again or by your vehicle. • Use of non-GM approved hood deflectors may adversely affect the performance of each outlet to ON. An indicator light in the center of the system. < (Rear Window Defogger...
... a rear window and outside mirror defogger on to turn off by pressing the button again or by your vehicle. • Use of non-GM approved hood deflectors may adversely affect the performance of each outlet to ON. An indicator light in the center of the system. < (Rear Window Defogger...
Owner's Manual
Page 183
... ...5-5 Gasoline Octane ...5-5 Gasoline Specifications ...5-5 California Fuel ...5-5 Additives ...5-6 Fuels in Foreign Countries ...5-6 Filling Your Tank ...5-7 Filling a Portable Fuel Container ...5-9 Checking Things Under the Hood ...5-10 Hood Release ...5-10 Engine Compartment Overview ...5-12 Engine Oil ...5-13 Engine Air Cleaner/Filter ...5-17 Automatic Transaxle Fluid ...5-18 Manual Transaxle Fluid ...5-20 Hydraulic Clutch ...5-20...
... ...5-5 Gasoline Octane ...5-5 Gasoline Specifications ...5-5 California Fuel ...5-5 Additives ...5-6 Fuels in Foreign Countries ...5-6 Filling Your Tank ...5-7 Filling a Portable Fuel Container ...5-9 Checking Things Under the Hood ...5-10 Hood Release ...5-10 Engine Compartment Overview ...5-12 Engine Oil ...5-13 Engine Air Cleaner/Filter ...5-17 Automatic Transaxle Fluid ...5-18 Manual Transaxle Fluid ...5-20 Hydraulic Clutch ...5-20...

Owner's Manual
Page 192
..., windshield washer and other fluids, and plastic or rubber. Then go to drop or spill things that burn can start a fire. Pull the hood release handle inside the vehicle. Keep hands, clothing and tools away from any underhood electric fan. {CAUTION: Things that will burn onto a hot engine. 2. ... vehicle and lift up and injure you even when the engine is located on the secondary hood release lever, located under the front center of the instrument panel. {CAUTION: An electric fan under the hood can get on hot engine parts and start up on the lower left side of the...
..., windshield washer and other fluids, and plastic or rubber. Then go to drop or spill things that burn can start a fire. Pull the hood release handle inside the vehicle. Keep hands, clothing and tools away from any underhood electric fan. {CAUTION: Things that will burn onto a hot engine. 2. ... vehicle and lift up and injure you even when the engine is located on the secondary hood release lever, located under the front center of the instrument panel. {CAUTION: An electric fan under the hood can get on hot engine parts and start up on the lower left side of the...

Owner's Manual
Page 193
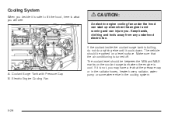
Lift the hood and release the hood prop from the slot in the inner fender and return the prop to make sure the hood is closed and repeat the process if necessary. 4. Place the hood prop into the slot on properly. Remove the hood prop from its retainer. Then lift the hood to latch fully. Lower the hood 12 inches (30 cm) above the vehicle and release it to relieve pressure on the underside of the hood. Before closing the hood, be sure all the filler caps are on the inner fender. 5-11 Check to its retainer located on the hood prop. 3.
Lift the hood and release the hood prop from the slot in the inner fender and return the prop to make sure the hood is closed and repeat the process if necessary. 4. Place the hood prop into the slot on properly. Remove the hood prop from its retainer. Then lift the hood to latch fully. Lower the hood 12 inches (30 cm) above the vehicle and release it to relieve pressure on the underside of the hood. Before closing the hood, be sure all the filler caps are on the inner fender. 5-11 Check to its retainer located on the hood prop. 3.
Owner's Manual
Page 194
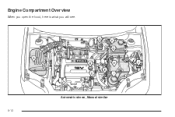
Engine Compartment Overview When you open the hood, here is what you will see: Automatic shown, Manual similar 5-12
Engine Compartment Overview When you open the hood, here is what you will see: Automatic shown, Manual similar 5-12

Owner's Manual
Page 206
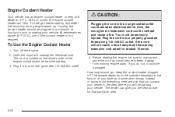
... spill coolant on page 3-23. Just turn it off and get out of steam or coolant before you open the hood. You or others could be burned if you just open the hood. Stop your engine if it overheats, and get everyone away from the vehicle until the engine is overheated, the...
... spill coolant on page 3-23. Just turn it off and get out of steam or coolant before you open the hood. You or others could be burned if you just open the hood. Stop your engine if it overheats, and get everyone away from the vehicle until the engine is overheated, the...
Owner's Manual
Page 207
... you are parked. Sometimes the engine can idle the engine for three minutes while you no steam, the problem may decide not to lift the hood, but see or hear no longer have the warning, turn off the road, shift to full hot at the highest fan speed and open the...
... you are parked. Sometimes the engine can idle the engine for three minutes while you no steam, the problem may decide not to lift the hood, but see or hear no longer have the warning, turn off the road, shift to full hot at the highest fan speed and open the...
Owner's Manual
Page 208
... the coolant surge tank is turned off. Cooling System When you decide it is safe to lift the hood, here is what you will see: {CAUTION: An electric engine cooling fan under the hood can start up even when the engine is not running and can injure you may have a leak at...
... the coolant surge tank is turned off. Cooling System When you decide it is safe to lift the hood, here is what you will see: {CAUTION: An electric engine cooling fan under the hood can start up even when the engine is not running and can injure you may have a leak at...
Owner's Manual
Page 220
... of that can burn you don't, explosive gas could be sure the right amount of fluid is low, add water to explode. Open the hoods and locate the batteries. 4.
... of that can burn you don't, explosive gas could be sure the right amount of fluid is low, add water to explode. Open the hoods and locate the batteries. 4.

Owner's Manual
Page 224
Release the spring that retains the bulb by loosing the screw. 5-42 Open the hood. Remove the headlamp cap. 4. Disconnect the wiring harness connector from top of the bulb. 7. Remove the headlamp assembly. 8. Remove the five screws from the rear of the radiator grille. 3. Headlamps To replace a headlamp bulb, do the following: 1. See Hood Release on page 5-10 for more information. 2. Remove the radiator grille. 6. Remove the three bolts from the headlamp assembly. 5.
Release the spring that retains the bulb by loosing the screw. 5-42 Open the hood. Remove the headlamp cap. 4. Disconnect the wiring harness connector from top of the bulb. 7. Remove the headlamp assembly. 8. Remove the five screws from the rear of the radiator grille. 3. Headlamps To replace a headlamp bulb, do the following: 1. See Hood Release on page 5-10 for more information. 2. Remove the radiator grille. 6. Remove the three bolts from the headlamp assembly. 5.

Owner's Manual
Page 227
... 2 through 3 to reinstall. Install the new bulb by pressing it . 4. Pull the front sidemarker bulb socket out of the front bumper. 4. Reverse Steps 2 through 5 under Hood Release on page 5-10 to install the bulb socket and assembly. 5-45 3.
... 2 through 3 to reinstall. Install the new bulb by pressing it . 4. Pull the front sidemarker bulb socket out of the front bumper. 4. Reverse Steps 2 through 5 under Hood Release on page 5-10 to install the bulb socket and assembly. 5-45 3.
Owner's Manual
Page 287
... a clean cloth. Also look for fluid loss. See Automatic Transaxle Fluid on page 5-18. Body Lubrication Service Lubricate all hood latch assemblies, secondary latch, pivots, spring anchor, release pawl, hood and body door hinges, rear compartment and any opened or broken airbag coverings, and have them last longer, seal better, and...
... a clean cloth. Also look for fluid loss. See Automatic Transaxle Fluid on page 5-18. Body Lubrication Service Lubricate all hood latch assemblies, secondary latch, pivots, spring anchor, release pawl, hood and body door hinges, rear compartment and any opened or broken airbag coverings, and have them last longer, seal better, and...

Owner's Manual
Page 293
...in Canada 88901242) or lubricant meeting requirements of NLGI #2, Category LB or GC-LB. U.S. 12345579, in Canada 10953474). Chassis Lubrication Hood Latch Assembly, Secondary Latch, Pivots, Spring Anchor and Release Pawl Chassis Lubricant (GM Part No. Usage Fluid/Lubricant Usage Fluid/Lubricant... Chassis Lubricant Manual (GM Part No. Lubricant, Superlube Hood and Door Multi-Purpose U.S. 12346241, (GM Part No. Hinges in Canada 992887). 6-25 Lubriplate Lubricant Aerosol (GM Part No. ...
...in Canada 88901242) or lubricant meeting requirements of NLGI #2, Category LB or GC-LB. U.S. 12345579, in Canada 10953474). Chassis Lubrication Hood Latch Assembly, Secondary Latch, Pivots, Spring Anchor and Release Pawl Chassis Lubricant (GM Part No. Usage Fluid/Lubricant Usage Fluid/Lubricant... Chassis Lubricant Manual (GM Part No. Lubricant, Superlube Hood and Door Multi-Purpose U.S. 12346241, (GM Part No. Hinges in Canada 992887). 6-25 Lubriplate Lubricant Aerosol (GM Part No. ...
Owner's Manual
Page 312
... Your CDs ...3-47 Center Rear Passenger Position, Safety Belts ...1-26 Chains, Tire ...5-61 Charging System Light ...3-29 Check Engine Light ...3-30 Checking Things Under the Hood ...5-10 Chemical Paint Spotting ...5-77 Child Restraints Child Restraint Systems ...1-34 Infants and Young Children ...1-30 Lower Anchorages and Top Tethers for Children (LATCH System...
... Your CDs ...3-47 Center Rear Passenger Position, Safety Belts ...1-26 Chains, Tire ...5-61 Charging System Light ...3-29 Check Engine Light ...3-30 Checking Things Under the Hood ...5-10 Chemical Paint Spotting ...5-77 Child Restraints Child Restraint Systems ...1-34 Infants and Young Children ...1-30 Lower Anchorages and Top Tethers for Children (LATCH System...
Owner's Manual
Page 316
... Signal Lamps ...5-44 Heater ...3-14 Height Adjuster, Driver Seat ...1-3 Highbeam On Light ...3-24 Highway Hypnosis ...4-21 Hill and Mountain Roads ...4-22 Hold Mode Light ...3-30 Hood Checking Things Under ...5-10 Release ...5-10 Horn ...3-6 How to Use This Manual ...ii How to Wear Safety Belts Properly ...1-15 Hydraulic Clutch ...5-20 I Ignition Positions...
... Signal Lamps ...5-44 Heater ...3-14 Height Adjuster, Driver Seat ...1-3 Highbeam On Light ...3-24 Highway Hypnosis ...4-21 Hill and Mountain Roads ...4-22 Hold Mode Light ...3-30 Hood Checking Things Under ...5-10 Release ...5-10 Horn ...3-6 How to Use This Manual ...ii How to Wear Safety Belts Properly ...1-15 Hydraulic Clutch ...5-20 I Ignition Positions...

