Owner's Manual
Page 1
2005 Chevrolet Aveo Owner Manual Seats and Restraint Systems ...1-1 Front Seats ...1-2 Rear Seats ...1-6 Safety Belts ...1-10 Child Restraints ...1-28 Airbag System ...1-48 Restraint System Check ...1-...Driving Your Vehicle ...4-1 Your Driving, the Road, and Your Vehicle ...4-2 Towing ...4-35 Service and Appearance Care ...5-1 Service ...5-3 Fuel ...5-5 Checking Things Under the Hood ...5-10 Headlamp Aiming ...5-41 Bulb Replacement ...5-41 Windshield Wiper Blade Replacement ...5-47 Tires ...5-48 Appearance Care ...5-70 Vehicle Identification ...5-78 Electrical System ...5-79 Capacities and...
2005 Chevrolet Aveo Owner Manual Seats and Restraint Systems ...1-1 Front Seats ...1-2 Rear Seats ...1-6 Safety Belts ...1-10 Child Restraints ...1-28 Airbag System ...1-48 Restraint System Check ...1-...Driving Your Vehicle ...4-1 Your Driving, the Road, and Your Vehicle ...4-2 Towing ...4-35 Service and Appearance Care ...5-1 Service ...5-3 Fuel ...5-5 Checking Things Under the Hood ...5-10 Headlamp Aiming ...5-41 Bulb Replacement ...5-41 Windshield Wiper Blade Replacement ...5-47 Tires ...5-48 Appearance Care ...5-70 Vehicle Identification ...5-78 Electrical System ...5-79 Capacities and...

Owner's Manual
Page 95
... you can see clearly behind is reduced. The outside manual mirrors using the control lever located next to the mirror so that the glare of headlamps from behind your vehicle when you can be adjusted so you are sitting in the center to side.
... you can see clearly behind is reduced. The outside manual mirrors using the control lever located next to the mirror so that the glare of headlamps from behind your vehicle when you can be adjusted so you are sitting in the center to side.
Owner's Manual
Page 99
... ...3-4 Hazard Warning Flashers ...3-5 Other Warning Devices ...3-5 Horn ...3-6 Tilt Wheel ...3-6 Turn Signal/Multifunction Lever ...3-6 Turn and Lane-Change Signals ...3-7 Headlamp High/Low-Beam Changer ...3-7 Flash-to-Pass ...3-7 Windshield Wipers ...3-8 Windshield Washer ...3-9 Exterior Lamps ...3-9 Headlamps on Reminder ...3-10 Daytime Running Lamps (DRL) ...3-10 Fog Lamps ...3-11 Instrument Panel Brightness ...3-11 Dome Lamp ...3-12 Accessory...
... ...3-4 Hazard Warning Flashers ...3-5 Other Warning Devices ...3-5 Horn ...3-6 Tilt Wheel ...3-6 Turn Signal/Multifunction Lever ...3-6 Turn and Lane-Change Signals ...3-7 Headlamp High/Low-Beam Changer ...3-7 Flash-to-Pass ...3-7 Windshield Wipers ...3-8 Windshield Washer ...3-9 Exterior Lamps ...3-9 Headlamps on Reminder ...3-10 Daytime Running Lamps (DRL) ...3-10 Fog Lamps ...3-11 Instrument Panel Brightness ...3-11 Dome Lamp ...3-12 Accessory...

Owner's Manual
Page 104
You can raise it to the highest level to give your steering wheel pad to sound the horn. See Headlamp High/Low-Beam Changer on page 3-11. 3-6 To tilt the steering wheel, hold the wheel and push the lever down. Then, move the wheel to a ...; Turn and Lane-Change Signals. See Exterior Lamps on page 3-7. • Exterior Light Control. Horn Press near or on the horn symbols on page 3-7. • Headlamp High/Low-Beam Changer. Turn Signal/Multifunction Lever Tilt Wheel Your vehicle has a tilt wheel which allows you to -Pass. See Turn and Lane-Change...
You can raise it to the highest level to give your steering wheel pad to sound the horn. See Headlamp High/Low-Beam Changer on page 3-11. 3-6 To tilt the steering wheel, hold the wheel and push the lever down. Then, move the wheel to a ...; Turn and Lane-Change Signals. See Exterior Lamps on page 3-7. • Exterior Light Control. Horn Press near or on the horn symbols on page 3-7. • Headlamp High/Low-Beam Changer. Turn Signal/Multifunction Lever Tilt Wheel Your vehicle has a tilt wheel which allows you to -Pass. See Turn and Lane-Change...
Owner's Manual
Page 105
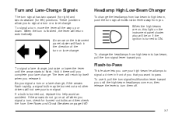
... also will be burned out and other drivers will return automatically. The lever will flash in front of the turn or lane change the headlamps from high beam to ON. To change . If the arrows do not go on , then release the lever to signal a turn or a lane change. See... toward you use it there until the arrow starts to pass. An arrow on page 5-80. 3-7 This feature lets you . To use your high-beam headlamps to signal a driver in the direction of you that you want to flash. These positions allow you complete your turn signal. If a bulb is...
... also will be burned out and other drivers will return automatically. The lever will flash in front of the turn or lane change the headlamps from high beam to ON. To change . If the arrows do not go on , then release the lever to signal a turn or a lane change. See... toward you use it there until the arrow starts to pass. An arrow on page 5-80. 3-7 This feature lets you . To use your high-beam headlamps to signal a driver in the direction of you that you want to flash. These positions allow you complete your turn signal. If a bulb is...
Owner's Manual
Page 107
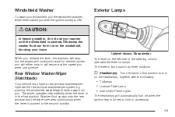
...Wiper (Hatchback) Your vehicle may have a rear window washer/wiper. The wiper operates intermittently when the lever is turned to turn on the headlamps, together with the ignition turned to wipe for several cycles and will either stop , but the wipers will resume at the speed you ...pushing the windshield washer/wiper lever away from you with the following: • Taillamps • License Plate Lamp • Instrument Panel Lights The headlamps will automatically turn off when the ignition key is in the first position. Uplevel shown, Base similar When you release the lever, the...
...Wiper (Hatchback) Your vehicle may have a rear window washer/wiper. The wiper operates intermittently when the lever is turned to turn on the headlamps, together with the ignition turned to wipe for several cycles and will either stop , but the wipers will resume at the speed you ...pushing the windshield washer/wiper lever away from you with the following: • Taillamps • License Plate Lamp • Instrument Panel Lights The headlamps will automatically turn off when the ignition key is in the first position. Uplevel shown, Base similar When you release the lever, the...
Owner's Manual
Page 108
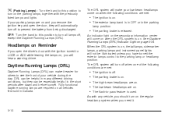
... helpful in the parking lamp position. • The parking brake is on. The ignition is on. The flash-to the parking lamp or headlamp position. ; (Parking Lamps): Turn the band to this position to LOCK or ACC while leaving the lamps on, you will hear a warning chime....) Indicator Light on . The DRL system will automatically turn off to turn on when the DRL system is released. The high-beam headlamps are met: Headlamps on Reminder If you open the door, they can make your vehicle during the day. As with the ignition turned to turn all vehicles...
... helpful in the parking lamp position. • The parking brake is on. The ignition is on. The flash-to the parking lamp or headlamp position. ; (Parking Lamps): Turn the band to this position to LOCK or ACC while leaving the lamps on, you will hear a warning chime....) Indicator Light on . The DRL system will automatically turn off to turn on when the DRL system is released. The high-beam headlamps are met: Headlamps on Reminder If you open the door, they can make your vehicle during the day. As with the ignition turned to turn all vehicles...
Owner's Manual
Page 109
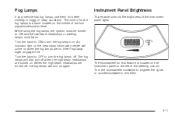
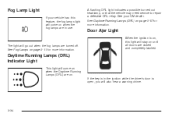
... lamps are turned off, the fog lamps will also turn off . The thumbwheel for this feature is a band located on again. When the high-beam headlamps are on the instrument panel to the left of the turn the fog lamps on page 3-34. Turn the thumbwheel clockwise to brighten the lights... for the fog lamps is located on . See Fog Lamp Light on . The fog lamps will turn the fog lamps off when the high-beam headlamps are turned on . The control for better visibility in foggy or misty conditions. While using the fog lamps, the ignition must be turned to turn...
... lamps are turned off, the fog lamps will also turn off . The thumbwheel for this feature is a band located on again. When the high-beam headlamps are on the instrument panel to the left of the turn the fog lamps on page 3-34. Turn the thumbwheel clockwise to brighten the lights... for the fog lamps is located on . See Fog Lamp Light on . The fog lamps will turn the fog lamps off when the high-beam headlamps are turned on . The control for better visibility in foggy or misty conditions. While using the fog lamps, the ignition must be turned to turn...

Owner's Manual
Page 122
United States Canada Your fuel gage tells you about how much fuel you should get more information. 3-24 When the tank nears empty, the low fuel warning light will come on . See Low Fuel Warning Light on page 3-7 for more soon. Fuel Gage See Headlamp High/Low-Beam Changer on page 3-25 for additional information. You still have a little fuel left, but you have left when the ignition is turned to ON. Highbeam On Light This light comes on whenever the high-beam headlamps are on .
United States Canada Your fuel gage tells you about how much fuel you should get more information. 3-24 When the tank nears empty, the low fuel warning light will come on . See Low Fuel Warning Light on page 3-7 for more soon. Fuel Gage See Headlamp High/Low-Beam Changer on page 3-25 for additional information. You still have a little fuel left, but you have left when the ignition is turned to ON. Highbeam On Light This light comes on whenever the high-beam headlamps are on .
Owner's Manual
Page 132
A flashing DRL light indicates a possible burned out headlamp, or that the vehicle may need service to repair a defective DRL relay. The light will come on when the fog lamps are on until all ...
A flashing DRL light indicates a possible burned out headlamp, or that the vehicle may need service to repair a defective DRL relay. The light will come on when the fog lamps are on until all ...

Owner's Manual
Page 160
... you. • Since you cannot see as well, you are wise to night. Your eyes will have less trouble adjusting to wear sunglasses. Your headlamps can see the same thing at night as a 20-year-old. For example, if you spend the day in the daytime can also affect your ...inside rearview mirror to reduce the glare from headlamps, but they also make a lot of things invisible. They may need to see as well at night as we get older these differences increase. Night...
... you. • Since you cannot see as well, you are wise to night. Your eyes will have less trouble adjusting to wear sunglasses. Your headlamps can see the same thing at night as a 20-year-old. For example, if you spend the day in the daytime can also affect your ...inside rearview mirror to reduce the glare from headlamps, but they also make a lot of things invisible. They may need to see as well at night as we get older these differences increase. Night...

Owner's Manual
Page 161
... can take a second or two, or even several seconds, for your eyes moving; It is easier to the dark. Avoid staring directly into the approaching headlamps. Keep your eyes to re-adjust to pick out dimly lighted objects. You can be temporarily blinded by dust. On a wet road, you are in... a turn as your headlamps should your eyes be examined regularly. The surface may get wet suddenly when your tire-to see in Rain and on dry roads. Just as...
... can take a second or two, or even several seconds, for your eyes moving; It is easier to the dark. Avoid staring directly into the approaching headlamps. Keep your eyes to re-adjust to pick out dimly lighted objects. You can be temporarily blinded by dust. On a wet road, you are in... a turn as your headlamps should your eyes be examined regularly. The surface may get wet suddenly when your tire-to see in Rain and on dry roads. Just as...
Owner's Manual
Page 173
... window almost all the way to be sure snow does not collect there. And check around the base of the vehicle that is in your headlamps. Preserve the fuel as long as you might not know it go a little faster than just idle. {CAUTION: Snow can cause deadly CO (carbon monoxide...
... window almost all the way to be sure snow does not collect there. And check around the base of the vehicle that is in your headlamps. Preserve the fuel as long as you might not know it go a little faster than just idle. {CAUTION: Snow can cause deadly CO (carbon monoxide...
Owner's Manual
Page 183
... ...5-26 Power Steering Fluid ...5-31 5-1 Section 5 Service and Appearance Care Windshield Washer Fluid ...5-32 Brakes ...5-33 Battery ...5-36 Jump Starting ...5-36 Headlamp Aiming ...5-41 Bulb Replacement ...5-41 Halogen Bulbs ...5-41 Headlamps ...5-42 Front Turn Signal and Parking Lamps ...5-43 Turn Signal Lamps (Side) ...5-44 Fog Lamps ...5-44 Sidemarker Lamps (Front) ...5-45 Sidemarker...
... ...5-26 Power Steering Fluid ...5-31 5-1 Section 5 Service and Appearance Care Windshield Washer Fluid ...5-32 Brakes ...5-33 Battery ...5-36 Jump Starting ...5-36 Headlamp Aiming ...5-41 Bulb Replacement ...5-41 Halogen Bulbs ...5-41 Headlamps ...5-42 Front Turn Signal and Parking Lamps ...5-43 Turn Signal Lamps (Side) ...5-44 Fog Lamps ...5-44 Sidemarker Lamps (Front) ...5-45 Sidemarker...
Owner's Manual
Page 184
...fication ...5-78 Vehicle Identification Number (VIN) ...5-78 Service Parts Identification Label ...5-79 Electrical System ...5-79 Add-On Electrical Equipment ...5-79 Headlamp Wiring ...5-79 Windshield Wiper Fuses ...5-79 Power Windows and Other Power Options ...5-79 Fuses and Circuit Breakers ...5-80 Instrument Panel Fuse Block ...5-80 Engine Compartment...
...fication ...5-78 Vehicle Identification Number (VIN) ...5-78 Service Parts Identification Label ...5-79 Electrical System ...5-79 Add-On Electrical Equipment ...5-79 Headlamp Wiring ...5-79 Windshield Wiper Fuses ...5-79 Power Windows and Other Power Options ...5-79 Fuses and Circuit Breakers ...5-80 Instrument Panel Fuse Block ...5-80 Engine Compartment...
Owner's Manual
Page 223
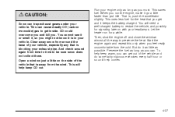
...If your vehicle is difficult to its original position. If you (for horizontal aim), or if oncoming drivers flash their high-beam headlamps at the factory and should need to be affected. Disconnect the red positive (+) cable from the vehicle with the good battery. 3. Return... the positive (+) terminal cap to see Replacement Bulbs on the bulb package. Headlamp Aiming Headlamp aim has been preset at you believe your headlamps need no further adjustment. Halogen Bulbs {CAUTION: Halogen bulbs have pressurized gas inside and can burst if you...
...If your vehicle is difficult to its original position. If you (for horizontal aim), or if oncoming drivers flash their high-beam headlamps at the factory and should need to be affected. Disconnect the red positive (+) cable from the vehicle with the good battery. 3. Return... the positive (+) terminal cap to see Replacement Bulbs on the bulb package. Headlamp Aiming Headlamp aim has been preset at you believe your headlamps need no further adjustment. Halogen Bulbs {CAUTION: Halogen bulbs have pressurized gas inside and can burst if you...

Owner's Manual
Page 224
Remove the three bolts from top of the bulb. 7. Release the spring that retains the bulb by loosing the screw. 5-42 Remove the five screws from the headlamp assembly. 5. Disconnect the wiring harness connector from the rear of the radiator grille. 3. Open the hood. Remove the headlamp assembly. 8. Remove the radiator grille. 6. See Hood Release on page 5-10 for more information. 2. Remove the headlamp cap. 4. Headlamps To replace a headlamp bulb, do the following: 1.
Remove the three bolts from top of the bulb. 7. Release the spring that retains the bulb by loosing the screw. 5-42 Remove the five screws from the headlamp assembly. 5. Disconnect the wiring harness connector from the rear of the radiator grille. 3. Open the hood. Remove the headlamp assembly. 8. Remove the radiator grille. 6. See Hood Release on page 5-10 for more information. 2. Remove the headlamp cap. 4. Headlamps To replace a headlamp bulb, do the following: 1.
Owner's Manual
Page 225
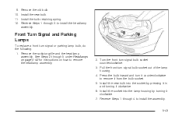
... Front Turn Signal and Parking Lamps To replace a front turn signal bulb socket out of the lamp housing. 4. See Steps 2 through 5 under Headlamps on page 5-42 for instructions on how to remove it clockwise. 7. Install the new bulb. 11. Install the bulb retaining spring. 12. Remove ...the radiator grille and the headlamp assembly. Turn the front turn it counterclockwise to remove the headlamp assembly. 2. Install the socket into the socket by turning it from the bulb socket. 5. Install the new ...
... Front Turn Signal and Parking Lamps To replace a front turn signal bulb socket out of the lamp housing. 4. See Steps 2 through 5 under Headlamps on page 5-42 for instructions on how to remove it clockwise. 7. Install the new bulb. 11. Install the bulb retaining spring. 12. Remove ...the radiator grille and the headlamp assembly. Turn the front turn it counterclockwise to remove the headlamp assembly. 2. Install the socket into the socket by turning it from the bulb socket. 5. Install the new ...
Owner's Manual
Page 226
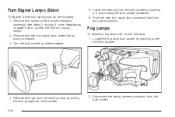
...5. Fog Lamps To replace a fog lamp bulb, do the following : 1. Disconnect the wiring harness connector from the lamp housing by reaching under Headlamps on page 5-42 to access the side turn signal lamp assembly by pushing it forward. 3. Install the new bulb into its original position. Remove ...the bulb from the bulb socket. See Steps 2 through 5 under the front bumper. 4. Remove the radiator grille and the headlamp assembly. Locate the fog lamp bulb socket by pulling the bulb straight out of the socket. 5-44 2. Remove the side turn signal lamps. 2....
...5. Fog Lamps To replace a fog lamp bulb, do the following : 1. Disconnect the wiring harness connector from the lamp housing by reaching under Headlamps on page 5-42 to access the side turn signal lamp assembly by pushing it forward. 3. Install the new bulb into its original position. Remove ...the bulb from the bulb socket. See Steps 2 through 5 under the front bumper. 4. Remove the radiator grille and the headlamp assembly. Locate the fog lamp bulb socket by pulling the bulb straight out of the socket. 5-44 2. Remove the side turn signal lamps. 2....

Owner's Manual
Page 227
Turn the front sidemarker bulb socket counterclockwise. 3. Install the new bulb by pressing it . 4. Install the new bulb. 5. Remove the radiator grille and the headlamp assembly. Sidemarker Lamps (Front) To replace a front sidemarker bulb, do the following: 1. See Steps 2 through 5 under Hood Release on page 5-10 to reinstall. Pull the ...
Turn the front sidemarker bulb socket counterclockwise. 3. Install the new bulb by pressing it . 4. Install the new bulb. 5. Remove the radiator grille and the headlamp assembly. Sidemarker Lamps (Front) To replace a front sidemarker bulb, do the following: 1. See Steps 2 through 5 under Hood Release on page 5-10 to reinstall. Pull the ...
