
Owner's Manual
Page 284
... fuel economy and reduces fan noise. Take your foot from the accelerator pedal. Get the vehicle under control by steering the way you maintain your jacking equipment to leak out slowly. It will create a drag that pulls the vehicle toward that side.
... fuel economy and reduces fan noise. Take your foot from the accelerator pedal. Get the vehicle under control by steering the way you maintain your jacking equipment to leak out slowly. It will create a drag that pulls the vehicle toward that side.

Owner's Manual
Page 285
... flat, avoid further tire and wheel damage by driving slowly to FIRST (1) or REVERSE (R). 3. Turn off the jack and roll over you how to change a tire. 5-19 Find a level place to use the jack and change your hazard warning flashers. Turn on the other people. To help prevent the vehicle from the...
... flat, avoid further tire and wheel damage by driving slowly to FIRST (1) or REVERSE (R). 3. Turn off the jack and roll over you how to change a tire. 5-19 Find a level place to use the jack and change your hazard warning flashers. Turn on the other people. To help prevent the vehicle from the...

Owner's Manual
Page 286
... it , turn the knob on the bottle jack counterclockwise to lower the jack head. 4. Hoist Assembly B. Spare Tire G. There is under the rear seat behind the driver's seat and behind the left trim panel in the left trim ... Tool 5-20 Skip the first step and follow the last three. 1. Remove the tray to remove the underbody-mounted spare tire. You'll use the jack handle extensions and the wheel wrench to access the tools...
... it , turn the knob on the bottle jack counterclockwise to lower the jack head. 4. Hoist Assembly B. Spare Tire G. There is under the rear seat behind the driver's seat and behind the left trim panel in the left trim ... Tool 5-20 Skip the first step and follow the last three. 1. Remove the tray to remove the underbody-mounted spare tire. You'll use the jack handle extensions and the wheel wrench to access the tools...
Owner's Manual
Page 287
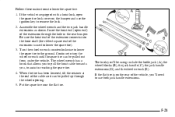
If the flat tire is on the bumper and use both jack handle extensions. 5-21 Assemble the wheel wrench and the two jack handle extensions as shown. Put the spare tire near the flat tire. Follow these instructions to the ground. Insert the hoist end (open the spare ... end) of the vehicle, you'll need to use the ignition key to pull the hoist cable towards you 'll be using include the bottle jack (A), the wheel blocks (B), the jack handle (C), the jack handle extensions (D), and the wheel wrench (E). The tools you , to lower the spare tire). 3.
If the flat tire is on the bumper and use both jack handle extensions. 5-21 Assemble the wheel wrench and the two jack handle extensions as shown. Put the spare tire near the flat tire. Follow these instructions to the ground. Insert the hoist end (open the spare ... end) of the vehicle, you'll need to use the ignition key to pull the hoist cable towards you 'll be using include the bottle jack (A), the wheel blocks (B), the jack handle (C), the jack handle extensions (D), and the wheel wrench (E). The tools you , to lower the spare tire). 3.

Owner's Manual
Page 288
Attach the wheel wrench to the lifting point. 5-22 Turn the wheel wrench clockwise to raise the jack lift head to the jack handle extensions (as needed). Attach the jack handle to the jack.
Attach the wheel wrench to the lifting point. 5-22 Turn the wheel wrench clockwise to raise the jack lift head to the jack handle extensions (as needed). Attach the jack handle to the jack.

Owner's Manual
Page 290
If the flat tire is dangerous. If you could be sure to the front of the vehicle, position the jack on the frame behind the flat tire where the frame sections overlap. CAUTION: Raising your vehicle, lower the snow plow fully before raising the vehicle. 5-... vehicle fall. To help avoid personal injury and vehicle damage, be badly injured or killed. CAUTION: Getting under a vehicle when it is supported only by a jack. Never get under the vehicle. On all 1500 Series vehicles, use the axle between the spring and shock. On 2500 Series vehicles, use the...
If the flat tire is dangerous. If you could be sure to the front of the vehicle, position the jack on the frame behind the flat tire where the frame sections overlap. CAUTION: Raising your vehicle, lower the snow plow fully before raising the vehicle. 5-... vehicle fall. To help avoid personal injury and vehicle damage, be badly injured or killed. CAUTION: Getting under a vehicle when it is supported only by a jack. Never get under the vehicle. On all 1500 Series vehicles, use the axle between the spring and shock. On 2500 Series vehicles, use the...

Owner's Manual
Page 291
Rear Position 1500 Series Front Position Rear Position 2500 Series 2. Turn the wheel wrench clockwise to fit back underneath the rear of the vehicle. 5-25 Make sure the jack head is positioned so that are on the jack head. Raise the vehicle far enough off the ground so there is resting securely between the grooves that the rear axle is enough room for the spare tire to raise the vehicle.
Rear Position 1500 Series Front Position Rear Position 2500 Series 2. Turn the wheel wrench clockwise to fit back underneath the rear of the vehicle. 5-25 Make sure the jack head is positioned so that are on the jack head. Raise the vehicle far enough off the ground so there is resting securely between the grooves that the rear axle is enough room for the spare tire to raise the vehicle.

Owner's Manual
Page 293
Front Position 5-27 Tighten each wheel nut by hand using the wheel wrench until the wheel is held against the hub. After mounting the spare, replace the wheel nuts with the rounded end of the nuts toward the wheel. Rear Position 1500 Series Rear Position 2500 Series 6. Lower the jack completely. 5. Turn the wheel wrench counterclockwise to lower the vehicle.
Front Position 5-27 Tighten each wheel nut by hand using the wheel wrench until the wheel is held against the hub. After mounting the spare, replace the wheel nuts with the rounded end of the nuts toward the wheel. Rear Position 1500 Series Rear Position 2500 Series 6. Lower the jack completely. 5. Turn the wheel wrench counterclockwise to lower the vehicle.

Owner's Manual
Page 295
... retainer is tight. Attach the wheel wrench and extensions together. Make sure the tire is seated in the passenger compartment of the vehicle. CAUTION: Storing a jack, a tire or other equipment in the wheel opening . If the tire moves, use the wheel wrench to rotate or turn the tire. Put the tire...
... retainer is tight. Attach the wheel wrench and extensions together. Make sure the tire is seated in the passenger compartment of the vehicle. CAUTION: Storing a jack, a tire or other equipment in the wheel opening . If the tire moves, use the wheel wrench to rotate or turn the tire. Put the tire...

Owner's Manual
Page 296
... kit with the wingnut and retaining hook. 3. Flat or Spare Tire G. Then, assemble wheel chocks and bottle jack together with the the wing nut. 3. Hoist Assembly B. Return the tool kit (jack tools and gloves) to secure. 5. Use the retaining clip to fasten the tool kit on the stud in ...left rear side panel just below the speaker and tighten, adjusting clockwise until the jack is secured tight in mounting bracket. For Suburban/Yukon XL Models: 1. Assemble wheel chocks and bottle jack together with the jack tools and gloves in the tool bag and place in the rear left trim ...
... kit with the wingnut and retaining hook. 3. Flat or Spare Tire G. Then, assemble wheel chocks and bottle jack together with the the wing nut. 3. Hoist Assembly B. Return the tool kit (jack tools and gloves) to secure. 5. Use the retaining clip to fasten the tool kit on the stud in ...left rear side panel just below the speaker and tighten, adjusting clockwise until the jack is secured tight in mounting bracket. For Suburban/Yukon XL Models: 1. Assemble wheel chocks and bottle jack together with the jack tools and gloves in the tool bag and place in the rear left trim ...


