
Owner's Manual
Page 80
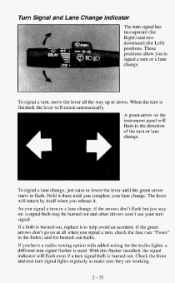
...turn signal lights regularly to make sure they are working. As you to signal a turn signal bulb is finished, the lever will return automatically. With this flasher installed, the signal indicator will flash ...To signal a turn, move the lever all when you signal a turn signal flasher is burned out, replace it to flash. es 2-35 A green arrow on the instrument panel will return by itself whenyou release...in the Index) and for Left) positions. If the green arrows don't go on , a signal bulb may be burned out and other drivers won't see "Fuses" in the direction of the turnor lane...
...turn signal lights regularly to make sure they are working. As you to signal a turn signal bulb is finished, the lever will return automatically. With this flasher installed, the signal indicator will flash ...To signal a turn, move the lever all when you signal a turn signal flasher is burned out, replace it to flash. es 2-35 A green arrow on the instrument panel will return by itself whenyou release...in the Index) and for Left) positions. If the green arrows don't go on , a signal bulb may be burned out and other drivers won't see "Fuses" in the direction of the turnor lane...

Owner's Manual
Page 247
Contact your dealer to learn how to prepare your vehicle for longer storage periods. Remove the screws from the headlamp retainer. 6-30 Sealed Beam Headlamps 1. Bulb Replacement Before you replace any bulbs, be sure that all the lamps are off and the engine isn't running.
Contact your dealer to learn how to prepare your vehicle for longer storage periods. Remove the screws from the headlamp retainer. 6-30 Sealed Beam Headlamps 1. Bulb Replacement Before you replace any bulbs, be sure that all the lamps are off and the engine isn't running.

Owner's Manual
Page 250
Front Parlcrrurn SignalLamps (Composite and Sealed Beam) If you have fog lamps, the fog lamp bracket must be removed beforeyou can replace the front park/turn it clockwise until it out. 6-33 Reach under the bumper and behind the parkinghrn signal lamp assembly. 2 . Plug in the electrical connector. 8. I . Push the tab on the socket, turn the socket counterclockwise and pull it is tight. 7. Put the headlamp lens assembly back into the headlamp lens assembly and turn signal lamps. ,. ,: : ; . . Install and tighten the screws. Put the new bulb into the vehicle. 6.
Front Parlcrrurn SignalLamps (Composite and Sealed Beam) If you have fog lamps, the fog lamp bracket must be removed beforeyou can replace the front park/turn it clockwise until it out. 6-33 Reach under the bumper and behind the parkinghrn signal lamp assembly. 2 . Plug in the electrical connector. 8. I . Push the tab on the socket, turn the socket counterclockwise and pull it is tight. 7. Put the headlamp lens assembly back into the headlamp lens assembly and turn signal lamps. ,. ,: : ; . . Install and tighten the screws. Put the new bulb into the vehicle. 6.

Owner's Manual
Page 252
Close the tailgate. 5. Install and tighten the screws. 9. Put the socket into the socket. 7. Center High Mounted Stop Lamp (CHMSL) 3. Pull the bulb out. 6. Replace the assembly. Replace the CHMSL lens. Install the new CHMSL bulb. 5. Install and tighten the screws. 6-35 Remove the CHMSL bulb. 4. Push the new bulb into the assembly and turn the socket clockwise until it locks in place. 8.
Close the tailgate. 5. Install and tighten the screws. 9. Put the socket into the socket. 7. Center High Mounted Stop Lamp (CHMSL) 3. Pull the bulb out. 6. Replace the assembly. Replace the CHMSL lens. Install the new CHMSL bulb. 5. Install and tighten the screws. 6-35 Remove the CHMSL bulb. 4. Push the new bulb into the assembly and turn the socket clockwise until it locks in place. 8.

Owner's Manual
Page 281
LAMPS Anti-lock Brake Warning Indicator Brake System Warning Indicator Check Gages Indicator Daytime Running Lamps Indicator Charging System Indicator High Beam Indicator Instrument Cluster Illumination Malfunction Indicator Lamp (ServiceEngine Soon) Seat Belt Indicator T r Signal Indicator un Upshift Indicator AIR BAG Indicator QUANTITY 1 1 TRADE NO. PC74 PC74 PC74 PC74 1 1 PC74 PC74 PC168 PC74 6 1 PC194 PC74 PC74 See GM Dealer 6-64 INSTRUMENT CLUSTER LAMPS NOTE: A PC part number indicates that the bulb and base are one assembly and must be replaced as such.
LAMPS Anti-lock Brake Warning Indicator Brake System Warning Indicator Check Gages Indicator Daytime Running Lamps Indicator Charging System Indicator High Beam Indicator Instrument Cluster Illumination Malfunction Indicator Lamp (ServiceEngine Soon) Seat Belt Indicator T r Signal Indicator un Upshift Indicator AIR BAG Indicator QUANTITY 1 1 TRADE NO. PC74 PC74 PC74 PC74 1 1 PC74 PC74 PC168 PC74 6 1 PC194 PC74 PC74 See GM Dealer 6-64 INSTRUMENT CLUSTER LAMPS NOTE: A PC part number indicates that the bulb and base are one assembly and must be replaced as such.
Owner's Manual
Page 345
... ...2-42 Passing Another Vehicle ...2-41 2-42 To Erase Speed Memory ...ToGetOutOf ...2-42 To Increase Speed ...2-40 ToReduceSpeed ...2-41 ToResume ...2-40 ToSet ...2-39 2 Break.1n. NewVehicle ...2-9 Bulb Replacement ...6-30 6-35 Center High Mounted Stop Lamp (CHMSL) ...6-32 Composite Headlamps ...6-33 Front Park Turn Signal Lamps ...Halogen...
... ...2-42 Passing Another Vehicle ...2-41 2-42 To Erase Speed Memory ...ToGetOutOf ...2-42 To Increase Speed ...2-40 ToReduceSpeed ...2-41 ToResume ...2-40 ToSet ...2-39 2 Break.1n. NewVehicle ...2-9 Bulb Replacement ...6-30 6-35 Center High Mounted Stop Lamp (CHMSL) ...6-32 Composite Headlamps ...6-33 Front Park Turn Signal Lamps ...Halogen...

Owner's Manual
Page 347
...") Wood Checking Under, Hood Release ...6-6 Horn ...2-33 6-18 HydraulicClutch ...Hydroplaning (See "Driving in the Rain") 4 F Filter Replacement Chart (See "Service-Replacement Parts and Filter Recommendations") Fluid Capacity (See "Capacity and Specifications") 6-30 l;luidLeakCheck ...Fluids (See "Recommended Fluids and Lubricants") ......Tachometer ...Trip Odometer ...Voltmeter ...2-65 2-66 2-54 2-65 2-54 2-55 2-55 2-67 Halogen Bulbs (See "Bulb Replacement") Hazard Warning Flashers ...5-1 Headlamps Replacement (See "Bulb Replacement") High Beam Indicator Light (See "Lights") 2.36,64 2.
...") Wood Checking Under, Hood Release ...6-6 Horn ...2-33 6-18 HydraulicClutch ...Hydroplaning (See "Driving in the Rain") 4 F Filter Replacement Chart (See "Service-Replacement Parts and Filter Recommendations") Fluid Capacity (See "Capacity and Specifications") 6-30 l;luidLeakCheck ...Fluids (See "Recommended Fluids and Lubricants") ......Tachometer ...Trip Odometer ...Voltmeter ...2-65 2-66 2-54 2-65 2-54 2-55 2-55 2-67 Halogen Bulbs (See "Bulb Replacement") Hazard Warning Flashers ...5-1 Headlamps Replacement (See "Bulb Replacement") High Beam Indicator Light (See "Lights") 2.36,64 2.
Owner's Manual
Page 348
... "Certification/Tire Label") Lamps Center High Mounted Stop Lamp (CHMSL) ...2-67 2-46 Dome ...2-44 FogLamps ...Headlights (See "Headlamps") Replacement (See "Bulb Replacement") 2-43 Lights ...2-57 Air Bag Readiness Light ...Anti-Lock Brake System Warning Light ...2-59 2-58 BrakeSystemLight ...2-62 Charging System Indicator... Lane Change Indicator Light ...Loading YourVehicle ...4-36 Add-on Equipment ...4-39 Off-Road Driving ...4-13 Payload ...4-38 Pickup Conversion to Chassis Cab ...4-42 TraileringPackage ...4-39 440 Truck-Camper Loading Information ...Two-Tiered Loading ...4-38 Lock Cylinders...
... "Certification/Tire Label") Lamps Center High Mounted Stop Lamp (CHMSL) ...2-67 2-46 Dome ...2-44 FogLamps ...Headlights (See "Headlamps") Replacement (See "Bulb Replacement") 2-43 Lights ...2-57 Air Bag Readiness Light ...Anti-Lock Brake System Warning Light ...2-59 2-58 BrakeSystemLight ...2-62 Charging System Indicator... Lane Change Indicator Light ...Loading YourVehicle ...4-36 Add-on Equipment ...4-39 Off-Road Driving ...4-13 Payload ...4-38 Pickup Conversion to Chassis Cab ...4-42 TraileringPackage ...4-39 440 Truck-Camper Loading Information ...Two-Tiered Loading ...4-38 Lock Cylinders...


