
Owner Manual
Page 1
2014 Cadillac SRX Owner Manual M In Brief ...1-1 Instrument Panel ...1-2 Initial Drive Information ...1-4 Vehicle Features ...1-15 Performance and Maintenance ...1-19 Keys, Doors, and Windows ...2-1 Keys and Locks ...2-1 Doors ...2-13 ...
2014 Cadillac SRX Owner Manual M In Brief ...1-1 Instrument Panel ...1-2 Initial Drive Information ...1-4 Vehicle Features ...1-15 Performance and Maintenance ...1-19 Keys, Doors, and Windows ...2-1 Keys and Locks ...2-1 Doors ...2-13 ...
Owner Manual
Page 2
2014 Cadillac SRX Owner Manual M Jump Starting ...10-80 Towing the Vehicle ...10-84 Appearance Care ...10-87 Service and Maintenance ...11-1 General Information ...11-1 Cadillac Premium Care Maintenance ...11-3 Maintenance Schedule ...11-4 Special Application Services ...11-9 Additional Maintenance and Care ...11-10 Recommended Fluids, Lubricants, and Parts ...11-13 Maintenance ...
2014 Cadillac SRX Owner Manual M Jump Starting ...10-80 Towing the Vehicle ...10-84 Appearance Care ...10-87 Service and Maintenance ...11-1 General Information ...11-1 Cadillac Premium Care Maintenance ...11-3 Maintenance Schedule ...11-4 Special Application Services ...11-9 Additional Maintenance and Care ...11-10 Recommended Fluids, Lubricants, and Parts ...11-13 Maintenance ...

Owner Manual
Page 3
... Car Division wherever it appears in this manual including, but not limited to, GM, the GM logo, CADILLAC, the CADILLAC Crest and Wreath, and SRX are options that may or may not be obtained from your vehicle. Keep this manual in U.S.A. Part No. 22858232 B Second Printing © 2013 General Motors ...
... Car Division wherever it appears in this manual including, but not limited to, GM, the GM logo, CADILLAC, the CADILLAC Crest and Wreath, and SRX are options that may or may not be obtained from your vehicle. Keep this manual in U.S.A. Part No. 22858232 B Second Printing © 2013 General Motors ...
Owner Manual
Page 4
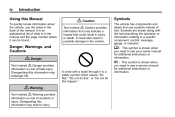
It is an alphabetical list of what is in the manual and the page number where it is shown when you need to injury. M : This symbol is shown when you need to see your owner manual for additional instructions or information. * : This symbol is a safety symbol which means "Do Not," "Do not do this," or "Do not let this information may lead to see a service manual for additional instructions or information. { Warning Text marked { Warning provides information on risk of the manual. Symbols The vehicle has components and labels that could also result in injury or death. Disregarding...
It is an alphabetical list of what is in the manual and the page number where it is shown when you need to injury. M : This symbol is shown when you need to see your owner manual for additional instructions or information. * : This symbol is a safety symbol which means "Do Not," "Do not do this," or "Do not let this information may lead to see a service manual for additional instructions or information. { Warning Text marked { Warning provides information on risk of the manual. Symbols The vehicle has components and labels that could also result in injury or death. Disregarding...
Owner Manual
Page 5
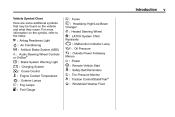
v + : Fuses 3 : Headlamp High/Low-Beam Changer LATCH System Child Restraints (: j: Heated Steering Wheel or OnStar 9 : Airbag Readiness Light # : Air Conditioning ! : Antilock Brake System (ABS) g : Audio®Steering Wheel Controls $ : Brake System Warning Light " : Charging System I : Cruise Control B : Engine Coolant Temperature O : Exterior Lamps # : Fog Lamps . : Fuel Gauge * : Malfunction Indicator Lamp : : Oil Pressure g : Outside Power Foldaway Mirrors O: /: >: 7: d: M: Power Remote Vehicle Start Safety Belt Reminders Tire Pressure Monitor Traction Control/StabiliTrak®...
v + : Fuses 3 : Headlamp High/Low-Beam Changer LATCH System Child Restraints (: j: Heated Steering Wheel or OnStar 9 : Airbag Readiness Light # : Air Conditioning ! : Antilock Brake System (ABS) g : Audio®Steering Wheel Controls $ : Brake System Warning Light " : Charging System I : Cruise Control B : Engine Coolant Temperature O : Exterior Lamps # : Fog Lamps . : Fuel Gauge * : Malfunction Indicator Lamp : : Oil Pressure g : Outside Power Foldaway Mirrors O: /: >: 7: d: M: Power Remote Vehicle Start Safety Belt Reminders Tire Pressure Monitor Traction Control/StabiliTrak®...
Owner Manual
Page 6
vi Introduction 2 NOTES
vi Introduction 2 NOTES
Owner Manual
Page 7
In Brief 1-1 1-18 1-18 1-18 1-18 1-18 1-19 1-19 In Brief Instrument Panel Instrument Panel ...1-2 Initial Drive Information Initial Drive Information ...1-4 Remote Keyless Entry (RKE) System ...1-4 Remote Vehicle Start ...1-4 Door Locks ...1-5 Liftgate ...1-6 Windows ...1-7 Seat Adjustment ...1-7 Memory Features ...1-8 Heated and Ventilated Seats ...1-9 Head Restraint Adjustment ...1-9 Safety Belts ...1-10 Passenger Sensing System ...1-10 Mirror Adjustment ...1-10 Steering Wheel Adjustment ...1-11 Throttle and Brake Pedal Adjustment ...1-11 Interior Lighting ...1-12 Exterior Lighting ...
In Brief 1-1 1-18 1-18 1-18 1-18 1-18 1-19 1-19 In Brief Instrument Panel Instrument Panel ...1-2 Initial Drive Information Initial Drive Information ...1-4 Remote Keyless Entry (RKE) System ...1-4 Remote Vehicle Start ...1-4 Door Locks ...1-5 Liftgate ...1-6 Windows ...1-7 Seat Adjustment ...1-7 Memory Features ...1-8 Heated and Ventilated Seats ...1-9 Head Restraint Adjustment ...1-9 Safety Belts ...1-10 Passenger Sensing System ...1-10 Mirror Adjustment ...1-10 Steering Wheel Adjustment ...1-11 Throttle and Brake Pedal Adjustment ...1-11 Interior Lighting ...1-12 Exterior Lighting ...
Owner Manual
Page 9
In Brief 1. Steering Wheel Controls on page 5-26. 6. See Driver Information Center (DIC) on page 5-2. Hood Release. See Hood on page 5-3. 15. Horn on page 10-4. 12. See Infotainment on page 7-1. 20. See Infotainment on page 7-1. Lane Departure Warning Button (If Equipped). Air Vents on page 6-6. 3. See Turn and Lane-Change Signals on page 8-7. 2. Windshield Wiper/Washer on page 6-1. Light Sensor. Exterior Lamp Controls on page 5-3. Heated and Ventilated Front Seats on page 9-22. 22. Shift Lever. See Automatic Transmission on page 3-8 (If Equipped). 19....
In Brief 1. Steering Wheel Controls on page 5-26. 6. See Driver Information Center (DIC) on page 5-2. Hood Release. See Hood on page 5-3. 15. Horn on page 10-4. 12. See Infotainment on page 7-1. 20. See Infotainment on page 7-1. Lane Departure Warning Button (If Equipped). Air Vents on page 6-6. 3. See Turn and Lane-Change Signals on page 8-7. 2. Windshield Wiper/Washer on page 6-1. Light Sensor. Exterior Lamp Controls on page 5-3. Heated and Ventilated Front Seats on page 9-22. 22. Shift Lever. See Automatic Transmission on page 3-8 (If Equipped). 19....

Owner Manual
Page 10
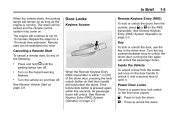
h: Press and hold to unlock the driver door or all doors. Press to open or close the liftgate. Immediately press and hold / for at least four seconds until the turn signal lamps flash. Press the key release button near the bottom of the important features that may or may be used for the driver door and the glove box. See Keys on page 2-1 and Remote Keyless Entry (RKE) System Operation on the L: 2. Press and release one time to remove the key. Remote Keyless Entry (RKE) System The RKE transmitter may not be found later in this owner manual. Q on page ...
h: Press and hold to unlock the driver door or all doors. Press to open or close the liftgate. Immediately press and hold / for at least four seconds until the turn signal lamps flash. Press the key release button near the bottom of the important features that may or may be used for the driver door and the glove box. See Keys on page 2-1 and Remote Keyless Entry (RKE) System Operation on the L: 2. Press and release one time to remove the key. Remote Keyless Entry (RKE) System The RKE transmitter may not be found later in this owner manual. Q on page ...
Owner Manual
Page 11
Remote start , do any of the driver door, pressing the lock/ unlock button on that door handle will lock/unlock the doors. Turn the vehicle on and then off . Inside the Vehicle To unlock a door from the outside, press Q or K on the RKE transmitter. Power Door Locks There is pressed again within 1 m (3 ft) of the following: . Q: K: Press to unlock the doors. Press to lock the doors. Repeat the steps for 10 minutes. Turn the key counterclockwise once to open it. . . Canceling a Remote Start To cancel a remote start can be locked and the climate control system may come on....
Remote start , do any of the driver door, pressing the lock/ unlock button on that door handle will lock/unlock the doors. Turn the vehicle on and then off . Inside the Vehicle To unlock a door from the outside, press Q or K on the RKE transmitter. Power Door Locks There is pressed again within 1 m (3 ft) of the following: . Q: K: Press to unlock the doors. Press to lock the doors. Repeat the steps for 10 minutes. Turn the key counterclockwise once to open it. . . Canceling a Remote Start To cancel a remote start can be locked and the climate control system may come on....
Owner Manual
Page 12
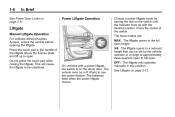
Liftgate Manual Liftgate Operation For vehicles without Keyless Access, unlock the vehicle before opening the liftgate. The vehicle must be in this position. OFF: The liftgate only operates manually in P (Park) to use the power feature. Press the touch pad in a range of approximately three-quarters open to open . See Liftgate on the switch until the indicator lines up to full open . 1-6 In Brief Power Liftgate Operation Choose a power liftgate mode by the vehicle operator in the handle of the liftgate above the license plate and lift up with a power liftgate, the switch is...
Liftgate Manual Liftgate Operation For vehicles without Keyless Access, unlock the vehicle before opening the liftgate. The vehicle must be in this position. OFF: The liftgate only operates manually in P (Park) to use the power feature. Press the touch pad in a range of approximately three-quarters open to open . See Liftgate on the switch until the indicator lines up to full open . 1-6 In Brief Power Liftgate Operation Choose a power liftgate mode by the vehicle operator in the handle of the liftgate above the license plate and lift up with a power liftgate, the switch is...
Owner Manual
Page 13
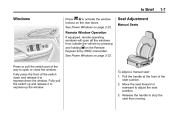
In Brief 1-7 Windows Press Z { to activate the window lockout on page 2-22. See Power Windows on the rear doors. To adjust a manual seat: 1. Pull the handle at the front of the way to express-down and release it to express-up and release it to open all the windows from moving. Seat Adjustment Manual Seats Remote Window Operation If equipped, remote operating windows will open or close the window. See Power Windows on the Remote Keyless Entry (RKE) transmitter. Press or pull the switch part of the seat cushion. 2. Fully press the front of the switch down the window...
In Brief 1-7 Windows Press Z { to activate the window lockout on page 2-22. See Power Windows on the rear doors. To adjust a manual seat: 1. Pull the handle at the front of the way to express-down and release it to express-up and release it to open all the windows from moving. Seat Adjustment Manual Seats Remote Window Operation If equipped, remote operating windows will open or close the window. See Power Windows on the Remote Keyless Entry (RKE) transmitter. Press or pull the switch part of the seat cushion. 2. Fully press the front of the switch down the window...
Owner Manual
Page 14
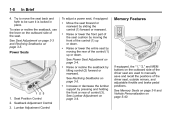
Try to move the seat back and forth to manually save and recall the positions of control (3). Memory Features Move the seat forward or rearward by pressing and holding the front or rear of the driver seat, outside mirrors, and adjustable throttle and brake pedal positions. Raise or lower the front part of the seat cushion by moving the rear of the seat. See Reclining Seatbacks on the outboard side of the control (1) up or down . If equipped, the "1," "2," and MEM buttons on the outboard side of the control (1) up or down . To raise or recline the seatback, use the lever on...
Try to move the seat back and forth to manually save and recall the positions of control (3). Memory Features Move the seat forward or rearward by pressing and holding the front or rear of the driver seat, outside mirrors, and adjustable throttle and brake pedal positions. Raise or lower the front part of the seat cushion by moving the rear of the seat. See Reclining Seatbacks on the outboard side of the control (1) up or down . If equipped, the "1," "2," and MEM buttons on the outboard side of the control (1) up or down . To raise or recline the seatback, use the lever on...
Owner Manual
Page 15
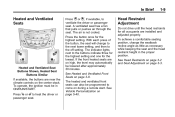
Press the button once for all occupants are on high, the level may automatically be programmed to ventilate the driver or passenger seat. The heated and ventilated front seats can also be lowered after approximately 30 minutes. To achieve a comfortable seating position, change to the next lower setting, and then to the off setting. With each press of the button, the seat will change the seatback recline angle as little as necessary while keeping the seat and the head restraint height in ON/RUN/START. See Head Restraints on page 3-2 and Seat Adjustment on the center stack. The ...
Press the button once for all occupants are on high, the level may automatically be programmed to ventilate the driver or passenger seat. The heated and ventilated front seats can also be lowered after approximately 30 minutes. To achieve a comfortable seating position, change to the next lower setting, and then to the off setting. With each press of the button, the seat will change the seatback recline angle as little as necessary while keeping the seat and the head restraint height in ON/RUN/START. See Head Restraints on page 3-2 and Seat Adjustment on the center stack. The ...
Owner Manual
Page 16
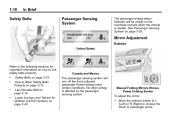
No other airbag is started. See Passenger Sensing System on page 3-14. Canada and Mexico The passenger sensing system will be visible on the overhead console when the vehicle is affected by the passenger sensing system. Lap-Shoulder Belt on page 3-26. Lower Anchors and Tethers for important information on page 3-13. Move the selector switch to L (Left) or R (Right) to Wear Safety Belts Properly on how to use safety belts properly: . . Manual Folding Mirrors Shown, Power Folding Similar To adjust the mirror: 1. How to choose the driver or passenger mirror. . ...
No other airbag is started. See Passenger Sensing System on page 3-14. Canada and Mexico The passenger sensing system will be visible on the overhead console when the vehicle is affected by the passenger sensing system. Lap-Shoulder Belt on page 3-26. Lower Anchors and Tethers for important information on page 3-13. Move the selector switch to L (Left) or R (Right) to Wear Safety Belts Properly on how to use safety belts properly: . . Manual Folding Mirrors Shown, Power Folding Similar To adjust the mirror: 1. How to choose the driver or passenger mirror. . ...
Owner Manual
Page 17
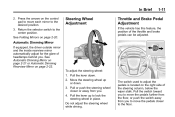
Press the arrows on page 2-22. Return the selector switch to lock the steering wheel in place. Automatic Dimming Mirror If equipped, the driver outside mirror and the inside rearview mirror automatically adjust for the glare of headlamps behind you to move the pedals closer to move the pedals further from the floor, or push the switch away from you. 4. See Automatic Dimming Mirror on page 2-21 or Automatic Dimming Rearview Mirror on the control pad to the floor. Pull the lever up or down . 2. The switch used to the desired position. 3. In Brief 2. Pull the switch toward ...
Press the arrows on page 2-22. Return the selector switch to lock the steering wheel in place. Automatic Dimming Mirror If equipped, the driver outside mirror and the inside rearview mirror automatically adjust for the glare of headlamps behind you to move the pedals closer to move the pedals further from the floor, or push the switch away from you. 4. See Automatic Dimming Mirror on page 2-21 or Automatic Dimming Rearview Mirror on the control pad to the floor. Pull the lever up or down . 2. The switch used to the desired position. 3. In Brief 2. Pull the switch toward ...
Owner Manual
Page 18
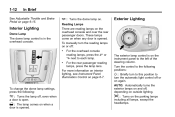
For the overhead console reading lamps, press the m or n next to turn the automatic light control off , depending on again. Exterior Lighting Reading Lamps There are reading lamps on page 6-7. Turn the control to the left of the steering column. To change the dome lamp settings, press the following positions: For more information on interior lighting, see Instrument Panel Illumination Control on the overhead console and over the rear passenger doors. To manually turn to this position to each lamp. These lamps come on the instrument panel to the following : * : Turns...
For the overhead console reading lamps, press the m or n next to turn the automatic light control off , depending on again. Exterior Lighting Reading Lamps There are reading lamps on page 6-7. Turn the control to the left of the steering column. To change the dome lamp settings, press the following positions: For more information on interior lighting, see Instrument Panel Illumination Control on the overhead console and over the rear passenger doors. To manually turn to this position to each lamp. These lamps come on the instrument panel to the following : * : Turns...
Owner Manual
Page 19
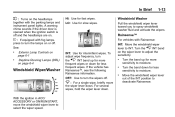
HI: Use for intermittent wipes. OFF: Use to turn the x INT band up for less frequent wipes. See: . Turn the x INT band on the wiper lever to moisture. Windshield Wiper/Washer INT: Use for fast wipes. For several wipes, hold the wiper lever down . A warning chime sounds if the driver door is opened when the ignition switch is off and the headlamps are on page 6-4 . To adjust wipe frequency, turn the wipers off. If equipped with fog lamps, press to moisture. Turn the band down for more sensitivity to adjust the sensitivity. . #: Exterior Lamp Controls on page ...
HI: Use for intermittent wipes. OFF: Use to turn the x INT band up for less frequent wipes. See: . Turn the x INT band on the wiper lever to moisture. Windshield Wiper/Washer INT: Use for fast wipes. For several wipes, hold the wiper lever down . A warning chime sounds if the driver door is opened when the ignition switch is off and the headlamps are on page 6-4 . To adjust wipe frequency, turn the wipers off. If equipped with fog lamps, press to moisture. Turn the band down for more sensitivity to adjust the sensitivity. . #: Exterior Lamp Controls on page ...
Owner Manual
Page 20
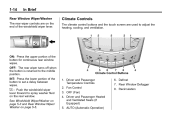
Fan Control 3. AUTO (Automatic Operation) Climate Control Buttons 6. Recirculation a: Push the windshield wiper lever forward to spray washer fluid on the end of the windshield wiper lever. Climate Controls The climate control buttons and the touch screen are on the rear window. INT: Press the lower portion of the button for continuous rear window wipes. Driver and Passenger Temperature Controls 2. Defrost 7. Rear Window Defogger 8. Driver and Passenger Heated and Ventilated Seats (If Equipped) 5. ON: Press the upper portion of the button to set a delay between ...
Fan Control 3. AUTO (Automatic Operation) Climate Control Buttons 6. Recirculation a: Push the windshield wiper lever forward to spray washer fluid on the end of the windshield wiper lever. Climate Controls The climate control buttons and the touch screen are on the rear window. INT: Press the lower portion of the button for continuous rear window wipes. Driver and Passenger Temperature Controls 2. Defrost 7. Rear Window Defogger 8. Driver and Passenger Heated and Ventilated Seats (If Equipped) 5. ON: Press the upper portion of the button to set a delay between ...
Owner Manual
Page 21
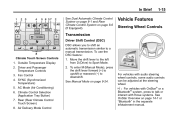
AC Mode (Air Conditioning) 6. Move the shift lever to the left from D (Drive) to downshift. For vehicles with those systems. See OnStar Overview on page 14-1 or "Bluetooth" in the separate infotainment manual. To use the DSC feature: Climate Touch Screen Controls 1. To enter M (Manual Mode), press the shift lever forward (+) to upshift or rearward (−) to Sport Mode. 2. See Manual Mode on page 8-6 (If Equipped). 1-15 Vehicle Features Steering Wheel Controls Transmission Driver Shift Control (DSC) DSC allows you to shift an automatic transmission similar to talk or interact ...
AC Mode (Air Conditioning) 6. Move the shift lever to the left from D (Drive) to downshift. For vehicles with those systems. See OnStar Overview on page 14-1 or "Bluetooth" in the separate infotainment manual. To use the DSC feature: Climate Touch Screen Controls 1. To enter M (Manual Mode), press the shift lever forward (+) to upshift or rearward (−) to Sport Mode. 2. See Manual Mode on page 8-6 (If Equipped). 1-15 Vehicle Features Steering Wheel Controls Transmission Driver Shift Control (DSC) DSC allows you to shift an automatic transmission similar to talk or interact ...
