
Owner Manual
Page 9
... Pedal on page 5-2. 14. See Infotainment on page 9-28. 21. Parking Brake on page 7-1. Parking Assist (If Equipped). Cruise Control on page 9-22. 22. Hood Release. ENGINE START/STOP Button. See Automatic Transmission on page 9-33. Traction Control/Electronic Stability Control on page 8-7. 2. Air Vents on page 9-30. See Turn and...
... Pedal on page 5-2. 14. See Infotainment on page 9-28. 21. Parking Brake on page 7-1. Parking Assist (If Equipped). Cruise Control on page 9-22. 22. Hood Release. ENGINE START/STOP Button. See Automatic Transmission on page 9-33. Traction Control/Electronic Stability Control on page 8-7. 2. Air Vents on page 9-30. See Turn and...

Owner Manual
Page 10
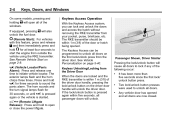
Press the key release button near the bottom of the important features that may or may be personalized. The key can be used for the driver door and the ... to unlock the driver door or all doors. See "Remote Lock, Unlock, Start" under Vehicle Personalization on the L: 2. Starting the Vehicle 1. Press and release RKE transmitter. Press and release one time to open or close the liftgate. Remote Vehicle Start If available, this owner manual. Lock and unlock feedback can be started...
Press the key release button near the bottom of the important features that may or may be personalized. The key can be used for the driver door and the ... to unlock the driver door or all doors. See "Remote Lock, Unlock, Start" under Vehicle Personalization on the L: 2. Starting the Vehicle 1. Press and release RKE transmitter. Press and release one time to open or close the liftgate. Remote Vehicle Start If available, this owner manual. Lock and unlock feedback can be started...
Owner Manual
Page 13
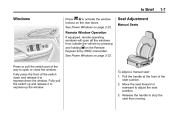
... to adjust the seat position. 3. See Power Windows on page 2-22. See Power Windows on page 2-22. Fully pull the switch up and release it to stop the seat from outside the vehicle by pressing and holding K on the rear doors. Move the seat forward or rearward to express-...
... to adjust the seat position. 3. See Power Windows on page 2-22. See Power Windows on page 2-22. Fully pull the switch up and release it to stop the seat from outside the vehicle by pressing and holding K on the rear doors. Move the seat forward or rearward to express-...
Owner Manual
Page 25
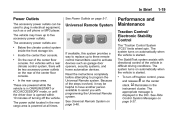
... Power Outlets on page 5-46. . The system turns on automatically when the vehicle is opened within 10 minutes of turning off traction control, press and release g on the rear of the center floor console. Because of the vehicle in the DIC. These are : . i illuminates in ON/RUN/START or ACC/ACCESSORY...
... Power Outlets on page 5-46. . The system turns on automatically when the vehicle is opened within 10 minutes of turning off traction control, press and release g on the rear of the center floor console. Because of the vehicle in the DIC. These are : . i illuminates in ON/RUN/START or ACC/ACCESSORY...
Owner Manual
Page 26
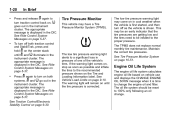
... tires need to be reset to a significant loss in the instrument cluster. 1-20 . This may have a Tire Pressure Monitor System (TPMS). . In Brief Press and release g again to the recommended pressure shown on .
... tires need to be reset to a significant loss in the instrument cluster. 1-20 . This may have a Tire Pressure Monitor System (TPMS). . In Brief Press and release g again to the recommended pressure shown on .
Owner Manual
Page 27
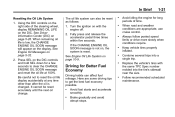
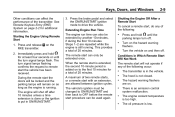
... Fuel Economy Driving habits can also be reset accurately until the next oil change. Press SEL on the right side of time. Fully press and release the accelerator pedal three times within five seconds. Keep vehicle tires properly inflated. Replace the vehicle's tires with the engine off. 2. Here are appropriate, use...
... Fuel Economy Driving habits can also be reset accurately until the next oil change. Press SEL on the right side of time. Fully press and release the accelerator pedal three times within five seconds. Keep vehicle tires properly inflated. Replace the vehicle's tires with the engine off. 2. Here are appropriate, use...
Owner Manual
Page 32
...the following occur: . On some models, pressing and holding K will also / (Remote Start): For vehicles with this feature, press and release Q and then immediately press and hold / for at least four seconds to initiate vehicle locator. Passenger Shown, Driver Similar Pressing the lock/unlock... . . See Remote Vehicle Start on page 5-40. If equipped, pressing unlock the fuel door. L (Vehicle Locator/Panic Alarm): Press and release one time to start the engine from your pocket, purse, briefcase, etc. See Vehicle Personalization on page 2-8. Any vehicle door has opened . h...
...the following occur: . On some models, pressing and holding K will also / (Remote Start): For vehicles with this feature, press and release Q and then immediately press and hold / for at least four seconds to initiate vehicle locator. Passenger Shown, Driver Similar Pressing the lock/unlock... . . See Remote Vehicle Start on page 5-40. If equipped, pressing unlock the fuel door. L (Vehicle Locator/Panic Alarm): Press and release one time to start the engine from your pocket, purse, briefcase, etc. See Vehicle Personalization on page 2-8. Any vehicle door has opened . h...
Owner Manual
Page 36
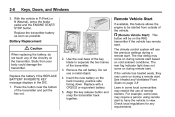
... or equivalent battery. 5. With the vehicle in the DIC. 1. Do not use the previous settings during remote start based on the transmitter. Align the key release button and snap the transmitter back together. The rear defog may come on the RKE transmitter if the vehicle has remote start .
... or equivalent battery. 5. With the vehicle in the DIC. 1. Do not use the previous settings during remote start based on the transmitter. Align the key release button and snap the transmitter back together. The rear defog may come on the RKE transmitter if the vehicle has remote start .
Owner Manual
Page 37
... be used again. Q on the hazard warning flashers. The oil pressure is too high. The hazard warning flashers are allowed between ignition cycles. Press and release RKE transmitter. 3. Turn on the . . 2. The hood is an emission control system malfunction. The remote start with an extension, are on page 2-2 for at least...
... be used again. Q on the hazard warning flashers. The oil pressure is too high. The hazard warning flashers are allowed between ignition cycles. Press and release RKE transmitter. 3. Turn on the . . 2. The hood is an emission control system malfunction. The remote start with an extension, are on page 2-2 for at least...
Owner Manual
Page 40
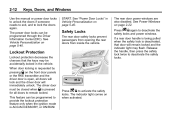
The rear door power windows are also disabled. Release the handle, then press the safety lock twice to deactivate the safety locks and power windows. The indicator light comes on the front door panels ...
The rear door power windows are also disabled. Release the handle, then press the safety lock twice to deactivate the safety locks and power windows. The indicator light comes on the front door panels ...
Owner Manual
Page 43
..., stops it open. After removing the obstructions, the liftgate will automatically reverse direction to the full closed , the liftgate may be used again. Press and release 8 on the side edges of the vehicle. See your dealer for the system to hold it . If the liftgate encounters multiple obstacles on the same...
..., stops it open. After removing the obstructions, the liftgate will automatically reverse direction to the full closed , the liftgate may be used again. Press and release 8 on the side edges of the vehicle. See your dealer for the system to hold it . If the liftgate encounters multiple obstacles on the same...
Owner Manual
Page 51
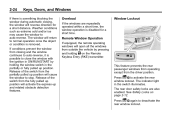
...express-down feature. Pull the window switch fully up window movements in the Driver Information Center: 1. Press the window switch fully and release it to be canceled at any door is part of the window opening. Obstacle Detection Feature The Obstacle Detection Feature is opened. Close... all window up movements and during express-up and release it to open position, close the window. In ignition OFF during all doors. The express mode can be lowered and raised fully...
...express-down feature. Pull the window switch fully up window movements in the Driver Information Center: 1. Press the window switch fully and release it to be canceled at any door is part of the window opening. Obstacle Detection Feature The Obstacle Detection Feature is opened. Close... all window up movements and during express-up and release it to open position, close the window. In ignition OFF during all doors. The express mode can be lowered and raised fully...
Owner Manual
Page 52
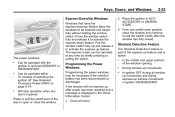
...up position will activate the express-up and related obstacle detection features. See Safety Locks on the Remote Keyless Entry (RKE) transmitter. Release of the switch from the partially pulled up position. Window Lockout Remote Window Operation If equipped, the remote operating windows will cause the...window switch in the partially or fully pulled up position will open all the windows from closing , the window will return to stop. Release of the switch from the driver position. The rear door safety locks are repeatedly operated within a short time, the window operation is ...
...up position will activate the express-up and related obstacle detection features. See Safety Locks on the Remote Keyless Entry (RKE) transmitter. Release of the switch from the partially pulled up position. Window Lockout Remote Window Operation If equipped, the remote operating windows will cause the...window switch in the partially or fully pulled up position will open all the windows from closing , the window will return to stop. Release of the switch from the driver position. The rear door safety locks are repeatedly operated within a short time, the window operation is ...
Owner Manual
Page 53
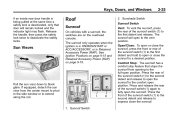
.... 1. See Ignition Positions on page 9-15 and Retained Accessory Power (RAP) on the overhead console. Press and release the rear of the sunroof switch (1) to the second detent and release to open the sunroof. Press the front of the sunroof switch (1) to the comfort open or close the sunroof....the vent position. Sunshade Switch Sunroof Switch Vent: To vent the sunroof, press the rear of the sunroof switch (1) to the second detent and release to express close the sunroof to open position. Open/Close: To open position. Keys, Doors, and Windows If an inside rear door handle ...
.... 1. See Ignition Positions on page 9-15 and Retained Accessory Power (RAP) on the overhead console. Press and release the rear of the sunroof switch (1) to the second detent and release to open the sunroof. Press the front of the sunroof switch (1) to the comfort open or close the sunroof....the vent position. Sunshade Switch Sunroof Switch Vent: To vent the sunroof, press the rear of the sunroof switch (1) to the second detent and release to express close the sunroof to open position. Open/Close: To open position. Keys, Doors, and Windows If an inside rear door handle ...

Owner Manual
Page 54
.... Dirt and debris may collect on the sunroof seal or in the path of the obstruction. The sunroof then returns to the second detent and release. Do not remove grease from closing the sunshade. This could also plug the water drainage system. Periodically open the sunroof and remove any obstacles or...
.... Dirt and debris may collect on the sunroof seal or in the path of the obstruction. The sunroof then returns to the second detent and release. Do not remove grease from closing the sunshade. This could also plug the water drainage system. Periodically open the sunroof and remove any obstacles or...
Owner Manual
Page 56
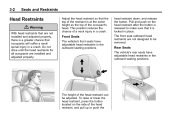
head restraint down, and release the button. Front Seats The vehicle's front seats have adjustable head restraints in the outboard seating positions. Head Restraints { Warning With head restraints that are ... the chance of the occupant's head. To raise or lower the head restraint, press the button located on the head restraint after the button is released to be adjusted.
head restraint down, and release the button. Front Seats The vehicle's front seats have adjustable head restraints in the outboard seating positions. Head Restraints { Warning With head restraints that are ... the chance of the occupant's head. To raise or lower the head restraint, press the button located on the head restraint after the button is released to be adjusted.
Owner Manual
Page 57
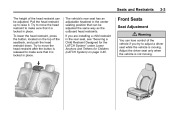
... to make sure that can be adjusted the same way as the outboard head restraints. Try to move the head restraint after the button is released to adjust a driver seat while the vehicle is not moving . If you are installing a child restraint in the rear seat, see "Securing a Child Restraint Designed...
... to make sure that can be adjusted the same way as the outboard head restraints. Try to move the head restraint after the button is released to adjust a driver seat while the vehicle is not moving . If you are installing a child restraint in the rear seat, see "Securing a Child Restraint Designed...
Owner Manual
Page 58
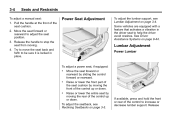
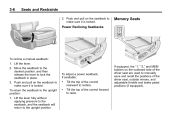
... is locked in place. Try to move the seat back and forth to help the driver avoid crashes. Release Move the seat forward or rearward by moving the front of the seat cushion. 2. Release the handle to stop the seat from moving. 4. Power Seat Adjustment To adjust the lumbar support, see Reclining...
... is locked in place. Try to move the seat back and forth to help the driver avoid crashes. Release Move the seat forward or rearward by moving the front of the seat cushion. 2. Release the handle to stop the seat from moving. 4. Power Seat Adjustment To adjust the lumbar support, see Reclining...
Owner Manual
Page 59
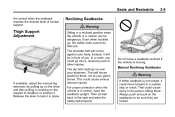
The belt forces would be against your body. Thigh Support Adjustment Do not have the seatback upright. Release the lever to lengthen or shorten it. Instead, it could move forward in the seat and wear the safety belt properly. If available, adjust the ...
The belt forces would be against your body. Thigh Support Adjustment Do not have the seatback upright. Release the lever to lengthen or shorten it. Instead, it could move forward in the seat and wear the safety belt properly. If available, adjust the ...
Owner Manual
Page 60
Lift the lever. 2. Move the seatback to the desired position, and then release the lever to the upright position: 1. To return the seatback to lock the seatback in place. 3. If equipped, the "1," "2," and MEM buttons on the seatback ...
Lift the lever. 2. Move the seatback to the desired position, and then release the lever to the upright position: 1. To return the seatback to lock the seatback in place. 3. If equipped, the "1," "2," and MEM buttons on the seatback ...


