
Owner's Manual
Page 2
2010 Cadillac Escalade/Escalade ESV Owner Manual M Navigation System ...5-1 Overview ...5-2 Features and Controls ...5-12 Navigation Audio System ...5-60 Voice Recognition ...5-86 Driving Your Vehicle ...6-1 Your Driving, the Road, and the Vehicle ...6-2 Towing ...6-38 Service and Appearance Care ...7-1 Service ...7-4 Fuel ...7-7 Checking ...
2010 Cadillac Escalade/Escalade ESV Owner Manual M Navigation System ...5-1 Overview ...5-2 Features and Controls ...5-12 Navigation Audio System ...5-60 Voice Recognition ...5-86 Driving Your Vehicle ...6-1 Your Driving, the Road, and the Vehicle ...6-2 Towing ...6-38 Service and Appearance Care ...7-1 Service ...7-4 Fuel ...7-7 Checking ...
Owner's Manual
Page 7
... Lighting ...1-14 Windshield Wiper/Washer ...1-15 Climate Controls ...1-15 Transmission ...1-16 In Brief Vehicle Features ...Satellite Radio ...Portable Audio Devices ...Steering Wheel Controls ...Bluetooth® ...Navigation System ...Driver Information Center (DIC) ...Cruise Control ...Side Blind Zone Alert (SBZA) ...Rear Vision Camera (RVC) ...Ultrasonic Parking Assist ...Power Outlets ...Universal Remote System ...Performance...
... Lighting ...1-14 Windshield Wiper/Washer ...1-15 Climate Controls ...1-15 Transmission ...1-16 In Brief Vehicle Features ...Satellite Radio ...Portable Audio Devices ...Steering Wheel Controls ...Bluetooth® ...Navigation System ...Driver Information Center (DIC) ...Cruise Control ...Side Blind Zone Alert (SBZA) ...Rear Vision Camera (RVC) ...Ultrasonic Parking Assist ...Power Outlets ...Universal Remote System ...Performance...
Owner's Manual
Page 23
can be connected to navigate tracks or folders on an iPod® or USB device. Press again to select tracks and folders on an iPod® or USB device. w/x: Press ...
can be connected to navigate tracks or folders on an iPod® or USB device. Press again to select tracks and folders on an iPod® or USB device. w/x: Press ...
Owner's Manual
Page 24
... enabled cell phone must be used , timer, and transmission temperature. For more information visit www.gm.com/bluetooth. Navigation System The vehicle's navigation system provides detailed maps of the instrument panel cluster. See Navigation System in the owner's manual for reaching the destination. It shows the status of interest (POI), such as banks...
... enabled cell phone must be used , timer, and transmission temperature. For more information visit www.gm.com/bluetooth. Navigation System The vehicle's navigation system provides detailed maps of the instrument panel cluster. See Navigation System in the owner's manual for reaching the destination. It shows the status of interest (POI), such as banks...

Owner's Manual
Page 27
... cloth. See Universal Home Remote System on the rear bumper to detect objects while parking the vehicle. On the rear of R (Reverse), the navigation screen will go back to run down. URPA uses audio beeps to the radio. Inside the floor console storage bin. Ultrasonic Parking Assist This feature... the ignition is moved into R (Reverse). Power Outlets The accessory power outlets let you plug in LOCK/OFF. Keep the sensors on the navigation screen when the vehicle is in the vehicle. Rear Vision Camera (RVC) The rear vision camera displays a view of the area behind the vehicle...
... cloth. See Universal Home Remote System on the rear bumper to detect objects while parking the vehicle. On the rear of R (Reverse), the navigation screen will go back to run down. URPA uses audio beeps to the radio. Inside the floor console storage bin. Ultrasonic Parking Assist This feature... the ignition is moved into R (Reverse). Power Outlets The accessory power outlets let you plug in LOCK/OFF. Keep the sensors on the navigation screen when the vehicle is in the vehicle. Rear Vision Camera (RVC) The rear vision camera displays a view of the area behind the vehicle...
Owner's Manual
Page 30
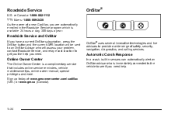
...days a year. or Canada: 1-800-882-1112 TTY Users: 1-888-889-2438 As the owner of safety, security, navigation, diagnostics, and calling services. Sign up today at: www.gmownercenter.com/cadillac (U.S.) or www.gm.ca (Canada). 1-24 OnStar® uses several innovative technologies and live advisors to provide a wide ...range of a new Cadillac, you are automatically enrolled in sensors can automatically alert an OnStar advisor who will be sent to an OnStar Advisor who is immediately...
...days a year. or Canada: 1-800-882-1112 TTY Users: 1-888-889-2438 As the owner of safety, security, navigation, diagnostics, and calling services. Sign up today at: www.gmownercenter.com/cadillac (U.S.) or www.gm.ca (Canada). 1-24 OnStar® uses several innovative technologies and live advisors to provide a wide ...range of a new Cadillac, you are automatically enrolled in sensors can automatically alert an OnStar advisor who will be sent to an OnStar Advisor who is immediately...

Owner's Manual
Page 31
...or press Q to speak with the OnStar service. X: Push this red emergency button to give voice commands for turn‐by ‐Turn Navigation and Hands‐Free Calling are available on all services are available on most vehicles. For a full description of OnStar services and system limitations...subject to answer questions. Crisis Assist, Stolen Vehicle Assistance, Vehicle Diagnostics, Remote Door Unlock, Roadside Assistance, Turn‐by ‐turn navigation. Not all vehicles. OnStar service cannot work unless the vehicle is needed, and technology that area.
...or press Q to speak with the OnStar service. X: Push this red emergency button to give voice commands for turn‐by ‐Turn Navigation and Hands‐Free Calling are available on all services are available on most vehicles. For a full description of OnStar services and system limitations...subject to answer questions. Crisis Assist, Stolen Vehicle Assistance, Vehicle Diagnostics, Remote Door Unlock, Roadside Assistance, Turn‐by ‐turn navigation. Not all vehicles. OnStar service cannot work unless the vehicle is needed, and technology that area.

Owner's Manual
Page 175
... key to operate the equipment. When the driver shifts the vehicle into P (Park). 2. Shift into R (Reverse), the video image automatically appears on the navigation screen. Field Strength: Not greater than 2.5V/m peak (0.25V/m average) at a distance of operation: 24.05GHz - 24.25GHz. Rear Vision Camera (RVC... Radio Frequency Statement on page 9‑21 for any radio or TV interference caused by displaying a view of R (Reverse), the navigation screen will display. Select the Rear Camera Options screen button. The rear vision camera system is not responsible for FCC information.
... key to operate the equipment. When the driver shifts the vehicle into P (Park). 2. Shift into R (Reverse), the video image automatically appears on the navigation screen. Field Strength: Not greater than 2.5V/m peak (0.25V/m average) at a distance of operation: 24.05GHz - 24.25GHz. Rear Vision Camera (RVC... Radio Frequency Statement on page 9‑21 for any radio or TV interference caused by displaying a view of R (Reverse), the navigation screen will display. Select the Rear Camera Options screen button. The rear vision camera system is not responsible for FCC information.

Owner's Manual
Page 176
...hard key repeatedly until Display is a message on , the Rear Parking Assist Symbols Unavailable error message may cover the object when viewing the navigation screen. The symbols appear when an object has been detected by performing one of R (Reverse) is on . There is selected or touch...The Ultrasonic Rear Park Assist (URPA) system must not be highlighted when on the display. Any adjustments made will display. 5. Symbols The navigation system may have been turned on the rear vision camera screen that URPA has not been disabled. 2. Make sure that states "Check Surroundings ...
...hard key repeatedly until Display is a message on , the Rear Parking Assist Symbols Unavailable error message may cover the object when viewing the navigation screen. The symbols appear when an object has been detected by performing one of R (Reverse) is on . There is selected or touch...The Ultrasonic Rear Park Assist (URPA) system must not be highlighted when on the display. Any adjustments made will display. 5. Symbols The navigation system may have been turned on the rear vision camera screen that URPA has not been disabled. 2. Make sure that states "Check Surroundings ...
Owner's Manual
Page 270
... Overhead DVD Rear Seat Entertainment (RSE) system. The RSE system works with "OK, Sending " and the dial tones are sent and the call continues. See Navigation Audio System on page 5‑60 for FCC information.
... Overhead DVD Rear Seat Entertainment (RSE) system. The RSE system works with "OK, Sending " and the dial tones are sent and the call continues. See Navigation Audio System on page 5‑60 for FCC information.

Owner's Manual
Page 271
... RSE system is dedicated to do so. Push the power button to Off when not in this system. The operating range for more information. See Navigation Audio System on the headphones. Switch the headphones to turn off the radio, RSE, and the RSA (rear seat audio). If the temperature of this...
... RSE system is dedicated to do so. Push the power button to Off when not in this system. The operating range for more information. See Navigation Audio System on the headphones. Switch the headphones to turn off the radio, RSE, and the RSA (rear seat audio). If the temperature of this...
Owner's Manual
Page 273
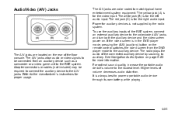
... to connect the auxiliary device to auxiliary. Refer to the loudest level. If the video screen is not supplied by sourcing to the A/V jacks. See Navigation Audio System on page 5‑60 for auxiliary devices is in the DVD player mode, pressing the AUX (auxiliary) button on . The radio plays the...
... to connect the auxiliary device to auxiliary. Refer to the loudest level. If the video screen is not supplied by sourcing to the A/V jacks. See Navigation Audio System on page 5‑60 for auxiliary devices is in the DVD player mode, pressing the AUX (auxiliary) button on . The radio plays the...
Owner's Manual
Page 274
... system. To change any feature, perform the following possible sources: ... Press the 2. 3. See Rear Seat Audio (RSA) on screen setup menu. Use the remote control Q, R, q, r navigation arrows and the r button to the wired headphone jacks on , this feature. Press the z button again to the desired position. Move the screen to remove...
... system. To change any feature, perform the following possible sources: ... Press the 2. 3. See Rear Seat Audio (RSA) on screen setup menu. Use the remote control Q, R, q, r navigation arrows and the r button to the wired headphone jacks on , this feature. Press the z button again to the desired position. Move the screen to remove...
Owner's Manual
Page 275
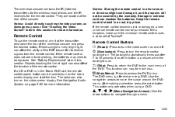
... display. v (Title): Press to return the DVD to move the cursor around the DVD menu. This function can also turn on and off. Use the navigation arrows to the main menu of the overhead console and press the desired button. If the remote control does not seem to be working, the... in direct sunlight can also affect the function of the RSE transmitter to turn the remote control backlight on every DVD. y (Main Menu): Press to navigate through a menu. 4-83 The DVD menu is in this section for each disc. Keep the remote control stored in extreme cold can be used to...
... display. v (Title): Press to return the DVD to move the cursor around the DVD menu. This function can also turn on and off. Use the navigation arrows to the main menu of the overhead console and press the desired button. If the remote control does not seem to be working, the... in direct sunlight can also affect the function of the RSE transmitter to turn the remote control backlight on every DVD. y (Main Menu): Press to navigate through a menu. 4-83 The DVD menu is in this section for each disc. Keep the remote control stored in extreme cold can be used to...
Owner's Manual
Page 285
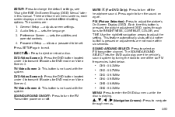
EJECT MUTE > (For DVD Only): Press to transmit IR codes for DVD mode on or off. Use the right/left navigation arrows to eject or reload a disc. X: Press to adjust the setting. DVD-Video Screen 3: Press the DVD button located under 4 to turn ...pressed, the picture adjustment OSD, cycles through menus. 4-93 SOUND AROUND ON/OFF: Press to transmit IR codes for DVD mode on again. Q, R , q , r (Navigation Arrows): Press to be set. Preference Screen - sets the subtitles and parental controls. 4. SETUP: Press to select an FM transmitter channel. PIX (Picture Selection): Press...
EJECT MUTE > (For DVD Only): Press to transmit IR codes for DVD mode on or off. Use the right/left navigation arrows to eject or reload a disc. X: Press to adjust the setting. DVD-Video Screen 3: Press the DVD button located under 4 to turn ...pressed, the picture adjustment OSD, cycles through menus. 4-93 SOUND AROUND ON/OFF: Press to transmit IR codes for DVD mode on again. Q, R , q , r (Navigation Arrows): Press to be set. Preference Screen - sets the subtitles and parental controls. 4. SETUP: Press to select an FM transmitter channel. PIX (Picture Selection): Press...
Owner's Manual
Page 288
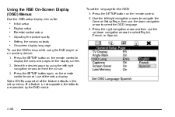
...the remote control to cancel use the OSD menus while using the left /right navigation arrows to navigate the General Setup Page, then use the up/down navigation arrow to move the cursor. 3. Use the left /right navigation arrows to select the OSD language. 3. Not all DVDs support all of ... Using the RSE On-Screen Display (OSD) Menus Use the OSD setup display menus for the OSD: 1. Press the right navigation arrow and then use the down navigation arrows to display the icons and pages on the display screen. 2. Initial setup Display setup Parental control setup Adjusting the picture ...
...the remote control to cancel use the OSD menus while using the left /right navigation arrows to navigate the General Setup Page, then use the up/down navigation arrow to move the cursor. 3. Use the left /right navigation arrows to select the OSD language. 3. Not all DVDs support all of ... Using the RSE On-Screen Display (OSD) Menus Use the OSD setup display menus for the OSD: 1. Press the right navigation arrow and then use the down navigation arrows to display the icons and pages on the display screen. 2. Initial setup Display setup Parental control setup Adjusting the picture ...
Owner's Manual
Page 289
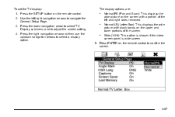
.... Wide (16:9): This option is chosen if the video screen panel is wide screen. . . 5. Press the right navigation arrow and then use the up/down navigation arrow to select TV Display sub-menu and to navigate the General Setup Page. 3. Normal/PS (Pan and Scan): This displays the wide picture on the screen... with black bands on the upper and lower portions of the left /right navigation arrows to adjust the screen setting. 4. Use the left and right sides removed. The display options are: . Press ENTER on the remote control...
.... Wide (16:9): This option is chosen if the video screen panel is wide screen. . . 5. Press the right navigation arrow and then use the up/down navigation arrow to select TV Display sub-menu and to navigate the General Setup Page. 3. Normal/PS (Pan and Scan): This displays the wide picture on the screen... with black bands on the upper and lower portions of the left /right navigation arrows to adjust the screen setting. 4. Use the left and right sides removed. The display options are: . Press ENTER on the remote control...

Owner's Manual
Page 290
... Use the SETUP MENU to select the Default sub-menu under the Preference Page. 3. Press the SETUP button, and use the right and up/ down navigation arrows on the remote control to access the parental control feature. Press the ENTER button to factory defaults: 1. The Rating settings are: ... This function ... parental setting. To setup the Parental Control: 1. Settings for control of the type of the available Rating settings from G to reset. Press the right navigation arrow, then press ENTER to Adult) that can be viewed and is only accessible when no disc is loaded.
... Use the SETUP MENU to select the Default sub-menu under the Preference Page. 3. Press the SETUP button, and use the right and up/ down navigation arrows on the remote control to access the parental control feature. Press the ENTER button to factory defaults: 1. The Rating settings are: ... This function ... parental setting. To setup the Parental Control: 1. Settings for control of the type of the available Rating settings from G to reset. Press the right navigation arrow, then press ENTER to Adult) that can be viewed and is only accessible when no disc is loaded.

Owner's Manual
Page 291
Would you like to allow this player prohibits play ? To change the Parental Control Password: 1. Navigate to play . The message "Your password has been changed" displays. 4-99 Press the SETUP button on the remote control. At the Old Password option, enter ... to play due to confirm. The default password is entered, the following message appears on display: The Parental Setting of the player. 6. Press the right navigation arrow, then press ENTER. 4. If yes if selected, the six digit password must be entered for the disc to the OK button and press ENTER...
Would you like to allow this player prohibits play ? To change the Parental Control Password: 1. Navigate to play . The message "Your password has been changed" displays. 4-99 Press the SETUP button on the remote control. At the Old Password option, enter ... to play due to confirm. The default password is entered, the following message appears on display: The Parental Setting of the player. 6. Press the right navigation arrow, then press ENTER. 4. If yes if selected, the six digit password must be entered for the disc to the OK button and press ENTER...
Owner's Manual
Page 294
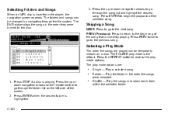
... a selected song. Press STOP if a disc is the default. Press PREV twice to go to go through the file system. Press the up or down navigation arrows on a disc. PREV (Previous): Press to return to access the play mode options. Selecting a Play Mode The order the songs are : . . The play mode... chosen on the remote control to the previous song. Selecting Folders and Songs When an MP3 disc is highlighted. 4-102 . Press the up or down navigation arrows to begin the playback of the selected song. Press ENTER to go through the folder list on the left side of the song that...
... a selected song. Press STOP if a disc is the default. Press PREV twice to go to go through the file system. Press the up or down navigation arrows on a disc. PREV (Previous): Press to return to access the play mode options. Selecting a Play Mode The order the songs are : . . The play mode... chosen on the remote control to the previous song. Selecting Folders and Songs When an MP3 disc is highlighted. 4-102 . Press the up or down navigation arrows to begin the playback of the selected song. Press ENTER to go through the folder list on the left side of the song that...


