
Owner's Manual
Page 1
2010 Cadillac DTS Owner Manual In Brief ...1-1 Instrument Panel ...1-2 Initial Drive Information ...1-4 Vehicle Features ...1-15 Performance and Maintenance ...1-21 Seats and Restraint System ...2-1 Head Restraints ...2-2 Front Seats ...2-3 Rear Seats ...2-10 Safety Belts ...2-12 Child Restraints ...2-33 Airbag System ...2-58 Restraint System Check ...2-74 Features and Controls ...3-1 Keys ...3-3 Doors and Locks ...3-9 Windows ...3-14 Theft-Deterrent Systems ...3-18...
2010 Cadillac DTS Owner Manual In Brief ...1-1 Instrument Panel ...1-2 Initial Drive Information ...1-4 Vehicle Features ...1-15 Performance and Maintenance ...1-21 Seats and Restraint System ...2-1 Head Restraints ...2-2 Front Seats ...2-3 Rear Seats ...2-10 Safety Belts ...2-12 Child Restraints ...2-33 Airbag System ...2-58 Restraint System Check ...2-74 Features and Controls ...3-1 Keys ...3-3 Doors and Locks ...3-9 Windows ...3-14 Theft-Deterrent Systems ...3-18...
Owner's Manual
Page 3
...in the manual and the page number where it appears in this manual. This manual describes features that you did not purchase or due to changes subsequent to confirm each of the features found . Keep this manual in Canada, substitute the name "General Motors of Canada Limited"... guide en français auprès du concessionnaire ou à l'adresse suivante: GENERAL MOTORS, GM, the GM Emblem, CADILLAC, the CADILLAC Crest & Wreath, and the name DTS are options that may or may not be found on your specific vehicle either because they are registered trademarks of General...
...in the manual and the page number where it appears in this manual. This manual describes features that you did not purchase or due to changes subsequent to confirm each of the features found . Keep this manual in Canada, substitute the name "General Motors of Canada Limited"... guide en français auprès du concessionnaire ou à l'adresse suivante: GENERAL MOTORS, GM, the GM Emblem, CADILLAC, the CADILLAC Crest & Wreath, and the name DTS are options that may or may not be found on your specific vehicle either because they are registered trademarks of General...

Owner's Manual
Page 7
... Passenger Airbag ...1-9 Mirror Adjustment ...1-10 Steering Wheel Adjustment ...1-11 Interior Lighting ...1-12 Exterior Lighting ...1-12 Windshield Wiper/Washer ...1-13 Climate Controls ...1-14 In Brief Vehicle Features ...1-15 Radio(s) ...1-15 Satellite Radio ...1-17 Portable Audio Devices ...1-17 Steering Wheel Controls ...1-17 Bluetooth® ...1-18 Navigation System ...1-18 Driver Information Center (DIC) ...1-18...
... Passenger Airbag ...1-9 Mirror Adjustment ...1-10 Steering Wheel Adjustment ...1-11 Interior Lighting ...1-12 Exterior Lighting ...1-12 Windshield Wiper/Washer ...1-13 Climate Controls ...1-14 In Brief Vehicle Features ...1-15 Radio(s) ...1-15 Satellite Radio ...1-17 Portable Audio Devices ...1-17 Steering Wheel Controls ...1-17 Bluetooth® ...1-18 Navigation System ...1-18 Driver Information Center (DIC) ...1-18...
Owner's Manual
Page 10
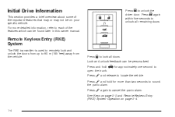
... The RKE transmitter is used to remotely lock and unlock the doors from up to locate the vehicle. Press L again to each of the important features that may or may not be on page 3-4. 1-4 Press and hold for approximately one second to lock all remaining doors. For more than two seconds... the panic alarm. V for more detailed information, refer to cancel the panic alarm. Initial Drive Information This section provides a brief overview about some of the features which can be personalized. Press L and hold open the trunk.
... The RKE transmitter is used to remotely lock and unlock the doors from up to locate the vehicle. Press L again to each of the important features that may or may not be on page 3-4. 1-4 Press and hold for approximately one second to lock all remaining doors. For more than two seconds... the panic alarm. V for more detailed information, refer to cancel the panic alarm. Initial Drive Information This section provides a brief overview about some of the features which can be personalized. Press L and hold open the trunk.
Owner's Manual
Page 11
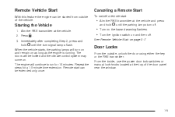
...;ashers. • Turn the ignition switch on page 3-7. 3. Door Locks From the outside of the door panel near the window. 1-5 Remote Vehicle Start With this feature the engine can be extended only once. See Remote Vehicle Start on and then off . From the inside, use the power door lock switches or...
...;ashers. • Turn the ignition switch on page 3-7. 3. Door Locks From the outside of the door panel near the window. 1-5 Remote Vehicle Start With this feature the engine can be extended only once. See Remote Vehicle Start on and then off . From the inside, use the power door lock switches or...
Owner's Manual
Page 14
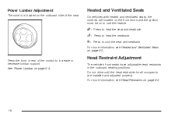
... are installed and adjusted properly. Head Restraint Adjustment The vehicle's front seats have adjustable head restraints in the outboard seating positions. Press to use the feature.
... are installed and adjusted properly. Head Restraint Adjustment The vehicle's front seats have adjustable head restraints in the outboard seating positions. Press to use the feature.

Owner's Manual
Page 16
... door armrest. Mirror Adjustment Exterior Mirrors Controls for the glare of lights from behind you. The vehicle may also have an automatic dimming feature on the automatic dimming inside rearview mirror. Press the selector switch (A) or (B) to choose either the left or right outside power folding... mirrors are located on page 3-36. This feature is started. To fold the mirrors: Press the selector switch (C) to fold the mirrors out, then press (D) to the desired direction. Automatic...
... door armrest. Mirror Adjustment Exterior Mirrors Controls for the glare of lights from behind you. The vehicle may also have an automatic dimming feature on the automatic dimming inside rearview mirror. Press the selector switch (A) or (B) to choose either the left or right outside power folding... mirrors are located on page 3-36. This feature is started. To fold the mirrors: Press the selector switch (C) to fold the mirrors out, then press (D) to the desired direction. Automatic...
Owner's Manual
Page 17
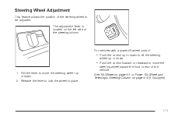
... 4-3 or Power Tilt Wheel and Telescopic Steering Column on the left side of the vehicle. 1. Pull the lever to be adjusted. Steering Wheel Adjustment This feature allows the position of the steering wheel to move the steering wheel toward the front or rear of the steering column. Release the lever to...
... 4-3 or Power Tilt Wheel and Telescopic Steering Column on the left side of the vehicle. 1. Pull the lever to be adjusted. Steering Wheel Adjustment This feature allows the position of the steering wheel to move the steering wheel toward the front or rear of the steering column. Release the lever to...
Owner's Manual
Page 21
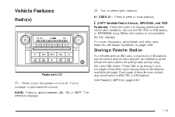
... Audio System(s) on page 4-92. Press to select radio stations. The selection displays. Vehicle Features Radio(s) a: 4 Turn to turn the system on and off. Press FAV to go through up to switch between AM, FM, or XM™. BAND: Press ... information is not available, No Info displays. Press to seek or scan stations. © SEEK ¨: (XM™ Satellite Radio Service, MP3/WMA, and RDS Features): Press this button to display additional text information related to increase or decrease the volume. Turn to the current FM-RDS or XM station, or...
... Audio System(s) on page 4-92. Press to select radio stations. The selection displays. Vehicle Features Radio(s) a: 4 Turn to turn the system on and off. Press FAV to go through up to switch between AM, FM, or XM™. BAND: Press ... information is not available, No Info displays. Press to seek or scan stations. © SEEK ¨: (XM™ Satellite Radio Service, MP3/WMA, and RDS Features): Press this button to display additional text information related to increase or decrease the volume. Turn to the current FM-RDS or XM station, or...

Owner's Manual
Page 25
... Press to the left of the steering wheel. 3: T: U: Press to scroll through the vehicle information displays. Vehicle Customization Some vehicle features can be programmed by using the DIC buttons on your vehicle. Language Door Lock and Unlock Settings Lighting Chime Volume Memory Settings Remote Start... See DIC Vehicle Customization on the instrument panel to scroll through the trip and fuel displays. These features include: The DIC buttons are located on page 4-80. 1-19 See DIC Vehicle Customization on page 4-61. y z: Press to...
... Press to the left of the steering wheel. 3: T: U: Press to scroll through the vehicle information displays. Vehicle Customization Some vehicle features can be programmed by using the DIC buttons on your vehicle. Language Door Lock and Unlock Settings Lighting Chime Volume Memory Settings Remote Start... See DIC Vehicle Customization on the instrument panel to scroll through the trip and fuel displays. These features include: The DIC buttons are located on page 4-80. 1-19 See DIC Vehicle Customization on page 4-61. y z: Press to...

Owner's Manual
Page 30
... used, the vehicle also sends OnStar the vehicle's GPS location so they can record and transmit vehicle information. Not all times. When the virtual advisor feature of OnStar services and system limitations, see the OnStar Owner's Guide or visit www.onstar.com (U.S.) or www.onstar.ca (Canada), contact OnStar at all...
... used, the vehicle also sends OnStar the vehicle's GPS location so they can record and transmit vehicle information. Not all times. When the virtual advisor feature of OnStar services and system limitations, see the OnStar Owner's Guide or visit www.onstar.com (U.S.) or www.onstar.ca (Canada), contact OnStar at all...

Owner's Manual
Page 35
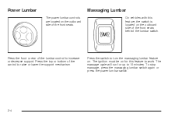
... located on the head restraint after the button is locked in place. The front seats also have power reclining seatbacks. On vehicles with the memory feature, memory settings can be removed. • Move the seat forward or rearward by sliding the control forward or rearward. • Raise or lower the front...
... located on the head restraint after the button is locked in place. The front seats also have power reclining seatbacks. On vehicles with the memory feature, memory settings can be removed. • Move the seat forward or rearward by sliding the control forward or rearward. • Raise or lower the front...
Owner's Manual
Page 36
... work. The ignition must be on for up to turn the massaging lumbar feature on. To stop massage, press the massaging lumbar switch again or press the power lumbar switch. 2-4 Press the switch to 10 minutes. Press the top ... or lower the support mechanism. Press the front or rear of the control to increase or decrease support. The massage cycle will run for this feature, the switch is located on the outboard side of the front seats. Power Lumbar The power lumbar controls are located on the outboard side of...
... work. The ignition must be on for up to turn the massaging lumbar feature on. To stop massage, press the massaging lumbar switch again or press the power lumbar switch. 2-4 Press the switch to 10 minutes. Press the top ... or lower the support mechanism. Press the front or rear of the control to increase or decrease support. The massage cycle will run for this feature, the switch is located on the outboard side of the front seats. Power Lumbar The power lumbar controls are located on the outboard side of...

Owner's Manual
Page 37
... the high setting if it is on. A column of three lights next to turn off. When you press the button, the feature will turn the heated seat feature back on, press the desired button. Driver's Side Buttons shown J (Heated Seat Cushion and Seatback): Press this button to cool ...the seat cushion and seatback. 2-5 H (Ventilated Seat Cushion and Seatback): Press this button to use the feature. See "Remote Vehicle Start" under Remote Keyless Entry (RKE) System Operation on at the highest setting. There are located on the desired...
... the high setting if it is on. A column of three lights next to turn off. When you press the button, the feature will turn the heated seat feature back on, press the desired button. Driver's Side Buttons shown J (Heated Seat Cushion and Seatback): Press this button to cool ...the seat cushion and seatback. 2-5 H (Ventilated Seat Cushion and Seatback): Press this button to use the feature. See "Remote Vehicle Start" under Remote Keyless Entry (RKE) System Operation on at the highest setting. There are located on the desired...

Owner's Manual
Page 38
... seat, including the seatback recliner and lumbar, both outside mirror, and steering wheel position if the vehicle has the power tilt wheel and telescopic steering feature.
... seat, including the seatback recliner and lumbar, both outside mirror, and steering wheel position if the vehicle has the power tilt wheel and telescopic steering feature.
Owner's Manual
Page 39
...DIC, automatic seat and power telescopic steering column movement will move back, and if the vehicle has the power tilt wheel and telescopic steering feature, the power telescopic steering column will occur when the key is removed from the ignition. You will occur. Easy Exit Recall The control...recalling, see DIC Vehicle Customization on page 4-80. 2-7 If you use the RKE transmitter to enter the vehicle and the remote recall memory feature is on, automatic seat and mirror movement will hear a single beep. If something has blocked the driver seat and/or the steering column ...
...DIC, automatic seat and power telescopic steering column movement will move back, and if the vehicle has the power tilt wheel and telescopic steering feature, the power telescopic steering column will occur when the key is removed from the ignition. You will occur. Easy Exit Recall The control...recalling, see DIC Vehicle Customization on page 4-80. 2-7 If you use the RKE transmitter to enter the vehicle and the remote recall memory feature is on, automatic seat and mirror movement will hear a single beep. If something has blocked the driver seat and/or the steering column ...

Owner's Manual
Page 42
...turn on . I (Heated Seatback): Press to turn on . When you press the button, the feature will display to turn on the desired feature. Press a button to show which feature is the lowest. Each feature has three temperature settings indicated by three lights next to turn off. A light on that button ...will go down one is on the heated seat and seatback. 2-10 Each time you press a button, the feature will turn on at the highest setting. J (Heated Seat and Seatback): Press to the buttons. Rear Seats Heated Seats Your vehicle may have ...
...turn on . I (Heated Seatback): Press to turn on . When you press the button, the feature will display to turn on the desired feature. Press a button to show which feature is the lowest. Each feature has three temperature settings indicated by three lights next to turn off. A light on that button ...will go down one is on the heated seat and seatback. 2-10 Each time you press a button, the feature will turn on at the highest setting. J (Heated Seat and Seatback): Press to the buttons. Rear Seats Heated Seats Your vehicle may have ...
Owner's Manual
Page 43
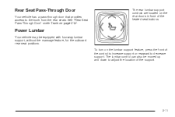
... the front of the support. 2-11 The lumbar control can also be equipped with four-way lumbar support, without the massage feature, for the outboard rear seat positions. The rear lumbar support controls are located on page 3-12. Power Lumbar Your vehicle may be moved up and ...
... the front of the support. 2-11 The lumbar control can also be equipped with four-way lumbar support, without the massage feature, for the outboard rear seat positions. The rear lumbar support controls are located on page 3-12. Power Lumbar Your vehicle may be moved up and ...

Owner's Manual
Page 58
... let the belt go fully into the buckle until it . If the latch plate will not go back all the way, the child restraint locking feature may be quickly unbuckled if necessary. 4. Do not let it is right for you . Push the latch plate into the buckle, check if the..." later in the Index. 2. If equipped with a shoulder belt height adjuster, move it to make sure it get twisted. Engaging the child restraint locking feature in the vehicle have a lap-shoulder except for more information. Position the release button on page 2-32 for the center front passenger position (if equipped...
... let the belt go fully into the buckle until it . If the latch plate will not go back all the way, the child restraint locking feature may be quickly unbuckled if necessary. 4. Do not let it is right for you . Push the latch plate into the buckle, check if the..." later in the Index. 2. If equipped with a shoulder belt height adjuster, move it to make sure it get twisted. Engaging the child restraint locking feature in the vehicle have a lap-shoulder except for more information. Position the release button on page 2-32 for the center front passenger position (if equipped...
Owner's Manual
Page 98
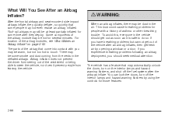
... the interior lamps and hazard warning flashers by opening a window or a door. The vehicle has a feature that come into contact with a history of the vehicle after the airbags in flated for those features. 2-66 Airbag in the vehicle should seek medical attention. What Will You See After an Airbag In...
... the interior lamps and hazard warning flashers by opening a window or a door. The vehicle has a feature that come into contact with a history of the vehicle after the airbags in flated for those features. 2-66 Airbag in the vehicle should seek medical attention. What Will You See After an Airbag In...
