Owner's Manual
Page 1
2009 Cadillac XLR/XLR-V Owner Manual Seats and Restraint System ...1-1 Front Seats ...1-2 Safety Belts ...1-6 Child Restraints ...1-23 Airbag System ...1-38 Restraint System Check ...1-52 Features and Controls...20 Starting and Operating Your Vehicle ...2-24 Mirrors ...2-38 Object Detection Systems ...2-40 OnStar® System ...2-42 Universal Home Remote System ...2-45 Storage Areas ...2-53 Retractable Hardtop ...2-54 M Instrument Panel ...3-1 Instrument Panel Overview ...3-4 Climate Controls ...3-36 Warning Lights, Gages, and Indicators ...3-41 Driver Information Center (DIC) ...3-57 Trip ...
2009 Cadillac XLR/XLR-V Owner Manual Seats and Restraint System ...1-1 Front Seats ...1-2 Safety Belts ...1-6 Child Restraints ...1-23 Airbag System ...1-38 Restraint System Check ...1-52 Features and Controls...20 Starting and Operating Your Vehicle ...2-24 Mirrors ...2-38 Object Detection Systems ...2-40 OnStar® System ...2-42 Universal Home Remote System ...2-45 Storage Areas ...2-53 Retractable Hardtop ...2-54 M Instrument Panel ...3-1 Instrument Panel Overview ...3-4 Climate Controls ...3-36 Warning Lights, Gages, and Indicators ...3-41 Driver Information Center (DIC) ...3-57 Trip ...

Owner's Manual
Page 60
Section 2 Features and Controls Center Console Storage ...2-53 Floor Mats ...2-53 Rear Storage Area ...2-54 Convenience Net ...2-54 Retractable Hardtop ...2-54 Lowering the Retractable Hardtop ...2-55 Raising the Retractable Hardtop ...2-56 Object Detection Systems ...2-40 Ultrasonic Rear Parking Assist (URPA) ...2-40 OnStar® System ...2-42 Universal Home Remote System ...2-45 Universal Home Remote System Operation ...2-46 Storage Areas ...2-53 Glove Box ...2-53 Cupholders ...2-53 2-2
Section 2 Features and Controls Center Console Storage ...2-53 Floor Mats ...2-53 Rear Storage Area ...2-54 Convenience Net ...2-54 Retractable Hardtop ...2-54 Lowering the Retractable Hardtop ...2-55 Raising the Retractable Hardtop ...2-56 Object Detection Systems ...2-40 Ultrasonic Rear Parking Assist (URPA) ...2-40 OnStar® System ...2-42 Universal Home Remote System ...2-45 Universal Home Remote System Operation ...2-46 Storage Areas ...2-53 Glove Box ...2-53 Cupholders ...2-53 2-2

Owner's Manual
Page 78
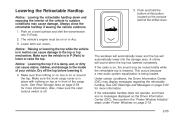
Theft-Deterrent Systems Vehicle theft is big business, especially in some cities. Sun Visors Notice: Raising or lowering the retractable hardtop with the power door lock switch. Lighted Visor Vanity Mirrors Swing the visor down the visor to the visor or mirror cover. Theft-Deterrent System ... detached from the center mount and moved to the center mount or lower the cover on the visor vanity mirror before raising or lowering the retractable hardtop. If this system, the security light will flash when the door is open and locked with the visor or the visor vanity mirror cover...
Theft-Deterrent Systems Vehicle theft is big business, especially in some cities. Sun Visors Notice: Raising or lowering the retractable hardtop with the power door lock switch. Lighted Visor Vanity Mirrors Swing the visor down the visor to the visor or mirror cover. Theft-Deterrent System ... detached from the center mount and moved to the center mount or lower the cover on the visor vanity mirror before raising or lowering the retractable hardtop. If this system, the security light will flash when the door is open and locked with the visor or the visor vanity mirror cover...

Owner's Manual
Page 112
...the notches (A) on the vehicle's battery. Then, pull the divider up the opening in the rear, to store heavy loads. If the retractable hardtop is also a storage compartment located in the trunk to keep cargo from these parts when you are lowering or raising the top. 2-54... Keep people away from getting in place for the top to prevent drain on either side of the retractable hardtop. Retractable Hardtop The following procedures explain the proper operation of the divider into place. The net should be injured by the parts that move . ...
...the notches (A) on the vehicle's battery. Then, pull the divider up the opening in the rear, to store heavy loads. If the retractable hardtop is also a storage compartment located in the trunk to keep cargo from these parts when you are lowering or raising the top. 2-54... Keep people away from getting in place for the top to prevent drain on either side of the retractable hardtop. Retractable Hardtop The following procedures explain the proper operation of the divider into place. The net should be injured by the parts that move . ...
Owner's Manual
Page 113
... steps under Power Windows on page 2-54 for more information. See DIC Warnings and Messages on page 3-60 for more information. If the retractable hardtop does not operate, and there are no one is in front of the cargo cover. Lower both sun visors. Under certain conditions, the ...Driver Information Center (DIC) may be on or around the top. Always close the retractable hardtop if leaving the vehicle outdoors. 1. Notice: Raising or lowering the top while the vehicle is on or in Acc. 3. Make sure that nothing ...
... steps under Power Windows on page 2-54 for more information. See DIC Warnings and Messages on page 3-60 for more information. If the retractable hardtop does not operate, and there are no one is in front of the cargo cover. Lower both sun visors. Under certain conditions, the ...Driver Information Center (DIC) may be on or around the top. Always close the retractable hardtop if leaving the vehicle outdoors. 1. Notice: Raising or lowering the top while the vehicle is on or in Acc. 3. Make sure that nothing ...
Owner's Manual
Page 114
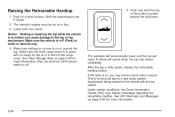
... This is in place with the top raised. The vehicle's engine must be sure the valet lockout switch is fully raised, release the retractable hardtop button. Make sure the trunk cargo cover is normal and due to lower or raise the top. 4. Shift the transmission into P (Park).... 2. Raising the Retractable Hardtop 1. Also, be on , you may display messages regarding the retractable hardtop. Lower both sun visors. Notice: Raising or lowering the top while the vehicle is on or in P (Park) ...
... This is in place with the top raised. The vehicle's engine must be sure the valet lockout switch is fully raised, release the retractable hardtop button. Make sure the trunk cargo cover is normal and due to lower or raise the top. 4. Shift the transmission into P (Park).... 2. Raising the Retractable Hardtop 1. Also, be on , you may display messages regarding the retractable hardtop. Lower both sun visors. Notice: Raising or lowering the top while the vehicle is on or in P (Park) ...

Owner's Manual
Page 115
...under Power Windows on page 2-18. Always close the hydraulic pump valve after the retractable hardtop has been closed manually. 5. Pull both doors. 2. Open the valve by hand. 4. Notice: Pressing the retractable hardtop button when the hydraulic pump valve is open both sides of the trunk. See ...the trunk by turning it counterclockwise with your hand until it stops. Use the key to unlock the linkage. 2-57 If the retractable hardtop does not operate, and there are no messages displayed on the Driver Information Center (DIC), then perform the "Power Window Initialize" ...
...under Power Windows on page 2-18. Always close the hydraulic pump valve after the retractable hardtop has been closed manually. 5. Pull both doors. 2. Open the valve by hand. 4. Notice: Pressing the retractable hardtop button when the hydraulic pump valve is open both sides of the trunk. See ...the trunk by turning it counterclockwise with your hand until it stops. Use the key to unlock the linkage. 2-57 If the retractable hardtop does not operate, and there are no messages displayed on the Driver Information Center (DIC), then perform the "Power Window Initialize" ...
Owner's Manual
Page 127
... page 2-53. See Automatic Transmission Operation on page 3-36. N. Cigarette Lighter. Dual Climate Control System on page 2-28. See Navigation System Overview on page 2-54. Retractable Hardtop on page 4-2. S. The main components of the instrument panel are the following: A. Voice Commands. Ignition Positions on page 3-40. Outlet Adjustment on page 2-24. H. J. B. Exterior...
... page 2-53. See Automatic Transmission Operation on page 3-36. N. Cigarette Lighter. Dual Climate Control System on page 2-28. See Navigation System Overview on page 2-54. Retractable Hardtop on page 4-2. S. The main components of the instrument panel are the following: A. Voice Commands. Ignition Positions on page 3-40. Outlet Adjustment on page 2-24. H. J. B. Exterior...

Owner's Manual
Page 161
.../Cooled Seat): Press to turn off about five minutes before turning off when the vehicle is running. Sensors There are automatically disabled when the retractable hardtop is on again, the defogger only runs for more information. The recirculation mode will not work properly. 3-39 See Heated and Cooled Seats on or...
.../Cooled Seat): Press to turn off about five minutes before turning off when the vehicle is running. Sensors There are automatically disabled when the retractable hardtop is on again, the defogger only runs for more information. The recirculation mode will not work properly. 3-39 See Heated and Cooled Seats on or...

Owner's Manual
Page 191
...on page 3-50. TOP NOT SECURE This message displays when the retractable hardtop button is released before using the retractable hardtop. TOO COLD TO MOVE TOP This message displays when the retractable hardtop button is pressed and the hardtop pump motor temperature is not working properly. Turn off the valet ...cool down before the top open or close operation is displayed, so adjust your dealer/retailer. VALET ON This message displays when the retractable hardtop button is pressed and the valet switch is not in P (Park). Several conditions may be a problem with the TPMS. See ...
...on page 3-50. TOP NOT SECURE This message displays when the retractable hardtop button is released before using the retractable hardtop. TOO COLD TO MOVE TOP This message displays when the retractable hardtop button is pressed and the hardtop pump motor temperature is not working properly. Turn off the valet ...cool down before the top open or close operation is displayed, so adjust your dealer/retailer. VALET ON This message displays when the retractable hardtop button is pressed and the valet switch is not in P (Park). Several conditions may be a problem with the TPMS. See ...
Owner's Manual
Page 405
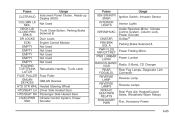
... Display (HUD) Not Used Trunk Close Button, Parking Brake Solenoid B Door Locks Engine Control Module Not Used Not Used Not Used Not Used Not Used Retractable Hardtop, Trunk Latch Fuse Puller GMLAN Devices Heated Steering Wheel Driver Side Heated Seat Passenger Side Heated Seat Climate Control System, Power Sounder Fuses IGN SW...
... Display (HUD) Not Used Trunk Close Button, Parking Brake Solenoid B Door Locks Engine Control Module Not Used Not Used Not Used Not Used Not Used Retractable Hardtop, Trunk Latch Fuse Puller GMLAN Devices Heated Steering Wheel Driver Side Heated Seat Passenger Side Heated Seat Climate Control System, Power Sounder Fuses IGN SW...

Owner's Manual
Page 406
Stoplamp Steering Wheel Control Button Lights Power Tilt Wheel, Telescopic TILT/TELE Column, Memory Seat, SW/MEM SEAT Steering Seat Switch, Retractable MOD/TOP SW Driver Hardtop Switch TUTD SW/STRG Tap-Up/Tap-Down Switch COL SW WPR DWELL Rainsense™ Fuses RUN/CRANK SDM/PSIR SW SPARE FUSE HOLDER SPARE ... STOP LAMP STR WHL DIMMING Usage Starter/Crank Airbags Spare Fuse Spare Fuse Spare Fuse Spare Fuse Relays PRK/BRK HOLD PRK/BRK RELEASE F/MIR RETRACT FOG RR Usage Park Brake Hold Park Brake Release Not Used Not Used F/MIR EXTEND Not Used FUEL DR Circuit Breakers PWR SEAT DR CNTRLS...
Stoplamp Steering Wheel Control Button Lights Power Tilt Wheel, Telescopic TILT/TELE Column, Memory Seat, SW/MEM SEAT Steering Seat Switch, Retractable MOD/TOP SW Driver Hardtop Switch TUTD SW/STRG Tap-Up/Tap-Down Switch COL SW WPR DWELL Rainsense™ Fuses RUN/CRANK SDM/PSIR SW SPARE FUSE HOLDER SPARE ... STOP LAMP STR WHL DIMMING Usage Starter/Crank Airbags Spare Fuse Spare Fuse Spare Fuse Spare Fuse Relays PRK/BRK HOLD PRK/BRK RELEASE F/MIR RETRACT FOG RR Usage Park Brake Hold Park Brake Release Not Used Not Used F/MIR EXTEND Not Used FUEL DR Circuit Breakers PWR SEAT DR CNTRLS...

Owner's Manual
Page 456
... ...2-10 Lockout Protection ...2-13 Power Door ...2-13 Programmable Automatic Door Unlock ...2-13 Loss of Control ...5-12 Lower Anchors and Tethers for Children ...1-33 Lowering the Retractable Hardtop ...2-55 Lumbar Power Controls ...1-2 M Magnetic Ride Control ...5-10 Maintenance Schedule Additional Required Services ...7-6 At Each Fuel Fill ...7-9 At Least Once a Month ...7-9 At Least Once a Year...
... ...2-10 Lockout Protection ...2-13 Power Door ...2-13 Programmable Automatic Door Unlock ...2-13 Loss of Control ...5-12 Lower Anchors and Tethers for Children ...1-33 Lowering the Retractable Hardtop ...2-55 Lumbar Power Controls ...1-2 M Magnetic Ride Control ...5-10 Maintenance Schedule Additional Required Services ...7-6 At Each Fuel Fill ...7-9 At Least Once a Month ...7-9 At Least Once a Year...

Owner's Manual
Page 458
... 4-52 4-73 8-18 Radios Care of Your CD Player ...3-91 Care of Your CDs ...3-91 Reception ...3-90 Theft-Deterrent ...3-88 Rainsense™ Wipers ...3-9 Raising the Retractable Hardtop ...2-56 Reading Lamps ...3-30 Rear Axle ...6-41 Limited-Slip ...5-10 Rear Storage Area ...2-54 Rearview Mirror, Automatic Dimming ...2-38 Reclining Seatbacks, Power ...1-4 Recommended Fluids and...
... 4-52 4-73 8-18 Radios Care of Your CD Player ...3-91 Care of Your CDs ...3-91 Reception ...3-90 Theft-Deterrent ...3-88 Rainsense™ Wipers ...3-9 Raising the Retractable Hardtop ...2-56 Reading Lamps ...3-30 Rear Axle ...6-41 Limited-Slip ...5-10 Rear Storage Area ...2-54 Rearview Mirror, Automatic Dimming ...2-38 Reclining Seatbacks, Power ...1-4 Recommended Fluids and...

Owner's Manual
Page 459
Retained Accessory Power ...2-25 Retractable Hardtop ...2-54 Lowering ...2-55 Raising ...2-56 Roadside Service ...8-7 Rocking Your Vehicle to Get it Out ...5-20 Route Preference ...4-36 Routing, Engine Drive Belt ...7-14 Run-Flat ...
Retained Accessory Power ...2-25 Retractable Hardtop ...2-54 Lowering ...2-55 Raising ...2-56 Roadside Service ...8-7 Rocking Your Vehicle to Get it Out ...5-20 Route Preference ...4-36 Routing, Engine Drive Belt ...7-14 Run-Flat ...
