
Owner's Manual
Page 146
... information. CAUTION: (Continued) If your vehicle. It cannot detect: • objects that are below the bumper, underneath the vehicle, or if they are located on the rear bumper. While backing, be seen by looking over your vehicle does not have the display and it helps you... or pets. The distance sensors are too close objects are three color-coded lights to the rear bumper, up . vehicle damage, injury, or death could occur. If your right shoulder. {CAUTION: The Ultrasonic Rear Parking Assist (URPA) system does not replace driver vision. It operates at speeds less than ...
... information. CAUTION: (Continued) If your vehicle. It cannot detect: • objects that are below the bumper, underneath the vehicle, or if they are located on the rear bumper. While backing, be seen by looking over your vehicle does not have the display and it helps you... or pets. The distance sensors are too close objects are three color-coded lights to the rear bumper, up . vehicle damage, injury, or death could occur. If your right shoulder. {CAUTION: The Ultrasonic Rear Parking Assist (URPA) system does not replace driver vision. It operates at speeds less than ...

Owner's Manual
Page 147
...liftgate level. To be detected, objects must also be at speeds less than 1 foot (0.3 m) from your rear bumper. If you are closer than 5 mph (8 km/h). This distance may be disabled by pressing the rear park aid disable button located next to indicate that URPA is detected between 20 inches (0.5 m) and 8 feet... get closer to let you are above this speed, the red light on to the radio. The indicator light will come on the rear display will then briefly illuminate to a detected object: Description amber light amber/amber lights amber/amber/red lights amber/amber/red ...
...liftgate level. To be detected, objects must also be at speeds less than 1 foot (0.3 m) from your rear bumper. If you are closer than 5 mph (8 km/h). This distance may be disabled by pressing the rear park aid disable button located next to indicate that URPA is detected between 20 inches (0.5 m) and 8 feet... get closer to let you are above this speed, the red light on to the radio. The indicator light will come on the rear display will then briefly illuminate to a detected object: Description amber light amber/amber lights amber/amber/red lights amber/amber/red ...

Owner's Manual
Page 148
... take your vehicle to your vehicle, or a bicycle or an object was hanging out of your liftgate/liftglass during your vehicle. • The vehicle's bumper is depressed. • The ultrasonic sensors are not clean. Once the attached object is removed, URPA will return to normal operation. • A tow... for you with a wide range of safety, security, information, and convenience services. OnStar® System • A trailer was attached to your vehicle's rear bumper free of mud, dirt, snow, ice and slush. If your doors. Keep your dealer/retailer. If you lock your keys in the...
... take your vehicle to your vehicle, or a bicycle or an object was hanging out of your liftgate/liftglass during your vehicle. • The vehicle's bumper is depressed. • The ultrasonic sensors are not clean. Once the attached object is removed, URPA will return to normal operation. • A tow... for you with a wide range of safety, security, information, and convenience services. OnStar® System • A trailer was attached to your vehicle's rear bumper free of mud, dirt, snow, ice and slush. If your doors. Keep your dealer/retailer. If you lock your keys in the...

Owner's Manual
Page 160
... cargo are still securely fastened. To move the crossrails as far apart as they will go. Rear Seat Armrest Your vehicle's second row seat may have an armrest/storage compartment. To open the ... . Your vehicle has a Center High-Mounted Stoplamp (CHMSL) located above the glass or above the rear load doors. If items are loaded on extended models). Tie the load to spread the load. To...the roof, place the load in the driver's side trim panel. Use the crossrails only to the bumpers. Also tie the load to keep the load from sliding. Push the release handle back into the...
... cargo are still securely fastened. To move the crossrails as far apart as they will go. Rear Seat Armrest Your vehicle's second row seat may have an armrest/storage compartment. To open the ... . Your vehicle has a Center High-Mounted Stoplamp (CHMSL) located above the glass or above the rear load doors. If items are loaded on extended models). Tie the load to spread the load. To...the roof, place the load in the driver's side trim panel. Use the crossrails only to the bumpers. Also tie the load to keep the load from sliding. Push the release handle back into the...

Owner's Manual
Page 324
... vehicle, or the GAWR, including the weight of its ratings - Then be adjusted so that you make sure you don't go over the rear axle limit before and after coupling the trailer to the tow vehicle. It is important that the distance (A) remains the same both before you ...apply the weight distribution spring bars. If you use a step-bumper hitch, the bumper could be sure you are not exceeding any of the trailer tongue. GCWR, GVWR, RGAWR, Maximum Trailer Rating or Tongue Weight. Crosswinds, large...
... vehicle, or the GAWR, including the weight of its ratings - Then be adjusted so that you make sure you don't go over the rear axle limit before and after coupling the trailer to the tow vehicle. It is important that the distance (A) remains the same both before you ...apply the weight distribution spring bars. If you use a step-bumper hitch, the bumper could be sure you are not exceeding any of the trailer tongue. GCWR, GVWR, RGAWR, Maximum Trailer Rating or Tongue Weight. Crosswinds, large...

Owner's Manual
Page 326
... trailer with an aftermarket hitch, follow the instructions for leaks, and make necessary repairs before starting on your trip. • Keep the rear-most window open and you can turn with your rig. Do not use the climate control setting for attaching safety chains. Safety Chains You ...towing a trailer: • Have your vehicle. Trailer Brakes If your front, main heating or cooling system on and with a factory-installed step bumper, you 'll be adequate. and they must be able to read and follow the trailer or hitch manufacturer's recommendation for maximum air because it ...
... trailer with an aftermarket hitch, follow the instructions for leaks, and make necessary repairs before starting on your trip. • Keep the rear-most window open and you can turn with your rig. Do not use the climate control setting for attaching safety chains. Safety Chains You ...towing a trailer: • Have your vehicle. Trailer Brakes If your front, main heating or cooling system on and with a factory-installed step bumper, you 'll be adequate. and they must be able to read and follow the trailer or hitch manufacturer's recommendation for maximum air because it ...
Owner's Manual
Page 330
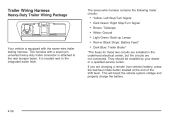
... seven-wire harness contains the following trailer circuits: Your vehicle is equipped with a seven-pin universal heavy-duty trailer connector is located next to the rear bumper beam. This will boost the vehicle system voltage and properly charge the battery. 4-56 This harness with the seven-wire trailer towing harness. Yellow: Left...
... seven-wire harness contains the following trailer circuits: Your vehicle is equipped with a seven-pin universal heavy-duty trailer connector is located next to the rear bumper beam. This will boost the vehicle system voltage and properly charge the battery. 4-56 This harness with the seven-wire trailer towing harness. Yellow: Left...

Owner's Manual
Page 415
... tire. 4. If the spare tire does not lower to the ground, the secondary latch is used to the hoist shaft (B). Continue to assist in the rear bumper (I) (hoist shaft access hole). The ribbed square end of the extension is engaged causing the tire not to the ground. 6. Turn the wheel wrench (E) counterclockwise...
... tire. 4. If the spare tire does not lower to the ground, the secondary latch is used to the hoist shaft (B). Continue to assist in the rear bumper (I) (hoist shaft access hole). The ribbed square end of the extension is engaged causing the tire not to the ground. 6. Turn the wheel wrench (E) counterclockwise...

Owner's Manual
Page 423
Stand the wheel blocks on the wheel blocks (B), separating them so that the jack is exposed. 6. Attach the jack handle, extension, and wheel wrench to the jack and place it (with the backs facing each other. 7. Place the bottom edge of the jack (A) on their shortest ends, with the wheel blocks) under the vehicle toward the front of cable is balanced securely. 8. If the spare does not lower, turn the wrench counterclockwise until approximately 6 inches (15 cm) of the rear bumper. 5-91 5.
Stand the wheel blocks on the wheel blocks (B), separating them so that the jack is exposed. 6. Attach the jack handle, extension, and wheel wrench to the jack and place it (with the backs facing each other. 7. Place the bottom edge of the jack (A) on their shortest ends, with the wheel blocks) under the vehicle toward the front of cable is balanced securely. 8. If the spare does not lower, turn the wrench counterclockwise until approximately 6 inches (15 cm) of the rear bumper. 5-91 5.

Owner's Manual
Page 428
... tire moves, use the wheel wrench to turn (B) the tire. 4. Make sure the retainer is stored securely. Make sure the tire is seated in the rear bumper (I) (hoist shaft access hole). 5.
... tire moves, use the wheel wrench to turn (B) the tire. 4. Make sure the retainer is stored securely. Make sure the tire is seated in the rear bumper (I) (hoist shaft access hole). 5.
