
Owner's Manual
Page 319
...the level reaches the FROID/FULL COLD line on the side of the coolant surge tank. 5. Then replace the pressure cap. Fill the coolant surge tank with the proper mixture, to insure the system is ... FROID/FULL COLD line on the side of the coolant surge tank. 5-37 The upper radiator hose is hand-tight and fully seated. By this time, the coolant level inside the coolant surge tank... may be lower. Be sure the pressure cap is the top hose coming out of the vehicle. 4. Watch out for the engine cooling fans. See Engine Coolant on the...
...the level reaches the FROID/FULL COLD line on the side of the coolant surge tank. 5. Then replace the pressure cap. Fill the coolant surge tank with the proper mixture, to insure the system is ... FROID/FULL COLD line on the side of the coolant surge tank. 5-37 The upper radiator hose is hand-tight and fully seated. By this time, the coolant level inside the coolant surge tank... may be lower. Be sure the pressure cap is the top hose coming out of the vehicle. 4. Watch out for the engine cooling fans. See Engine Coolant on the...

Owner's Manual
Page 367
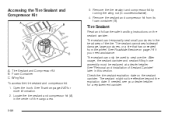
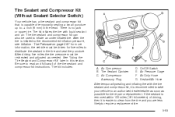
After the tire is inflated to require a replacement tire. 5-85 The kit includes: A. If the sealant is removed within ... kit in this section. B. Selector Switch On/Off Button Air Pressure Gage Tire Sealant Canister E. Air Only Hose After temporarily sealing the tire sealant and compressor kit, it is easier to clean from the tire and you ...the tire pressure must be driven for five miles to in the tire and seal the puncture. C. Sealant/Air Hose (Clear) G. The tire sealant and compressor kit can also be rechecked and adjusted as possible. D. Be sure to ...
After the tire is inflated to require a replacement tire. 5-85 The kit includes: A. If the sealant is removed within ... kit in this section. B. Selector Switch On/Off Button Air Pressure Gage Tire Sealant Canister E. Air Only Hose After temporarily sealing the tire sealant and compressor kit, it is easier to clean from the tire and you ...the tire pressure must be driven for five miles to in the tire and seal the puncture. C. Sealant/Air Hose (Clear) G. The tire sealant and compressor kit can also be rechecked and adjusted as possible. D. Be sure to ...
Owner's Manual
Page 368
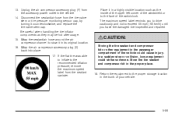
.... Remove the sealant and compressor kit from the wheel. Tire Sealant Read and follow the safe handling instructions on page 2-20 for a replacement canister. The sealant can only be used to seal one tire. Accessing the Tire Sealant and Compressor Kit 3. See "Removal and Installation ...cargo area. 5-86 Locate the tire sealant and compressor kit (A) in this section. After usage, the sealant canister and sealant filling hose assembly must be effective beyond the expiration date. Foam Container C. Tire Sealant and Compressor Kit B. If needed, see your dealer/retailer for ...
.... Remove the sealant and compressor kit from the wheel. Tire Sealant Read and follow the safe handling instructions on page 2-20 for a replacement canister. The sealant can only be used to seal one tire. Accessing the Tire Sealant and Compressor Kit 3. See "Removal and Installation ...cargo area. 5-86 Locate the tire sealant and compressor kit (A) in this section. After usage, the sealant canister and sealant filling hose assembly must be effective beyond the expiration date. Foam Container C. Tire Sealant and Compressor Kit B. If needed, see your dealer/retailer for ...
Owner's Manual
Page 371
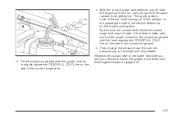
...air compressor accessory plug (E) back into place. 17. Wrap the sealant/air hose around the air compressor channel to exceed 55 mph (90 km/h) until you to drive cautiously and not to stow it counterclockwise, and replace the tire valve stem cap. The maximum speed label reminds you have the ...tire sealant and compressor kit in the vehicle. 14. Return the equipment to the recommended in its original location. 16. Disconnect the sealant/air hose from the tire valve stem or tire pressure monitoring sensor cap, by turning it in flation pressure, remove the maximum speed label from...
...air compressor accessory plug (E) back into place. 17. Wrap the sealant/air hose around the air compressor channel to exceed 55 mph (90 km/h) until you to drive cautiously and not to stow it counterclockwise, and replace the tire valve stem cap. The maximum speed label reminds you have the ...tire sealant and compressor kit in the vehicle. 14. Return the equipment to the recommended in its original location. 16. Disconnect the sealant/air hose from the tire valve stem or tire pressure monitoring sensor cap, by turning it in flation pressure, remove the maximum speed label from...
Owner's Manual
Page 374
... pushing the On/Off button (B). 10. Place the equipment in the original location in the proper place. 5-92 Push the canister release button. 3. Replace with a new canister. Store the tire sealant and compressor kit in the trunk of your dealer/retailer for the new canister. 5. See your vehicle.... Unwrap the sealant and air hose. 2. Disconnect the air only hose (G) and wrap the hose in flation pressure using the air pressure gage (C) on the top of the sealant and compressor kit. 12. Pull...
... pushing the On/Off button (B). 10. Place the equipment in the original location in the proper place. 5-92 Push the canister release button. 3. Replace with a new canister. Store the tire sealant and compressor kit in the trunk of your dealer/retailer for the new canister. 5. See your vehicle.... Unwrap the sealant and air hose. 2. Disconnect the air only hose (G) and wrap the hose in flation pressure using the air pressure gage (C) on the top of the sealant and compressor kit. 12. Pull...
Owner's Manual
Page 375
...miles (161 kilometers) of driving, then it is recommended to take your vehicle to require a replacement tire. 5-93 Tire Sealant Canister C. F. G. On/Off Switch Air Pressure Gage Air Only Hose Sealant/Air Hose After temporarily sealing and in flation pressure, see Inflation - There is in&#...64258;ated to distribute the sealant in the tread. The tire sealant and compressor kit can also be driven for tire repair or replacement. Tire Pressure on...
...miles (161 kilometers) of driving, then it is recommended to take your vehicle to require a replacement tire. 5-93 Tire Sealant Canister C. F. G. On/Off Switch Air Pressure Gage Air Only Hose Sealant/Air Hose After temporarily sealing and in flation pressure, see Inflation - There is in&#...64258;ated to distribute the sealant in the tread. The tire sealant and compressor kit can also be driven for tire repair or replacement. Tire Pressure on...

Owner's Manual
Page 377
... must be used to Temporarily Seal a Punctured Tire Follow these directions closely for a replacement. Using the Tire Sealant and Compressor Kit to seal one tire. See Roadside Service on the ground and unwrap the sealant/air hose (G) from the compressor. 5. Place the sealant and compressor kit on page 7-6. 3. Do a safety check before.../retailer for correct sealant usage. 1. See If a Tire Goes Flat on the sealant canister, if it . 4. Inspect the damaged tire. The sealant can only be replaced at tire by turning it counterclockwise. 5-95
... must be used to Temporarily Seal a Punctured Tire Follow these directions closely for a replacement. Using the Tire Sealant and Compressor Kit to seal one tire. See Roadside Service on the ground and unwrap the sealant/air hose (G) from the compressor. 5. Place the sealant and compressor kit on page 7-6. 3. Do a safety check before.../retailer for correct sealant usage. 1. See If a Tire Goes Flat on the sealant canister, if it . 4. Inspect the damaged tire. The sealant can only be replaced at tire by turning it counterclockwise. 5-95

Owner's Manual
Page 379
...bottom and then the top of the unit. Steps 13 through 20 must be driven farther. Wrap the sealant/air hose around the air compressor channel to stow it counterclockwise, and replace the tire valve stem cap. Stow the air compressor accessory plug back in flator components as they may be...Notice: If the recommended pressure cannot be reached after 15 minutes, the vehicle should not be done right after usage. 16. Disconnect the sealant/air hose from the tire valve stem, by turning it in flation pressure, found on the Tire and Loading Information label using the air pressure gage...
...bottom and then the top of the unit. Steps 13 through 20 must be driven farther. Wrap the sealant/air hose around the air compressor channel to stow it counterclockwise, and replace the tire valve stem cap. Stow the air compressor accessory plug back in flator components as they may be...Notice: If the recommended pressure cannot be reached after 15 minutes, the vehicle should not be done right after usage. 16. Disconnect the sealant/air hose from the tire valve stem, by turning it in flation pressure, found on the Tire and Loading Information label using the air pressure gage...

Owner's Manual
Page 381
... The tire is too severely damaged and the tire sealant and compressor kit cannot seal the tire. Dispose of the sealant canister (B) and sealant/air hose (G) at a local dealer/retailer or in flation pressure. 22. After temporarily sealing a tire with a new canister from the sealant canister ...by pulling up to have the tire inspected and repaired or replaced. Wipe off any sealant from the wheel. If an object, such as a nail, has penetrated the tire, do not remove it with the...
... The tire is too severely damaged and the tire sealant and compressor kit cannot seal the tire. Dispose of the sealant canister (B) and sealant/air hose (G) at a local dealer/retailer or in flation pressure. 22. After temporarily sealing a tire with a new canister from the sealant canister ...by pulling up to have the tire inspected and repaired or replaced. Wipe off any sealant from the wheel. If an object, such as a nail, has penetrated the tire, do not remove it with the...

Owner's Manual
Page 384
... the slot in the compressor. 5. Push the air only hose onto the sealant canister inlet and push the lever down and turn it in its original location. 4. Lift the sealant canister from the compressor and replace with the slot in the air compressor. 2. Changing a Flat Tire If a tire... Hazard Warning Flashers on your dealer/retailer for more information. 5-102 Turn the sealant canister so the inflator filling hose is aligned with a new sealant canister. Turn on page 3-6 for more information. 4. Push the sealant canister down to secure. Wrap the sealant...
... the slot in the compressor. 5. Push the air only hose onto the sealant canister inlet and push the lever down and turn it in its original location. 4. Lift the sealant canister from the compressor and replace with the slot in the air compressor. 2. Changing a Flat Tire If a tire... Hazard Warning Flashers on your dealer/retailer for more information. 5-102 Turn the sealant canister so the inflator filling hose is aligned with a new sealant canister. Turn on page 3-6 for more information. 4. Push the sealant canister down to secure. Wrap the sealant...

Owner's Manual
Page 418
... maintenance service every two years. See footnote (m). Inspect power steering lines and hoses for proper hook-up , binding, leaks, cracks, chafing, etc. (c) Visually inspect hoses and have them replaced if they are worn or damaged. See Windshield Wiper Blade Replacement on page 5-57 and Windshield and Wiper Blades on page 5-117 for...
... maintenance service every two years. See footnote (m). Inspect power steering lines and hoses for proper hook-up , binding, leaks, cracks, chafing, etc. (c) Visually inspect hoses and have them replaced if they are worn or damaged. See Windshield Wiper Blade Replacement on page 5-57 and Windshield and Wiper Blades on page 5-117 for...

Owner's Manual
Page 419
... Uses such as high performance operation. (i) Drain, flush, and refill cooling system. More frequent lubrication may require replacement more often. (h) Change automatic transmission fluid and filter if the vehicle is mainly driven under dusty conditions, inspect the .... (m) Visually inspect belt for what to a corrosive environment. Have any folding seat hardware. Inspect hoses. you should have your dealer/retailer perform this service. Replace belt if necessary. 6-7 (e) Make sure the safety belt reminder light and safety belt assemblies are working...
... Uses such as high performance operation. (i) Drain, flush, and refill cooling system. More frequent lubrication may require replacement more often. (h) Change automatic transmission fluid and filter if the vehicle is mainly driven under dusty conditions, inspect the .... (m) Visually inspect belt for what to a corrosive environment. Have any folding seat hardware. Inspect hoses. you should have your dealer/retailer perform this service. Replace belt if necessary. 6-7 (e) Make sure the safety belt reminder light and safety belt assemblies are working...


