
Owner's Manual
Page 1
2007 Cadillac DTS Owner Manual Seats and Restraint Systems ...7 Front Seats ...9 Rear Seats ...16 Safety Belts ...18 Child Restraints ...40 Airbag System ...66 Restraint System Check ...84 Features and Controls ...87 Keys ...89 Doors and Locks ...98 Windows ...104 Theft-Deterrent Systems ...108 Starting and Operating Your Vehicle ...113 Mirrors ...128 OnStar® System ...135 M Universal Home Remote System ...139 Storage Areas ...150 Sunroof ...152 Instrument Panel ...Instrument Panel Overview ...Climate Controls ...Warning Lights, Gages, and Indicators ...Driver Information Center (DIC) ...
2007 Cadillac DTS Owner Manual Seats and Restraint Systems ...7 Front Seats ...9 Rear Seats ...16 Safety Belts ...18 Child Restraints ...40 Airbag System ...66 Restraint System Check ...84 Features and Controls ...87 Keys ...89 Doors and Locks ...98 Windows ...104 Theft-Deterrent Systems ...108 Starting and Operating Your Vehicle ...113 Mirrors ...128 OnStar® System ...135 M Universal Home Remote System ...139 Storage Areas ...150 Sunroof ...152 Instrument Panel ...Instrument Panel Overview ...Climate Controls ...Warning Lights, Gages, and Indicators ...Driver Information Center (DIC) ...
Owner's Manual
Page 2
Service and Appearance Care ...Service ...Fuel ...Checking Things Under the Hood ...Headlamp Aiming ...Bulb Replacement ...Windshield Wiper Blade Replacement ...Tires ...Appearance Care ...Vehicle Identification ... 345 347 349 354 389 392 392 394 431 441 Electrical System ...442 Capacities and Specifications ...452 Maintenance Schedule ...453 Maintenance Schedule ...454 Customer Assistance Information ...473 Customer Assistance and Information ...474 Reporting Safety Defects ...489 Index ...493 2
Service and Appearance Care ...Service ...Fuel ...Checking Things Under the Hood ...Headlamp Aiming ...Bulb Replacement ...Windshield Wiper Blade Replacement ...Tires ...Appearance Care ...Vehicle Identification ... 345 347 349 354 389 392 392 394 431 441 Electrical System ...442 Capacities and Specifications ...452 Maintenance Schedule ...453 Maintenance Schedule ...454 Customer Assistance Information ...473 Customer Assistance and Information ...474 Reporting Safety Defects ...489 Index ...493 2
Owner's Manual
Page 87
...Vehicle Break-In ...113 Ignition Positions ...114 Retained Accessory Power (RAP) ...115 Starting the Engine ...115 Engine Coolant Heater ...117 Automatic Transaxle Operation ...118 Performance Shifting ...121 Parking Brake ...121 Shifting Into Park (P) ...122 Shifting Out of Park (P) ...125 Parking Over Things That Burn ...125 Engine Exhaust ...126 Running the Engine While Parked ...127 Mirrors ...128 Automatic Dimming Rearview Mirror with Intellibeam™, OnStar®, and Compass ...128 Automatic Dimming Rearview Mirror with OnStar® and Compass ...130 Keys ...89 Remote Keyless Entry...
...Vehicle Break-In ...113 Ignition Positions ...114 Retained Accessory Power (RAP) ...115 Starting the Engine ...115 Engine Coolant Heater ...117 Automatic Transaxle Operation ...118 Performance Shifting ...121 Parking Brake ...121 Shifting Into Park (P) ...122 Shifting Out of Park (P) ...125 Parking Over Things That Burn ...125 Engine Exhaust ...126 Running the Engine While Parked ...127 Mirrors ...128 Automatic Dimming Rearview Mirror with Intellibeam™, OnStar®, and Compass ...128 Automatic Dimming Rearview Mirror with OnStar® and Compass ...130 Keys ...89 Remote Keyless Entry...
Owner's Manual
Page 97
... be started will lock. To start the vehicle using the remote start button on the RKE transmitter again before you can be extended 10 more minutes. If the vehicle is still running , insert the key into the ignition, and turn signal lights flash or if the vehicle's lights are added to drive the vehicle. Once two remote starts or a single start feature again. 97 When the vehicle starts, the parking lamps will automatically shut off a remote start...
... be started will lock. To start the vehicle using the remote start button on the RKE transmitter again before you can be extended 10 more minutes. If the vehicle is still running , insert the key into the ignition, and turn signal lights flash or if the vehicle's lights are added to drive the vehicle. Once two remote starts or a single start feature again. 97 When the vehicle starts, the parking lamps will automatically shut off a remote start...

Owner's Manual
Page 101
... driver's door will unlock. When you remove the ignition key when locking your vehicle cannot be overridden by lifting the rear door manual lock knob. 2. It is on your vehicle. Unlock the door and open a rear door when the security lock is always recommended that you want to disengage the lock. 3. The rear doors on , do the following : 1. Unlock the door using the remote keyless entry transmitter, the front door power lock switch, or by holding the power door lock switch...
... driver's door will unlock. When you remove the ignition key when locking your vehicle cannot be overridden by lifting the rear door manual lock knob. 2. It is on your vehicle. Unlock the door and open a rear door when the security lock is always recommended that you want to disengage the lock. 3. The rear doors on , do the following : 1. Unlock the door using the remote keyless entry transmitter, the front door power lock switch, or by holding the power door lock switch...
Owner's Manual
Page 102
... this feature, your vehicle. See Climate Control System. • If you must drive with the trunk symbol on the remote keyless entry transmitter to open or if electrical wiring or other cable connections must be off. Trunk Remote Trunk Release G (Remote Trunk Release): The remote trunk release button is located to the left of the steering wheel next to its highest speed and select the control setting that will force outside air into your vehicle. It...
... this feature, your vehicle. See Climate Control System. • If you must drive with the trunk symbol on the remote keyless entry transmitter to open or if electrical wiring or other cable connections must be off. Trunk Remote Trunk Release G (Remote Trunk Release): The remote trunk release button is located to the left of the steering wheel next to its highest speed and select the control setting that will force outside air into your vehicle. It...
Owner's Manual
Page 106
... ignition in the path of the window path. 106 Express Window Anti-Pinch Feature If any object is in ACCESSORY, RUN, or when Retained Accessory Power (RAP) is removed. The window will need to auto-reverse. Before you will return to a preset factory position. Continue holding the switch up until the window is not working, you use express override, make sure that all doors. 2. Weather conditions...
... ignition in the path of the window path. 106 Express Window Anti-Pinch Feature If any object is in ACCESSORY, RUN, or when Retained Accessory Power (RAP) is removed. The window will need to auto-reverse. Before you will return to a preset factory position. Continue holding the switch up until the window is not working, you use express override, make sure that all doors. 2. Weather conditions...
Owner's Manual
Page 107
Once the switch is released, the express mode is in a supervised mode. If your vehicle has the adjustable lighting feature, slide the switch up to -side slide capability. The rear windows still can be detached from the front. In this mode, the window can still close the cover. Use care when using the driver's window switches when the lockout feature is opened. Lighted Visor Vanity Mirror Pull the...
Once the switch is released, the express mode is in a supervised mode. If your vehicle has the adjustable lighting feature, slide the switch up to -side slide capability. The rear windows still can be detached from the front. In this mode, the window can still close the cover. Use care when using the driver's window switches when the lockout feature is opened. Lighted Visor Vanity Mirror Pull the...
Owner's Manual
Page 116
... transaxle gently until the vehicle starts. If the engine does not start and the key is turned to the START position, and then released when the engine begins cranking, the engine will continue cranking for many seconds, cranking will be covered by turning the ignition switch to cool down . 2. Wait at least 15 seconds between each try , to allow the cranking motor to a maximum of 15...
... transaxle gently until the vehicle starts. If the engine does not start and the key is turned to the START position, and then released when the engine begins cranking, the engine will continue cranking for many seconds, cranking will be covered by turning the ignition switch to cool down . 2. Wait at least 15 seconds between each try , to allow the cranking motor to a maximum of 15...

Owner's Manual
Page 122
... the released position. You or others could be sure your left the engine running, the vehicle can roll. Your vehicle can move , even when you are parking on any hill, see Towing a Trailer on until the parking brake is greater than 5 mph (8 km/h). See Brake System Warning Light on , and the vehicle speed is released. To be injured. If you lift your vehicle will not move suddenly. The brake light...
... the released position. You or others could be sure your left the engine running, the vehicle can roll. Your vehicle can move , even when you are parking on any hill, see Towing a Trailer on until the parking brake is greater than 5 mph (8 km/h). See Brake System Warning Light on , and the vehicle speed is released. To be injured. If you lift your vehicle will not move suddenly. The brake light...

Owner's Manual
Page 154
... ...287 Navigation/Radio System ...289 Theft-Deterrent Feature ...289 Audio Steering Wheel Controls ...289 Radio Reception ...291 Care of Your CDs ...292 Care of the CD Player ...292 Backglass Antenna ...292 XM™ Satellite Radio Antenna System ...293 Warning Lights, Gages, and Indicators ...215 Instrument Panel Cluster ...216 Speedometer and Odometer ...217 Tachometer ...217 Safety Belt Reminder Light ...218 Passenger Safety Belt Reminder Light ...218 Airbag Readiness Light ...219 Passenger Airbag Status Indicator ...220 Charging System Light ...222 Brake System Warning Light...
... ...287 Navigation/Radio System ...289 Theft-Deterrent Feature ...289 Audio Steering Wheel Controls ...289 Radio Reception ...291 Care of Your CDs ...292 Care of the CD Player ...292 Backglass Antenna ...292 XM™ Satellite Radio Antenna System ...293 Warning Lights, Gages, and Indicators ...215 Instrument Panel Cluster ...216 Speedometer and Odometer ...217 Tachometer ...217 Safety Belt Reminder Light ...218 Passenger Safety Belt Reminder Light ...218 Airbag Readiness Light ...219 Passenger Airbag Status Indicator ...220 Charging System Light ...222 Brake System Warning Light...
Owner's Manual
Page 160
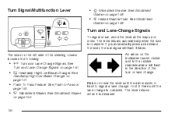
.... • Flash-To-Pass Feature. The lever on the left side of the steering column includes the following: An arrow on the instrument panel cluster and in the outside rearview mirror will flash in the direction of the turn signal will flash 3 times. See Flash-to signal a lane change . Turn Signal/Multifunction Lever • L Windshield Washer. See Windshield Washer on page 165. • N Windshield Wipers.
.... • Flash-To-Pass Feature. The lever on the left side of the steering column includes the following: An arrow on the instrument panel cluster and in the outside rearview mirror will flash in the direction of the turn signal will flash 3 times. See Flash-to signal a lane change . Turn Signal/Multifunction Lever • L Windshield Washer. See Windshield Washer on page 165. • N Windshield Wipers.
Owner's Manual
Page 205
... setting will start at near the windshield. Do not cover the solar sensor located in the center of the vehicle. 4. h (AUTO RECIRCULATION): If the AUTO position is operating automatically, even at reduced fan speeds to avoid blowing cold air into your comfort setting. The indicator light on the fan control to recirculation. The next time AUTO fan or mode is selected, the air inlet will light whenever the system switches to turn off...
... setting will start at near the windshield. Do not cover the solar sensor located in the center of the vehicle. 4. h (AUTO RECIRCULATION): If the AUTO position is operating automatically, even at reduced fan speeds to avoid blowing cold air into your comfort setting. The indicator light on the fan control to recirculation. The next time AUTO fan or mode is selected, the air inlet will light whenever the system switches to turn off...
Owner's Manual
Page 236
... value will display a message. See Scheduled Maintenance on page 457 and Engine Oil on page 222 for more information. It cannot be careful not to the engine oil life system monitoring the oil life, additional maintenance is high, the display will not reset itself. See Charging System Light on page 357. You should change . To reset the engine oil life system, See Engine Oil Life...
... value will display a message. See Scheduled Maintenance on page 457 and Engine Oil on page 222 for more information. It cannot be careful not to the engine oil life system monitoring the oil life, additional maintenance is high, the display will not reset itself. See Charging System Light on page 357. You should change . To reset the engine oil life system, See Engine Oil Life...
Owner's Manual
Page 353
... not to evaporate into the atmosphere. When replacing the fuel cap, turn it clockwise until it may not fit properly. See DIC Warnings and Messages on you if you have finished pumping before removing the nozzle. Your dealer can ...fuel cap too quickly. See Washing Your Vehicle on page 227. This would allow fuel to spill fuel. The diagnostic system can happen if your fuel tank and emissions system. Fuel can get one for any hiss noise to get the wrong type, it clicks. Leave the area immediately. This may cause your malfunction indicator lamp to light...
... not to evaporate into the atmosphere. When replacing the fuel cap, turn it clockwise until it may not fit properly. See DIC Warnings and Messages on you if you have finished pumping before removing the nozzle. Your dealer can ...fuel cap too quickly. See Washing Your Vehicle on page 227. This would allow fuel to spill fuel. The diagnostic system can happen if your fuel tank and emissions system. Fuel can get one for any hiss noise to get the wrong type, it clicks. Leave the area immediately. This may cause your malfunction indicator lamp to light...

Owner's Manual
Page 400
... , automatic transmission/ transaxle, power steering, power brakes, power windows, power seats, and air conditioning. See Loading Your Vehicle on page 327. GAWR RR: Gross Axle Weight Rating for the front axle. Aspect Ratio: The relationship of a tire's height to the centerline of the tread. Cords may be made from driving. Bias Ply Tire: A pneumatic tire in compliance with standard and optional equipment including the maximum capacity of fuel, oil, and coolant, but without passengers and cargo. Cold Tire Pressure...
... , automatic transmission/ transaxle, power steering, power brakes, power windows, power seats, and air conditioning. See Loading Your Vehicle on page 327. GAWR RR: Gross Axle Weight Rating for the front axle. Aspect Ratio: The relationship of a tire's height to the centerline of the tread. Cords may be made from driving. Bias Ply Tire: A pneumatic tire in compliance with standard and optional equipment including the maximum capacity of fuel, oil, and coolant, but without passengers and cargo. Cold Tire Pressure...
Owner's Manual
Page 408
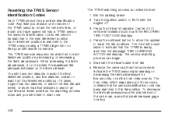
... Codes Each TPMS sensor has a unique identification code. Set the parking brake. 2. Remove the valve cap from the valve stem. The sensor matching process can begin. 5. Each tire/wheel position is matched to learn the tire positions. You will need to be matched to match the first tire and wheel, or more of the valve cap, a pencil-style air pressure gage or a key. 408 Start with the engine...
... Codes Each TPMS sensor has a unique identification code. Set the parking brake. 2. Remove the valve cap from the valve stem. The sensor matching process can begin. 5. Each tire/wheel position is matched to learn the tire positions. You will need to be matched to match the first tire and wheel, or more of the valve cap, a pencil-style air pressure gage or a key. 408 Start with the engine...
Owner's Manual
Page 490
... at 1-800-458-8006, or write: Cadillac Customer Assistance Center Cadillac Motor Car Division P.O. Service Bulletins Service Bulletins give technical service information needed to knowledgeably service General Motors cars and trucks. Or, write: Canadian Cadillac Customer Communication Centre, CA1-163-005 General Motors of your General Motors dealer or by contacting your vehicle. Transmission, Transaxle, Transfer Case Unit Repair Manual This manual provides information on engines, transmission, axle suspension, brakes, electrical, steering, body, etc. Box 33169 Detroit, MI...
... at 1-800-458-8006, or write: Cadillac Customer Assistance Center Cadillac Motor Car Division P.O. Service Bulletins Service Bulletins give technical service information needed to knowledgeably service General Motors cars and trucks. Or, write: Canadian Cadillac Customer Communication Centre, CA1-163-005 General Motors of your General Motors dealer or by contacting your vehicle. Transmission, Transaxle, Transfer Case Unit Repair Manual This manual provides information on engines, transmission, axle suspension, brakes, electrical, steering, body, etc. Box 33169 Detroit, MI...

Owner's Manual
Page 504
...8482; II Wipers ...167 Reading Lamps ...193 Rear Climate Control System ...211 Rear Door Security Locks ...100 Rear Heated Seats ...16 Rear Safety Belt Comfort Guides ...37 Rear Seat Armrest ...151 Rear Seat Passengers, Safety Belts ...34 Rearview Mirror, Automatic Dimming with Compass ...132 Rearview Mirror, Automatic Dimming with OnStar® and Compass ...130 Rearview Mirror with Compass and Temperature ...17 Reclining Seatbacks, Power ...13 Recommended Fluids and Lubricants ...467 Recreational Vehicle Towing ...334 Remote Keyless Entry (RKE) System ...91 Remote Keyless Entry (RKE) System...
...8482; II Wipers ...167 Reading Lamps ...193 Rear Climate Control System ...211 Rear Door Security Locks ...100 Rear Heated Seats ...16 Rear Safety Belt Comfort Guides ...37 Rear Seat Armrest ...151 Rear Seat Passengers, Safety Belts ...34 Rearview Mirror, Automatic Dimming with Compass ...132 Rearview Mirror, Automatic Dimming with OnStar® and Compass ...130 Rearview Mirror with Compass and Temperature ...17 Reclining Seatbacks, Power ...13 Recommended Fluids and Lubricants ...467 Recreational Vehicle Towing ...334 Remote Keyless Entry (RKE) System ...91 Remote Keyless Entry (RKE) System...
Owner's Manual
Page 507
... 414 416 416 411 Towing Recreational Vehicle ...Towing a Trailer ...Your Vehicle ...Traction Control System (TCS) ...Control System Warning Light ...Magnetic Ride Control ...StabiliTrak® System ...Transaxle Fluid, Automatic ...Transaxle Operation, Automatic ...Trunk ...Turn and Lane-Change Signals ...Turn Signal/Multifunction Lever ... 334 336 334 303 225 304 305 364 118 102 160 160 U Ultrasonic Front and Rear Parking Assist (UFRPA) ...Understanding Radio Reception ...Uniform Tire Quality Grading ...Universal Home Remote System ...139, Operation ...141...
... 414 416 416 411 Towing Recreational Vehicle ...Towing a Trailer ...Your Vehicle ...Traction Control System (TCS) ...Control System Warning Light ...Magnetic Ride Control ...StabiliTrak® System ...Transaxle Fluid, Automatic ...Transaxle Operation, Automatic ...Trunk ...Turn and Lane-Change Signals ...Turn Signal/Multifunction Lever ... 334 336 334 303 225 304 305 364 118 102 160 160 U Ultrasonic Front and Rear Parking Assist (UFRPA) ...Understanding Radio Reception ...Uniform Tire Quality Grading ...Universal Home Remote System ...139, Operation ...141...


