
Owner's Manual
Page 1
... ...137 Universal Home Remote System ...139 Storage Areas ...151 Sunroof ...153 M 155 158 180 188 209 218 258 287 288 326 329 332 334 340 383 384 387 Instrument Panel ...Instrument Panel Overview ...Climate Controls ...Warning Lights, Gages, and Indicators ...Message Center ...Driver Information Center (DIC) ...Audio System(s) ...Driving Your Vehicle ...Your Driving, the Road, and Your Vehicle ...Towing ...Service and Appearance Care ...Service ...Fuel ...Checking Things Under the Hood ...Rear Axle ...Headlamp Aiming ...Bulb Replacement ... 1
... ...137 Universal Home Remote System ...139 Storage Areas ...151 Sunroof ...153 M 155 158 180 188 209 218 258 287 288 326 329 332 334 340 383 384 387 Instrument Panel ...Instrument Panel Overview ...Climate Controls ...Warning Lights, Gages, and Indicators ...Message Center ...Driver Information Center (DIC) ...Audio System(s) ...Driving Your Vehicle ...Your Driving, the Road, and Your Vehicle ...Towing ...Service and Appearance Care ...Service ...Fuel ...Checking Things Under the Hood ...Rear Axle ...Headlamp Aiming ...Bulb Replacement ... 1

Owner's Manual
Page 89
...(Automatic Transmission) ...126 Shifting Out of Park (P) ...128 Parking Your Vehicle (Manual Transmission) ...128 Parking Over Things That Burn ...129 Engine Exhaust ...130 Running the Engine While Parked ...131 Mirrors ...132 Automatic Dimming Rearview Mirror with OnStar® ...132 Automatic Dimming Rearview Mirror with OnStar® and Compass ...133 Outside Power Mirrors ...135 Outside Curb View Assist Mirror ...136 Outside Convex Mirror ...137 Outside Heated Mirrors ...137 Keys ...91 Remote Keyless Entry System ...92 Remote Keyless Entry System Operation ...93 Doors and Locks ...96 Door...
...(Automatic Transmission) ...126 Shifting Out of Park (P) ...128 Parking Your Vehicle (Manual Transmission) ...128 Parking Over Things That Burn ...129 Engine Exhaust ...130 Running the Engine While Parked ...131 Mirrors ...132 Automatic Dimming Rearview Mirror with OnStar® ...132 Automatic Dimming Rearview Mirror with OnStar® and Compass ...133 Outside Power Mirrors ...135 Outside Curb View Assist Mirror ...136 Outside Convex Mirror ...137 Outside Heated Mirrors ...137 Keys ...91 Remote Keyless Entry System ...92 Remote Keyless Entry System Operation ...93 Doors and Locks ...96 Door...
Owner's Manual
Page 100
... trunk lid: • Make sure all other windows are shut. • Turn the fan on or under the instrument panel, open them using the remote keyless entry transmitter. If you press the power door lock switch when the key is in the ignition and any door is open, all the way. See Engine Exhaust on the remote keyless entry transmitter or by pressing the lock button on page 130. 100 See Climate Control...
... trunk lid: • Make sure all other windows are shut. • Turn the fan on or under the instrument panel, open them using the remote keyless entry transmitter. If you press the power door lock switch when the key is in the ignition and any door is open, all the way. See Engine Exhaust on the remote keyless entry transmitter or by pressing the lock button on page 130. 100 See Climate Control...
Owner's Manual
Page 105
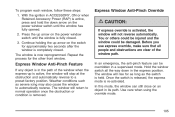
..., the window will return to a preset factory position. The window will not reverse automatically. Once the switch is released, the express mode is fully closed . In this mode, the window can be damaged. Express Window Anti-Pinch Feature If any object is activated, the window will rise for the other front window. Press the up arrow on the power window switch until the window is...
..., the window will return to a preset factory position. The window will not reverse automatically. Once the switch is released, the express mode is fully closed . In this mode, the window can be damaged. Express Window Anti-Pinch Feature If any object is activated, the window will rise for the other front window. Press the up arrow on the power window switch until the window is...
Owner's Manual
Page 106
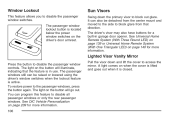
... closed. The passenger window lockout button is active. The passenger windows still can also be raised or lowered using the driver's window switches when the lockout feature is located below the power window switches on when the cover is lifted and goes out when it is in garage door opener. Lighted Visor Vanity Mirror Press the button to access the mirror. Sun Visors Swing down and lift the cover to disable the passenger window controls.
... closed. The passenger window lockout button is active. The passenger windows still can also be raised or lowered using the driver's window switches when the lockout feature is located below the power window switches on when the cover is lifted and goes out when it is in garage door opener. Lighted Visor Vanity Mirror Press the button to access the mirror. Sun Visors Swing down and lift the cover to disable the passenger window controls.
Owner's Manual
Page 112
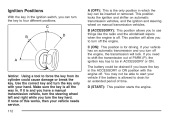
.... Ignition Positions With the key in . If none of PARK (P), the ignition key has to drain for driving. D (START): This position starts the engine. If your vehicle if the battery is for an extended period of time. Make sure the key is off . If it is and you have a manual transmission vehicle, turn the steering wheel left and right while you to turn the key to use things like the radio and the windshield wipers...
.... Ignition Positions With the key in . If none of PARK (P), the ignition key has to drain for driving. D (START): This position starts the engine. If your vehicle if the battery is for an extended period of time. Make sure the key is off . If it is and you have a manual transmission vehicle, turn the steering wheel left and right while you to turn the key to use things like the radio and the windshield wipers...
Owner's Manual
Page 122
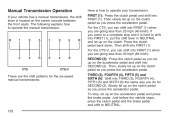
... the center console between the front seats. Just before the vehicle stops, press the clutch pedal and the brake pedal, and shift to operate your vehicle has a manual transmission, the shift lever is located on the accelerator pedal and shift into SECOND (2). Press the clutch pedal back down. Then shift into FIRST (1). The following explains how to shift into FIRST (1), put the shift lever in NEUTRAL and...
... the center console between the front seats. Just before the vehicle stops, press the clutch pedal and the brake pedal, and shift to operate your vehicle has a manual transmission, the shift lever is located on the accelerator pedal and shift into SECOND (2). Press the clutch pedal back down. Then shift into FIRST (1). The following explains how to shift into FIRST (1), put the shift lever in NEUTRAL and...
Owner's Manual
Page 125
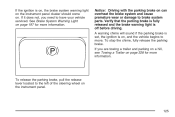
... left of the steering wheel on page 197 for more information. Verify that the parking brake is fully released and the brake warning light is off before driving. Notice: Driving with the parking brake on , and the vehicle begins to have your vehicle serviced. If you need to move. To stop the chime, fully release the parking brake. If the ignition is on, the brake system warning light on the instrument panel cluster should come...
... left of the steering wheel on page 197 for more information. Verify that the parking brake is fully released and the brake warning light is off before driving. Notice: Driving with the parking brake on , and the vehicle begins to have your vehicle serviced. If you need to move. To stop the chime, fully release the parking brake. If the ignition is on, the brake system warning light on the instrument panel cluster should come...

Owner's Manual
Page 155
...191 Engine Speed Limiter ...191 Safety Belt Reminder Light ...192 Airbag Readiness Light ...192 Passenger Airbag Status Indicator ...194 Charging System Light ...196 Brake System Warning Light ...197 Anti-Lock Brake System Warning Light ...198 Traction Control System (TCS) Warning Light ...199 Engine Coolant Temperature Warning Light (CTS) ...200 155 Instrument Panel Overview ...158 Hazard Warning Flashers ...160 Other Warning Devices ...160 Horn ...160 Tilt Wheel ...161 Reconfigurable Steering Wheel Controls (SWC) (CTS) ...161 Turn Signal/Multifunction Lever ...163 Turn and Lane-Change...
...191 Engine Speed Limiter ...191 Safety Belt Reminder Light ...192 Airbag Readiness Light ...192 Passenger Airbag Status Indicator ...194 Charging System Light ...196 Brake System Warning Light ...197 Anti-Lock Brake System Warning Light ...198 Traction Control System (TCS) Warning Light ...199 Engine Coolant Temperature Warning Light (CTS) ...200 155 Instrument Panel Overview ...158 Hazard Warning Flashers ...160 Other Warning Devices ...160 Horn ...160 Tilt Wheel ...161 Reconfigurable Steering Wheel Controls (SWC) (CTS) ...161 Turn Signal/Multifunction Lever ...163 Turn and Lane-Change...
Owner's Manual
Page 156
...CD Player ...285 Diversity Antenna System ...286 XM™ Satellite Radio Antenna System ...286 Engine Coolant Temperature Gage ...200 Tire Pressure Light (CTS-V Only) ...201 Malfunction Indicator Lamp ...202 Oil Pressure Light ...206 Sport Mode Light (Automatic Transmission/CTS) ...207 Security Light ...207 Fog Lamp Light ...207 Lights On Reminder ...207 Cruise Control Light ...208 Highbeam On Light ...208 Fuel Gage ...208 Message Center ...209 Message Center (CTS-V) ...209 Transmission Fluid Hot Message ...214 Hot Coolant Temperature Warning Message ...215 Check Engine Oil Pressure Message...
...CD Player ...285 Diversity Antenna System ...286 XM™ Satellite Radio Antenna System ...286 Engine Coolant Temperature Gage ...200 Tire Pressure Light (CTS-V Only) ...201 Malfunction Indicator Lamp ...202 Oil Pressure Light ...206 Sport Mode Light (Automatic Transmission/CTS) ...207 Security Light ...207 Fog Lamp Light ...207 Lights On Reminder ...207 Cruise Control Light ...208 Highbeam On Light ...208 Fuel Gage ...208 Message Center ...209 Message Center (CTS-V) ...209 Transmission Fluid Hot Message ...214 Hot Coolant Temperature Warning Message ...215 Check Engine Oil Pressure Message...

Owner's Manual
Page 182
..., the passenger compartment air filter may cause the air inside your vehicle more information, see Passenger Compartment Air Filter on page 186 and Scheduled Maintenance on the switch to increase or decrease the automatic temperature setting. QPWRR (Power/Driver's Temperature): Press the PWR button located on the driver's side of the climate control panel to turn the entire climate control system on the passenger's side of time may need...
..., the passenger compartment air filter may cause the air inside your vehicle more information, see Passenger Compartment Air Filter on page 186 and Scheduled Maintenance on the switch to increase or decrease the automatic temperature setting. QPWRR (Power/Driver's Temperature): Press the PWR button located on the driver's side of the climate control panel to turn the entire climate control system on the passenger's side of time may need...

Owner's Manual
Page 202
... to the engine, transmission, exhaust, intake, or fuel system of your vehicle or the replacement of the original tires with this light to pass a required Emission Inspection/Maintenance test. This system is apparent. This may also result in correctly diagnosing any problem is also designed to produce a cleaner environment. Modifications to these systems could lead to your warranty. Malfunctions often...
... to the engine, transmission, exhaust, intake, or fuel system of your vehicle or the replacement of the original tires with this light to pass a required Emission Inspection/Maintenance test. This system is apparent. This may also result in correctly diagnosing any problem is also designed to produce a cleaner environment. Modifications to these systems could lead to your warranty. Malfunctions often...

Owner's Manual
Page 227
...;gurable Steering Wheel Controls (SWC) (CTS) on page 161 and "Configurable Radio Display Keys" under Radio with CD on . For example, the climate control panel will display degrees Celsius if you choose will come on page 260 for more information. See Setting the Time on page 260 and "XM™ Satellite Radio Service" under Radio with CD on all the vehicle system...
...;gurable Steering Wheel Controls (SWC) (CTS) on page 161 and "Configurable Radio Display Keys" under Radio with CD on . For example, the climate control panel will display degrees Celsius if you choose will come on page 260 for more information. See Setting the Time on page 260 and "XM™ Satellite Radio Service" under Radio with CD on all the vehicle system...

Owner's Manual
Page 339
... then something ignites it, you are refueling, do not remove the nozzle. Then unscrew the cap all the way. When replacing the fuel cap, turn it clockwise until it clicks. This would allow fuel to spill fuel. See DIC Warnings and Messages on page 228 for more likely in the Driver Information Center (DIC) will be displayed if the fuel cap is fully...
... then something ignites it, you are refueling, do not remove the nozzle. Then unscrew the cap all the way. When replacing the fuel cap, turn it clockwise until it clicks. This would allow fuel to spill fuel. See DIC Warnings and Messages on page 228 for more likely in the Driver Information Center (DIC) will be displayed if the fuel cap is fully...

Owner's Manual
Page 397
... its width. Air pressure is located between the plies and the tread. Aspect Ratio: The relationship of the tire. Cords may be made from sidewall to carry a load. (B) Tire Width: The three-digit number indicates the tire section width in millimeters from steel or other reinforcing materials. Bias Ply Tire: A pneumatic tire in which the plies are , automatic transmission/transaxle, power steering, power brakes, power windows, power seats, and air conditioning. The speed rating...
... its width. Air pressure is located between the plies and the tread. Aspect Ratio: The relationship of the tire. Cords may be made from sidewall to carry a load. (B) Tire Width: The three-digit number indicates the tire section width in millimeters from steel or other reinforcing materials. Bias Ply Tire: A pneumatic tire in which the plies are , automatic transmission/transaxle, power steering, power brakes, power windows, power seats, and air conditioning. The speed rating...

Owner's Manual
Page 448
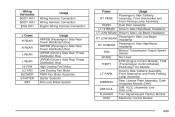
...-OPT LO BEAM RELAY/HID MINI-OPT HDLP WASH RELAY MINI-OPT SPARE BLOWER RELAY MINI FOG LAMP RELAY MICRO MAIN RELAY MICRO STARTER RELAY MINI CMP CLU RELAY MICRO IGN-1 RELAY MICRO Usage High-Beam Headlamps Daytime Running Lamps Low-Beam Headlamps Headlamp Washer Motor Not Used Front Blower Fog Lamps Powertrain/Engine Control Module (ECM) Starter Solenoid Compressor Clutch Ignition Switch (ON) 448
...-OPT LO BEAM RELAY/HID MINI-OPT HDLP WASH RELAY MINI-OPT SPARE BLOWER RELAY MINI FOG LAMP RELAY MICRO MAIN RELAY MICRO STARTER RELAY MINI CMP CLU RELAY MICRO IGN-1 RELAY MICRO Usage High-Beam Headlamps Daytime Running Lamps Low-Beam Headlamps Headlamp Washer Motor Not Used Front Blower Fog Lamps Powertrain/Engine Control Module (ECM) Starter Solenoid Compressor Clutch Ignition Switch (ON) 448
Owner's Manual
Page 449
... Fan Motor Assembly Starter Solenoid Anti-Lock Brake System Usage Passenger's Side Taillamp RT PARK Assembly, Front Sidemarker and Front Parking Lamp Assembly HORN Dual Horn Assembly LT HI BEAM Driver's Side High-Beam Headlamp LT LOW BEAM Driver's Side Low-Beam Headlamp Passenger's Side Low-Beam RT LOW BEAM Headlamp Side High-Beam RT HI BEAM Passenger's Headlamp Manual Transmission Output Speed TOS Sensor SPARE Not Used ECM (Engine Control Module), TCM THEFT (Transmission Control Module), PASS-Key...
... Fan Motor Assembly Starter Solenoid Anti-Lock Brake System Usage Passenger's Side Taillamp RT PARK Assembly, Front Sidemarker and Front Parking Lamp Assembly HORN Dual Horn Assembly LT HI BEAM Driver's Side High-Beam Headlamp LT LOW BEAM Driver's Side Low-Beam Headlamp Passenger's Side Low-Beam RT LOW BEAM Headlamp Side High-Beam RT HI BEAM Passenger's Headlamp Manual Transmission Output Speed TOS Sensor SPARE Not Used ECM (Engine Control Module), TCM THEFT (Transmission Control Module), PASS-Key...

Owner's Manual
Page 450
... Ignition Switch (Power to IGN-3 and IGN SW CRANK) VOLT CHECK DIM (Dash Integration Module) TCM (Transmission Control Module), ECM (Engine Control Module), IPC ECM/TCM (Instrument Panel Cluster), PASS-Key® III+ Module WPR MOD Windshield Wiper Module Assembly Fuses Usage Odd Ignition Coils, ODD INJ/COIL Odd Injection Coils Fuel Injectors, COMP CLUTCH Compressor Clutch WPR SW Windshield Wiper/Washer Switch FOG LAMP Fog Lamps Center Console Accessory Power OUTLET Outlet Driver's and Passenger's Side POST 02 Oxygen Sensors, LRPDB (Pusher Cooling Fan Relay) Instrument Panel Accessory Power...
... Ignition Switch (Power to IGN-3 and IGN SW CRANK) VOLT CHECK DIM (Dash Integration Module) TCM (Transmission Control Module), ECM (Engine Control Module), IPC ECM/TCM (Instrument Panel Cluster), PASS-Key® III+ Module WPR MOD Windshield Wiper Module Assembly Fuses Usage Odd Ignition Coils, ODD INJ/COIL Odd Injection Coils Fuel Injectors, COMP CLUTCH Compressor Clutch WPR SW Windshield Wiper/Washer Switch FOG LAMP Fog Lamps Center Console Accessory Power OUTLET Outlet Driver's and Passenger's Side POST 02 Oxygen Sensors, LRPDB (Pusher Cooling Fan Relay) Instrument Panel Accessory Power...
Owner's Manual
Page 504
Appearance Care (cont.) Speaker Covers ...Tires ...Underbody Maintenance ...Vehicle Care/Appearance Materials ...Washing Your Vehicle ...Weatherstrips ...Windshield and Wiper Blades ...Wood Panels ...Ashtray(s) ...Audio System(s) ...Audio Steering Wheel Controls ...281, Care of Your CD Player ...Care of Your CDs ...Diversity Antenna System ...Navigation/Radio System, see Navigation Manual ...Radio with CD ...Setting the Time ...Theft-Deterrent Feature ...Understanding Radio Reception ...XM™ Satellite Radio Antenna System ...Automatic Transmission Fluid ...Operation ... 439 442 443 444 ...
Appearance Care (cont.) Speaker Covers ...Tires ...Underbody Maintenance ...Vehicle Care/Appearance Materials ...Washing Your Vehicle ...Weatherstrips ...Windshield and Wiper Blades ...Wood Panels ...Ashtray(s) ...Audio System(s) ...Audio Steering Wheel Controls ...281, Care of Your CD Player ...Care of Your CDs ...Diversity Antenna System ...Navigation/Radio System, see Navigation Manual ...Radio with CD ...Setting the Time ...Theft-Deterrent Feature ...Understanding Radio Reception ...XM™ Satellite Radio Antenna System ...Automatic Transmission Fluid ...Operation ... 439 442 443 444 ...
Owner's Manual
Page 515
... Tire Compact ...Installing ...Remving ...String ...Specifications, Capacities ...Speedometer ...Sport Mode Light ...StabiliTrak® System ...Starting Your Engine ...Status of Vehicle Systems, DIC ...Steering ...Steering Wheel Comfort Controls ...Steering Wheel Controls, Audio ...281, Steering Wheel, Reconfigurable Steering Wheel Controls ...Steering Wheel, Tilt Wheel ...Storage Areas Center Console Storage Area ...Convenience Net ...Cupholder(s) ...Glove Box ...Map Pocket ...Roof Rack Provisions ...Stuck in Sand, Mud, Ice, or Snow ...Sun Visors ...Sunroof ...System Controls...
... Tire Compact ...Installing ...Remving ...String ...Specifications, Capacities ...Speedometer ...Sport Mode Light ...StabiliTrak® System ...Starting Your Engine ...Status of Vehicle Systems, DIC ...Steering ...Steering Wheel Comfort Controls ...Steering Wheel Controls, Audio ...281, Steering Wheel, Reconfigurable Steering Wheel Controls ...Steering Wheel, Tilt Wheel ...Storage Areas Center Console Storage Area ...Convenience Net ...Cupholder(s) ...Glove Box ...Map Pocket ...Roof Rack Provisions ...Stuck in Sand, Mud, Ice, or Snow ...Sun Visors ...Sunroof ...System Controls...


