
Owner's Manual
Page 1
2005 Cadillac XLR Owner Manual Seats and Restraint Systems ...1-1 Front Seats ...1-2 Safety Belts ...1-5 Child Restraints ...1-19 Airbag System ...1-36 Restraint System Check ...1-48 Features and Controls ...2-1 Keys ...2-2 Doors and Locks ...2-9 ...
2005 Cadillac XLR Owner Manual Seats and Restraint Systems ...1-1 Front Seats ...1-2 Safety Belts ...1-5 Child Restraints ...1-19 Airbag System ...1-36 Restraint System Check ...1-48 Features and Controls ...2-1 Keys ...2-2 Doors and Locks ...2-9 ...

Owner's Manual
Page 2
... help you are registered trademarks of General Motors Corporation. Box 07130 Detroit, MI 48207 GENERAL MOTORS, GM, the GM Emblem, CADILLAC, the CADILLAC Crest & Wreath, and the name XLR are on the road. Keep this manual in the vehicle. It is an alphabetical list of what is the Index in the owner... manual to explain things. Litho in the manual and the page number where it can be there if it was printed. All Rights ...
... help you are registered trademarks of General Motors Corporation. Box 07130 Detroit, MI 48207 GENERAL MOTORS, GM, the GM Emblem, CADILLAC, the CADILLAC Crest & Wreath, and the name XLR are on the road. Keep this manual in the vehicle. It is an alphabetical list of what is the Index in the owner... manual to explain things. Litho in the manual and the page number where it can be there if it was printed. All Rights ...

Owner's Manual
Page 4
... in this damage would not be costly. Vehicle Damage Warnings Also, in different words. Symbols are also warning labels on the vehicle. Many times, this manual you need help avoid the damage. But the notice will find these notices: Notice: These mean there is something that use the same words...
... in this damage would not be costly. Vehicle Damage Warnings Also, in different words. Symbols are also warning labels on the vehicle. Many times, this manual you need help avoid the damage. But the notice will find these notices: Notice: These mean there is something that use the same words...

Owner's Manual
Page 11
... be seriously injured or killed. In most states and all Canadian provinces, the law says to ride in a cargo area, inside or outside of the manual tells you are buckled up . In the same crash, you might not be if you should not do with seats and safety belts. It also...
... be seriously injured or killed. In most states and all Canadian provinces, the law says to ride in a cargo area, inside or outside of the manual tells you are buckled up . In the same crash, you might not be if you should not do with seats and safety belts. It also...

Owner's Manual
Page 32
... restraint itself or in your vehicle, but the child also has to be secured within the restraint. A shield may find these instructions on this manual. A T-shaped shield has shoulder straps that it is a permanent part of personal injury. If it meets federal motor vehicle safety standards. The child restraint instructions...
... restraint itself or in your vehicle, but the child also has to be secured within the restraint. A shield may find these instructions on this manual. A T-shaped shield has shoulder straps that it is a permanent part of personal injury. If it meets federal motor vehicle safety standards. The child restraint instructions...

Owner's Manual
Page 35
A. Lower Anchorage B. {CAUTION: If a LATCH-type child restraint is not attached to its anchorage points, the restraint will not be seriously injured or killed. In a crash, the child could be able to secure the restraint, following the instructions that came with that a LATCH-type child restraint is properly installed using the anchorage points, or use the vehicle's safety belts to protect the child correctly. Make sure that restraint, and also the instructions in this manual. Lower Anchorage 1-29
A. Lower Anchorage B. {CAUTION: If a LATCH-type child restraint is not attached to its anchorage points, the restraint will not be seriously injured or killed. In a crash, the child could be able to secure the restraint, following the instructions that came with that a LATCH-type child restraint is properly installed using the anchorage points, or use the vehicle's safety belts to protect the child correctly. Make sure that restraint, and also the instructions in this manual. Lower Anchorage 1-29

Owner's Manual
Page 50
... module and the instrument panel for service. United States Switch This switch should only be there to help protect you in another crash. The service manual for your vehicle covers the need to replace other parts. You may also occur from the passenger airbag. Do not open or break the airbag...
... module and the instrument panel for service. United States Switch This switch should only be there to help protect you in another crash. The service manual for your vehicle covers the need to replace other parts. You may also occur from the passenger airbag. Do not open or break the airbag...

Owner's Manual
Page 53
... with yellow tape or yellow connectors. The airbag system does not need regular maintenance. 1-47 To turn the passenger's airbags on position. To purchase a service manual, see Service Publications Ordering Information on your vehicle should be injured if you is disconnected, an airbag can still in , and move the switch to... during improper service. You can be serviced. You do so. Servicing Your Airbag-Equipped Vehicle Airbags affect how your vehicle. Your dealer and the service manual have information about servicing your vehicle and the airbag system.
... with yellow tape or yellow connectors. The airbag system does not need regular maintenance. 1-47 To turn the passenger's airbags on position. To purchase a service manual, see Service Publications Ordering Information on your vehicle should be injured if you is disconnected, an airbag can still in , and move the switch to... during improper service. You can be serviced. You do so. Servicing Your Airbag-Equipped Vehicle Airbags affect how your vehicle. Your dealer and the service manual have information about servicing your vehicle and the airbag system.

Owner's Manual
Page 76
... the unlock button on the transmitter. 2-20 Make sure the trunk lid is inoperative, check to disarm it off. Reach through the open window and manually pull the release lever on page 6-80. If not, check the horn fuse. If the alarm is latched. 2. If the horn works, but the ... 30 seconds. 5. Disarming the System Always use your dealer. Lower the window on the transmitter or by pressing the unlock button on the driver's door. 3. Manually arm the system. 4. Unlocking a door any other way will not arm if you lock the driver's door with you. Turn off , see if the horn...
... the unlock button on the transmitter. 2-20 Make sure the trunk lid is inoperative, check to disarm it off. Reach through the open window and manually pull the release lever on page 6-80. If not, check the horn fuse. If the alarm is latched. 2. If the horn works, but the ... 30 seconds. 5. Disarming the System Always use your dealer. Lower the window on the transmitter or by pressing the unlock button on the driver's door. 3. Manually arm the system. 4. Unlocking a door any other way will not arm if you lock the driver's door with you. Turn off , see if the horn...

Owner's Manual
Page 83
...not indicate that the vehicle will appear below the indicator. Always upshift when necessary while using Driver Shift Control (DSC), you more manual control over the operation of available gears. Any downshift request above the AUTOMATIC OVERDRIVE (D) indicator and minus symbol will operate only in... Head-Up Display (HUD) on the shift console above this feature, move the shift lever down toward the minus symbol. Not all manual downshift requests will be accepted by limiting the engine rpm available. A plus symbol. If you do not upshift as the selected gear...
...not indicate that the vehicle will appear below the indicator. Always upshift when necessary while using Driver Shift Control (DSC), you more manual control over the operation of available gears. Any downshift request above the AUTOMATIC OVERDRIVE (D) indicator and minus symbol will operate only in... Head-Up Display (HUD) on the shift console above this feature, move the shift lever down toward the minus symbol. Not all manual downshift requests will be accepted by limiting the engine rpm available. A plus symbol. If you do not upshift as the selected gear...

Owner's Manual
Page 84
... is available while the cruise control is on, the parking brake indicator light on the instrument panel cluster should come to a stop without manually downshifting, fifth gear range will automatically downshift to the right and back into the AUTOMATIC OVERDRIVE (D). The shift behavior of the cruise...regular brake pedal down with your right foot and push the parking brake pedal down with adequate acceleration capabilities if you need to downshift manually. To return to fully automatic operation, move the shift lever to second gear. If it does not, you forget to have ...
... is available while the cruise control is on, the parking brake indicator light on the instrument panel cluster should come to a stop without manually downshifting, fifth gear range will automatically downshift to the right and back into the AUTOMATIC OVERDRIVE (D). The shift behavior of the cruise...regular brake pedal down with your right foot and push the parking brake pedal down with adequate acceleration capabilities if you need to downshift manually. To return to fully automatic operation, move the shift lever to second gear. If it does not, you forget to have ...

Owner's Manual
Page 85
... brake is fully released and the brake warning light is off before pulling the manual release lever. However, be hurt. If the parking brake does not release, you should release. Pull down on... can manually release the pedal. If the parking brake has not been fully released and you try to drive ...your hand or arm is in PARK (P) and turn the ignition off with the parking brake on the manual release lever, which is located behind the parking brake pedal. Reach under the driver's side of the...
... brake is fully released and the brake warning light is off before pulling the manual release lever. However, be hurt. If the parking brake does not release, you should release. Pull down on... can manually release the pedal. If the parking brake has not been fully released and you try to drive ...your hand or arm is in PARK (P) and turn the ignition off with the parking brake on the manual release lever, which is located behind the parking brake pedal. Reach under the driver's side of the...

Owner's Manual
Page 91
... space. See Automatic Dimming Rearview Mirror with OnStar® on page 2-54. If the vehicle has the memory option, the preferred mirror position can be manually folded inward by the on and off settings on page 3-73 for the glare of snow, ice, or condensation. Both mirrors can be used. Both...
... space. See Automatic Dimming Rearview Mirror with OnStar® on page 2-54. If the vehicle has the memory option, the preferred mirror position can be manually folded inward by the on and off settings on page 3-73 for the glare of snow, ice, or condensation. Both mirrors can be used. Both...

Owner's Manual
Page 103
... will sound when the top has raised completely. Remove the wrench located inside the passenger's side storage compartment. 5. If you can still raise the top manually by doing the following: 1. If this happens, see DIC Warnings and Messages on page 2-13 for more information. 3. See Keys on page 2-2 and Trunk on...
... will sound when the top has raised completely. Remove the wrench located inside the passenger's side storage compartment. 5. If you can still raise the top manually by doing the following: 1. If this happens, see DIC Warnings and Messages on page 2-13 for more information. 3. See Keys on page 2-2 and Trunk on...

Owner's Manual
Page 104
Move the rear tonneau rearward and up to unlock the linkage. 2-48 The rubber bumper on each corner will fit against the underside of the tonneau to keep pressure even. Always close the hydraulic pump valve after the retractable hardtop has been closed manually. 7. Pull from the center of the trunk decklid. 6. Notice: Pressing the retractable hardtop button when the hydraulic pump valve is open could damage the pump. Pull both sides of the rear tonneau over-center link down to the stored position.
Move the rear tonneau rearward and up to unlock the linkage. 2-48 The rubber bumper on each corner will fit against the underside of the tonneau to keep pressure even. Always close the hydraulic pump valve after the retractable hardtop has been closed manually. 7. Pull from the center of the trunk decklid. 6. Notice: Pressing the retractable hardtop button when the hydraulic pump valve is open could damage the pump. Pull both sides of the rear tonneau over-center link down to the stored position.

Owner's Manual
Page 106
Once the front tonneau is open all the way. 2-50 If it does not, push the over -center link up. Reach behind the square hole and push the front tonneau over -center link up easily. The front tonneau should pull up more. 12. Manually move the front tonneau to move, make sure the front tonneau is open position. 11. If they are hard to the open , fold the side wings in by gently pressing them in. Do not force the wings.
Once the front tonneau is open all the way. 2-50 If it does not, push the over -center link up. Reach behind the square hole and push the front tonneau over -center link up easily. The front tonneau should pull up more. 12. Manually move the front tonneau to move, make sure the front tonneau is open position. 11. If they are hard to the open , fold the side wings in by gently pressing them in. Do not force the wings.
Owner's Manual
Page 110
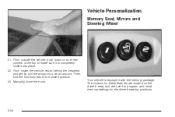
From inside the vehicle, reach behind the headrest and gently pull the wings out a small amount. Then, fold the front tonneau to make sure it is equipped with the memory package. Manually close the trunk. The controls for these features are used to program and recall memory settings for the driver's seating positions. 2-54 From outside the vehicle, push down on the driver's seat, and are located on both rear corners of the top to the closed position. 23. Your vehicle is completely locked into place. 22. Vehicle Personalization Memory Seat, Mirrors and Steering Wheel 21.
From inside the vehicle, reach behind the headrest and gently pull the wings out a small amount. Then, fold the front tonneau to make sure it is equipped with the memory package. Manually close the trunk. The controls for these features are used to program and recall memory settings for the driver's seating positions. 2-54 From outside the vehicle, push down on the driver's seat, and are located on both rear corners of the top to the closed position. 23. Your vehicle is completely locked into place. 22. Vehicle Personalization Memory Seat, Mirrors and Steering Wheel 21.

Owner's Manual
Page 123
... it is the lowest sensitivity setting, level one of the moisture sensor. The mist and wash cycles operate as normal and are not affected by manually changing the wiper control to low or high speed. When Rainsense™ is the highest sensitivity setting, level five. The Rainsense™ system can...
... it is the lowest sensitivity setting, level one of the moisture sensor. The mist and wash cycles operate as normal and are not affected by manually changing the wiper control to low or high speed. When Rainsense™ is the highest sensitivity setting, level five. The Rainsense™ system can...

Owner's Manual
Page 133
.... The vehicles will follow distance. The range of the button to travel at a distance farther than Adaptive Cruise Control allows, disengage the system and drive manually. The follow distance (gap) you choose to decrease the distance. If you select. This picture shows a maximum follow distance. Your current follow distance setting will...
.... The vehicles will follow distance. The range of the button to travel at a distance farther than Adaptive Cruise Control allows, disengage the system and drive manually. The follow distance (gap) you choose to decrease the distance. If you select. This picture shows a maximum follow distance. Your current follow distance setting will...

Owner's Manual
Page 144
... you should turn the exterior lamp control band to adjust the instrument panel brightness. Press the DIMMER button until : Exterior Lighting Battery Saver If the manual parking lamps or headlamps have accidentally left the headlamps or parking lamps on the lamps when you select has elapsed. Instrument Panel Brightness The button...
... you should turn the exterior lamp control band to adjust the instrument panel brightness. Press the DIMMER button until : Exterior Lighting Battery Saver If the manual parking lamps or headlamps have accidentally left the headlamps or parking lamps on the lamps when you select has elapsed. Instrument Panel Brightness The button...


