
Owner's Manual
Page 230
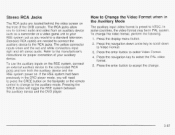
... stereo audio. To use the auxiliary inputs on the front of your RSE system just as a camcorder or a video game unit to NTSC. The RCA jacks allow you to connect audio and video from an auxiliary device such as you will toggle the RSE system between the auxiliary device and the... DVD player. Press the display menu button. 2. Press the enter button to the color-coded RCA jacks and turn both the auxiliary device and the RSE system power on the faceplate or the remote control to a standard television. Pressing the SRCE button...
... stereo audio. To use the auxiliary inputs on the front of your RSE system just as a camcorder or a video game unit to NTSC. The RCA jacks allow you to connect audio and video from an auxiliary device such as you will toggle the RSE system between the auxiliary device and the... DVD player. Press the display menu button. 2. Press the enter button to the color-coded RCA jacks and turn both the auxiliary device and the RSE system power on the faceplate or the remote control to a standard television. Pressing the SRCE button...

Owner's Manual
Page 231
... audio source on the radio if the RSE system power is capable of outputting audio to the vehicle speakers by infrared to the wired headphone jacks on page 3-91 for more information. Refer to Rear Seat Audio (RSA) on the Rear Seat Audio system (if equipped). Refer to the radio ... adjust the speaker volume on the radio. The RSE system may be heard through the following possible sources: Wireless Headphones Vehicle Speakers Vehicle wired headphone jacks on the Rear Seat Audio system (if equipped) The RSE system will not be selected as an audio source on the Rear Seat Audio system...
... audio source on the radio if the RSE system power is capable of outputting audio to the vehicle speakers by infrared to the wired headphone jacks on page 3-91 for more information. Refer to Rear Seat Audio (RSA) on the Rear Seat Audio system (if equipped). Refer to the radio ... adjust the speaker volume on the radio. The RSE system may be heard through the following possible sources: Wireless Headphones Vehicle Speakers Vehicle wired headphone jacks on the Rear Seat Audio system (if equipped) The RSE system will not be selected as an audio source on the Rear Seat Audio system...
Owner's Manual
Page 232
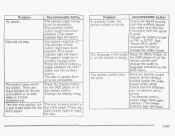
.... Press the SRCE button to eject DVD player. and the signal is being stored ir t was ejected, but The disc is good. See "Stereo RCA Jacks" previously for how to PAL or NTSC. The language in on both ;ides or it looks stretched out. window below the video screen while using...
.... Press the SRCE button to eject DVD player. and the signal is being stored ir t was ejected, but The disc is good. See "Stereo RCA Jacks" previously for how to PAL or NTSC. The language in on both ;ides or it looks stretched out. window below the video screen while using...

Owner's Manual
Page 369
Make sure the spare tire is on page 5-72 for damaged tires or wheels. If it moves, use the wheel wrench and jack handle extensions to Check Check your tires have enough air (underinflation), you can get the following: Too much air (overinflation), you that underinflation or overinflation ...
Make sure the spare tire is on page 5-72 for damaged tires or wheels. If it moves, use the wheel wrench and jack handle extensions to Check Check your tires have enough air (underinflation), you can get the following: Too much air (overinflation), you that underinflation or overinflation ...

Owner's Manual
Page 377
... at the opposite end. 5-74 Get the vehicle under control by driving slowly to a level place. It may require the same correction you'd use your jacking equipment to change your tires properly. You and they could be the tire on your foot from the one being changed. If a front tire fails... in PARK (P). 3. If a Tire Goes Flat It's unusual for a tire to "blowout" while you're driving, especially if you maintain your tire. well off the jack and roll over you or other side of a tire, it's much like a skid and may be very bumpy and noisy, but you can slip off...
... at the opposite end. 5-74 Get the vehicle under control by driving slowly to a level place. It may require the same correction you'd use your jacking equipment to change your tires properly. You and they could be the tire on your foot from the one being changed. If a front tire fails... in PARK (P). 3. If a Tire Goes Flat It's unusual for a tire to "blowout" while you're driving, especially if you maintain your tire. well off the jack and roll over you or other side of a tire, it's much like a skid and may be very bumpy and noisy, but you can slip off...
Owner's Manual
Page 378
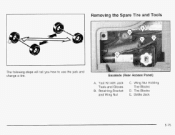
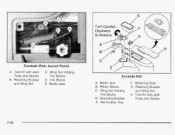
Tool Kit with Jack Tools and Gloves B. Tire Blocks E. Bottle Jack 5-75 Removing the Spare Tire and Tools The following steps will tell you how to use the jack ancI change a tire. Retaining Bracket and Wing Nut C. Wing Nut Holding Tire Blocks D. Escalade (Rear Access Panel) A.
Tool Kit with Jack Tools and Gloves B. Tire Blocks E. Bottle Jack 5-75 Removing the Spare Tire and Tools The following steps will tell you how to use the jack ancI change a tire. Retaining Bracket and Wing Nut C. Wing Nut Holding Tire Blocks D. Escalade (Rear Access Panel) A.
Owner's Manual
Page 379
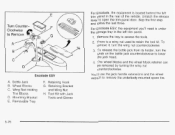
... extensions and the wheel wrench to access the tools. 2. Remove the tray to remove the underbody-mounted spare tire. 5-76 A B C 3. Bottle Jack B. Turn CounterClockwise to Remove e For Escalade, the equipment is located behind the left trim panel. 1. Wheel Blocks C. Unlatch the release lever to retain the tool kit. Mounting Bracket E.RemovableTray F. There...
... extensions and the wheel wrench to access the tools. 2. Remove the tray to remove the underbody-mounted spare tire. 5-76 A B C 3. Bottle Jack B. Turn CounterClockwise to Remove e For Escalade, the equipment is located behind the left trim panel. 1. Wheel Blocks C. Unlatch the release lever to retain the tool kit. Mounting Bracket E.RemovableTray F. There...

Owner's Manual
Page 380
If your vehicle is equipped with a hoist lock (J), open the spare tire lock cover on the bumper and use the ignition key to remove the lock. 2. A. Hoist Cable D. Jack Handle Extensions J. 1. HoistAssembly C. Hoist Shaft Access Hole H. Hoist End of Extension Tool G. Spare Tire (Valve Stem Pointed Up) B. HoistShaft F. Wheel Wrench I ) as shown. Hoist Lock (If Equipped) 5-77 Tire Retainer E. Assemble the wheel wrench (H) and the two jack handle extensions (I .
If your vehicle is equipped with a hoist lock (J), open the spare tire lock cover on the bumper and use the ignition key to remove the lock. 2. A. Hoist Cable D. Jack Handle Extensions J. 1. HoistAssembly C. Hoist Shaft Access Hole H. Hoist End of Extension Tool G. Spare Tire (Valve Stem Pointed Up) B. HoistShaft F. Wheel Wrench I ) as shown. Hoist Lock (If Equipped) 5-77 Tire Retainer E. Assemble the wheel wrench (H) and the two jack handle extensions (I .

Owner's Manual
Page 382
Remove the center cap by placing the chisel end of the wheel wrench in the slot on the wheel and gently prying the cap out. The tools you'll be using include the bottle jack (A), the wheel blocks (B), the jack handle (C), the jack handle extensions (D), and the wheel wrench (E). 5-79 Removing the Flat Tire and Installing the Spare Tire Use the following pictures and instructions to remove the flat tire and raise the vehicle, 1.
Remove the center cap by placing the chisel end of the wheel wrench in the slot on the wheel and gently prying the cap out. The tools you'll be using include the bottle jack (A), the wheel blocks (B), the jack handle (C), the jack handle extensions (D), and the wheel wrench (E). 5-79 Removing the Flat Tire and Installing the Spare Tire Use the following pictures and instructions to remove the flat tire and raise the vehicle, 1.

Owner's Manual
Page 383
See text and art following for the exact jack placement. 5-80 These locations are the general area of jack placement. Don't removethe wheel nuts yet. Turn the wheel wrench counterclockwise to loosen all the wheel nuts. Jack Positions (overall view) 2. Use the wheel wrench to loosen the wheel nuts.
See text and art following for the exact jack placement. 5-80 These locations are the general area of jack placement. Don't removethe wheel nuts yet. Turn the wheel wrench counterclockwise to loosen all the wheel nuts. Jack Positions (overall view) 2. Use the wheel wrench to loosen the wheel nuts.

Owner's Manual
Page 384
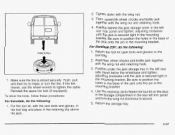
... To help avoid personal injury and vehicle damage, be badly injured killed. Position the jack on a front tire of the vehicle, you off the ground so there is it dangerous. Attach the jack handle to fit the jack lift head into the proper location before raising the vehicle. 3. Turn the wheel wrench ...Getting under the vehicle. Attach the wheel wrench to raise the vehicle. Raise the vehicle far enough off could be sure to the jack. If the vehicle slips the jack you 'll need to clear the ground. 5-81 Never get under or a vehicle whenit is on the frame behind the flat ...
... To help avoid personal injury and vehicle damage, be badly injured killed. Position the jack on a front tire of the vehicle, you off the ground so there is it dangerous. Attach the jack handle to fit the jack lift head into the proper location before raising the vehicle. 3. Turn the wheel wrench ...Getting under the vehicle. Attach the wheel wrench to raise the vehicle. Raise the vehicle far enough off could be sure to the jack. If the vehicle slips the jack you 'll need to clear the ground. 5-81 Never get under or a vehicle whenit is on the frame behind the flat ...

Owner's Manual
Page 385
...room for the spare tire to clear the ground. 5. Use the jacking pad provided on a rear tire of the vehicle, you'll need to the jack handle extensions. Rear Position Turn the wheel wrench clockwise to the jack. Remove any rust or dirt from the wheel bolts, mounting surfaces and... spare wheel. 5-82 Raise the vehicle far enough off the flat tire. I 4. Attach the wheel wrench to use the jack handle (C) and both jack handle ...
...room for the spare tire to clear the ground. 5. Use the jacking pad provided on a rear tire of the vehicle, you'll need to the jack handle extensions. Rear Position Turn the wheel wrench clockwise to the jack. Remove any rust or dirt from the wheel bolts, mounting surfaces and... spare wheel. 5-82 Raise the vehicle far enough off the flat tire. I 4. Attach the wheel wrench to use the jack handle (C) and both jack handle ...

Owner's Manual
Page 386
... use a cloth or a paper towel to use a scraper or wire brush later, if you can make the wheel nuts become loose after a time. Lower the jack completely. Your wheel could come loose. After mounting the spare, put the wheel nuts back on studs or nuts.If you change a wheel, remove any...
... use a cloth or a paper towel to use a scraper or wire brush later, if you can make the wheel nuts become loose after a time. Lower the jack completely. Your wheel could come loose. After mounting the spare, put the wheel nuts back on studs or nuts.If you change a wheel, remove any...

Owner's Manual
Page 388
... tire carrier. To avoid this, always stow the wheel properly with the hoist. Hoist Cable D. Hoist End of the vehicle could cause injury. Wheel Wrench I. Jack Handle Extensions J. Store the tire under the vehicle with the valve stem pointing up and have the wheel repaired as soon as possible. However, storing... for an extended period of the vehicle in the proper place. Usethe art and textfollowing to help you: A. Hoist Assembly C. Storing a Flat or Spare Tire, Jack and Tools Storing a jack,atire, 01 ther e lipment in the passenger compartment of Extension Tool G.
... tire carrier. To avoid this, always stow the wheel properly with the hoist. Hoist Cable D. Hoist End of the vehicle could cause injury. Wheel Wrench I. Jack Handle Extensions J. Store the tire under the vehicle with the valve stem pointing up and have the wheel repaired as soon as possible. However, storing... for an extended period of the vehicle in the proper place. Usethe art and textfollowing to help you: A. Hoist Assembly C. Storing a Flat or Spare Tire, Jack and Tools Storing a jack,atire, 01 ther e lipment in the passenger compartment of Extension Tool G.
Owner's Manual
Page 390
... the tool kit on the stud in the storage compartment in the mounting bracket. For Escalade ESV, do the following : PUSH & PULL 1. Assemble wheel chocks and bottle jack together with the jack tools and gloves, in the tool bag and place in the mounting bracket. Reinstall the.... To store the tools, follow these procedures: For Escalade, do the following : 1. Then, assemble wheel chocks and bottle jack together with the wing nut. 3. 2. Position behind the jack storage cover in the mounting bracket. Return the tool kit (jack tools and gloves) to tighten the cable. Tighten down...
... the tool kit on the stud in the storage compartment in the mounting bracket. For Escalade ESV, do the following : PUSH & PULL 1. Assemble wheel chocks and bottle jack together with the jack tools and gloves, in the tool bag and place in the mounting bracket. Reinstall the.... To store the tools, follow these procedures: For Escalade, do the following : 1. Then, assemble wheel chocks and bottle jack together with the wing nut. 3. 2. Position behind the jack storage cover in the mounting bracket. Return the tool kit (jack tools and gloves) to tighten the cable. Tighten down...
Owner's Manual
Page 391
Bottle Jack Escalade ESV A. RemovableTray F. Wing Nut Holding Tire Blocks D. Wing Nut Holding Tire Blocks D. Mounting Bracket E. Retaining Bracket and Wing Nut H. Escalade (Rear Access Panel) A. Bottle Jack B.Wheel Blocks C. Retaining Hook G. Retaining Bracket and Wing Nut C. Tire Blocks E. Tool with Jack Tools and Gloves B. Tool Kit with Kit Jack Tools and Gloves 5-88
Bottle Jack Escalade ESV A. RemovableTray F. Wing Nut Holding Tire Blocks D. Wing Nut Holding Tire Blocks D. Mounting Bracket E. Retaining Bracket and Wing Nut H. Escalade (Rear Access Panel) A. Bottle Jack B.Wheel Blocks C. Retaining Hook G. Retaining Bracket and Wing Nut C. Tire Blocks E. Tool with Jack Tools and Gloves B. Tool Kit with Kit Jack Tools and Gloves 5-88
Owner's Manual
Page 467
..., Audio ...StereoRCAJacks ...Storage Areas Center Console Storage Area ...Convenience Net ...Cupholder(s) ...GloveBox ...Luggage Carrier ...Rear Seat Armrest ...Rear Storage Area ...Storing a Flat or Spare Tire, Jack and Tools ...Stuck in Sand, Mud, Ice or Snow ...Sun Visors ...Sunroof ...Supplemental Restraint System(SRS) ...Adding Equipment to Your Air Bag-Equipped Vehicle ...How...
..., Audio ...StereoRCAJacks ...Storage Areas Center Console Storage Area ...Convenience Net ...Cupholder(s) ...GloveBox ...Luggage Carrier ...Rear Seat Armrest ...Rear Storage Area ...Storing a Flat or Spare Tire, Jack and Tools ...Stuck in Sand, Mud, Ice or Snow ...Sun Visors ...Sunroof ...Supplemental Restraint System(SRS) ...Adding Equipment to Your Air Bag-Equipped Vehicle ...How...


