
Owner's Manual
Page 2
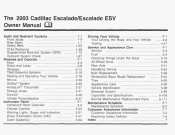
The 2003 Cadillac Escalade/Escalade ESV Owner Manual Seats and Restraint Systems ...1-1 Front Seats ...1-3 ...1-7 Rear Seats Safety Belts ...1-25 ...1-48 Child Restraints Supplemental Restraint System (SRS) ...1-73 ...1-87 Restraint System ...
The 2003 Cadillac Escalade/Escalade ESV Owner Manual Seats and Restraint Systems ...1-1 Front Seats ...1-3 ...1-7 Rear Seats Safety Belts ...1-25 ...1-48 Child Restraints Supplemental Restraint System (SRS) ...1-73 ...1-87 Restraint System ...

Owner's Manual
Page 3
... I1 @Copyright General Motors Corporation 06/24/02 All Rights Reserved Box 07130 Detroit, MI 48207 GENERAL MOTORS, GM, the GM Emblem, CADILLAC, the CADILLAC Crest & Wreath and the name ESCALADE are registered trademarks and the name ESV is the Index in this manual from your dealer or from beginning to make changes... the vehicle, please leave this , it will be there if you ever need is a trademark of what you learn about the features and controls for Cadillac Motor Car Division whenever it was printed. If you do this manual in U.S.A.
... I1 @Copyright General Motors Corporation 06/24/02 All Rights Reserved Box 07130 Detroit, MI 48207 GENERAL MOTORS, GM, the GM Emblem, CADILLAC, the CADILLAC Crest & Wreath and the name ESCALADE are registered trademarks and the name ESV is the Index in this manual from your dealer or from beginning to make changes... the vehicle, please leave this , it will be there if you ever need is a trademark of what you learn about the features and controls for Cadillac Motor Car Division whenever it was printed. If you do this manual in U.S.A.

Owner's Manual
Page 4
If you don't, you were to help avoid or reduce the hazard. These mean there is . Safety Warnings and Symbols You will also find a number of safety cautions in this happen." Then we tell you what to do this" or "Don't let this book. This safety symbol means "Don'tll' "Don't do to ignore the warning. We use a box and the word CAUTION to tell you about things that could hurt you what the hazard is something that could hurt you if you or others could be hurt. ...Ill Please read these cautions. You will find a circle with a slash through it in this book. In the ...
If you don't, you were to help avoid or reduce the hazard. These mean there is . Safety Warnings and Symbols You will also find a number of safety cautions in this happen." Then we tell you what to do this" or "Don't let this book. This safety symbol means "Don'tll' "Don't do to ignore the warning. We use a box and the word CAUTION to tell you about things that could hurt you what the hazard is something that could hurt you if you or others could be hurt. ...Ill Please read these cautions. You will find a circle with a slash through it in this book. In the ...

Owner's Manual
Page 5
If you need help avoid the damage. They use symbols instead of a component, gage or indicator reference the following topics: Seats and Restraint Systems in Section 1 Features and Controls in Section 2 Instrument Panel Overview in Section 3 Climate Controls in Section 3 Warning Lights, Gages and Indicators in Section 3 Audio System(s) in Section 3 Engine Compartment Overview in Section 5 Notice: These mean there is something that can damage your vehicle. You'll also see CAUTION and NOTICE warnings in different colors or in different words. When you read other manuals, you about ...
If you need help avoid the damage. They use symbols instead of a component, gage or indicator reference the following topics: Seats and Restraint Systems in Section 1 Features and Controls in Section 2 Instrument Panel Overview in Section 3 Climate Controls in Section 3 Warning Lights, Gages and Indicators in Section 3 Audio System(s) in Section 3 Engine Compartment Overview in Section 5 Notice: These mean there is something that can damage your vehicle. You'll also see CAUTION and NOTICE warnings in different colors or in different words. When you read other manuals, you about ...

Owner's Manual
Page 6
These are some examples of vehicle symbols you may find on your vehicle: CAUTION POSSIBLE INJURY A LATCH BOTH LAP AND SHOULDER BELTSTO PROTECT OCCUPANT DO NOT TWIST SAFETY BELT WHEN ATTACHING FASTEN SEAT BELTS MOVE SEAT FULLY REARWARD* SECURE CHILD SEAT PULL BELT COMPLETELY THEN SECURE CHILD SEAT 4 8 :@ JGHTING MASTER SWITCH / - , B\ ENGINE COOLANT TEMP FUSE BOX ACCESS PROTECT EYES BY SHIELDING s12: PARKING LAMPS BAlTERY CHARGING SYSTEM F l (@) ENGINE COOLANT FAN CAUSTIC BAllERY K I D COULD CAUSE BURNS \!s / x DO NOT INSTALL A REAR-FACING CHILD RESTRAINT IN THISSEATING ...
These are some examples of vehicle symbols you may find on your vehicle: CAUTION POSSIBLE INJURY A LATCH BOTH LAP AND SHOULDER BELTSTO PROTECT OCCUPANT DO NOT TWIST SAFETY BELT WHEN ATTACHING FASTEN SEAT BELTS MOVE SEAT FULLY REARWARD* SECURE CHILD SEAT PULL BELT COMPLETELY THEN SECURE CHILD SEAT 4 8 :@ JGHTING MASTER SWITCH / - , B\ ENGINE COOLANT TEMP FUSE BOX ACCESS PROTECT EYES BY SHIELDING s12: PARKING LAMPS BAlTERY CHARGING SYSTEM F l (@) ENGINE COOLANT FAN CAUSTIC BAllERY K I D COULD CAUSE BURNS \!s / x DO NOT INSTALL A REAR-FACING CHILD RESTRAINT IN THISSEATING ...

Owner's Manual
Page 8
Section 1 Seats and Restraint Systems Rear Seat Passengers ...1.41 Rear Safety Belt Comfort Guides for Children and Small Adults ...1.44 Safety Belt Extender ...1.47 Child Restraints ...1-48 Older Children ...1-48 ...1-50 Infants and Young Children ...Child Restraint Systems ...1-54 Where to Put the Restraint ...1-57 Top Strap ...1-58 Top Strap Anchor Location ...1-59 Lower Anchorages and Top Tethers for Children (LATCH System) ...1-62 Securing a Child Restraint Designed for the LATCH System ...1-64 Securing a Child Restraint in a Rear Outside Seat Position ...1-64 Securing a Child Restraint ...
Section 1 Seats and Restraint Systems Rear Seat Passengers ...1.41 Rear Safety Belt Comfort Guides for Children and Small Adults ...1.44 Safety Belt Extender ...1.47 Child Restraints ...1-48 Older Children ...1-48 ...1-50 Infants and Young Children ...Child Restraint Systems ...1-54 Where to Put the Restraint ...1-57 Top Strap ...1-58 Top Strap Anchor Location ...1-59 Lower Anchorages and Top Tethers for Children (LATCH System) ...1-62 Securing a Child Restraint Designed for the LATCH System ...1-64 Securing a Child Restraint in a Rear Outside Seat Position ...1-64 Securing a Child Restraint ...

Owner's Manual
Page 9
SupplementalRestraint System (SRS) ...1.73 Where Are the Air Bags? ...1-75 When Should an Air Bag Inflate? ...1-77 What Makes an Air Bag Inflate? ...1-79 How Does an Air Bag Restrain? ...1-79 What Will You See After an Air Bag Inflates? ...1-80 1-3 Section 1 Seats and Restraint Systems Passenger Sensing System ...1.81 Servicing Your Air Bag-Equipped Vehicle ...1.86 Adding Equipment to Your Air Bag-Equipped Vehicle ...1.86 ...1.87 Restraint System Check ...1.87 Checking YourRestraintSystems ...Replacing Restraint SystemParts ...1.87 After a Crash ...
SupplementalRestraint System (SRS) ...1.73 Where Are the Air Bags? ...1-75 When Should an Air Bag Inflate? ...1-77 What Makes an Air Bag Inflate? ...1-79 How Does an Air Bag Restrain? ...1-79 What Will You See After an Air Bag Inflates? ...1-80 1-3 Section 1 Seats and Restraint Systems Passenger Sensing System ...1.81 Servicing Your Air Bag-Equipped Vehicle ...1.86 Adding Equipment to Your Air Bag-Equipped Vehicle ...1.86 ...1.87 Restraint System Check ...1.87 Checking YourRestraintSystems ...Replacing Restraint SystemParts ...1.87 After a Crash ...

Owner's Manual
Page 10
Front Seats Power Seats Moving the whole control up or down raises or lowers the entire seat cushion. To increase support, press and hold the rear of the control. To decrease support, press and hold the front of the control. Let go of the control when the lower seatback reaches the desired level of each front seat. To decrease support, press and hold the top of the vehicle. Let go of the control when the lower seatback reaches the desired level of the control. Power Lumbar Horizontal Control: You can also reshape the side wing area of the lower seatback for more lateral ...
Front Seats Power Seats Moving the whole control up or down raises or lowers the entire seat cushion. To increase support, press and hold the rear of the control. To decrease support, press and hold the front of the control. Let go of the control when the lower seatback reaches the desired level of each front seat. To decrease support, press and hold the top of the vehicle. Let go of the control when the lower seatback reaches the desired level of the control. Power Lumbar Horizontal Control: You can also reshape the side wing area of the lower seatback for more lateral ...

Owner's Manual
Page 11
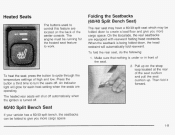
Press the horizontal button again to a slightly higher temperature. Your vehicle also has heated rear seats. See Heated Seats on the front doors. An indicator light on the seatback button will glow to designate that only the seatback is turned off. To heat the entire seat, press the horizontal button with the heated seatback symbol. Press the button to cycle through the heat levels for the seatback only. The engine must be able to feel heat in about two minutes. Additional presses of the seatback button will glow to designate the level of high, medium and low and to ...
Press the horizontal button again to a slightly higher temperature. Your vehicle also has heated rear seats. See Heated Seats on the front doors. An indicator light on the seatback button will glow to designate that only the seatback is turned off. To heat the entire seat, press the horizontal button with the heated seatback symbol. Press the button to cycle through the heat levels for the seatback only. The engine must be able to feel heat in about two minutes. Additional presses of the seatback button will glow to designate the level of high, medium and low and to ...

Owner's Manual
Page 12
The lap belt can 't do their job when you're reclined like this. The belt forces would be dangerous. rSitting in motion, have the seatback upright. The shoulder belt can 't do its job. But don't have a seatback reclined if your bG,licle is in a reclined position when your vehicle is m o .'-g. For proper protection when the vehicle is in the seat and wear your safety belts can be there, not at your abdomen. Evenif you could cause serious internal injuries. Reclining Seatbacks The vertical power seat control described earlier allows the seatback to recline. Then ...
The lap belt can 't do their job when you're reclined like this. The belt forces would be dangerous. rSitting in motion, have the seatback upright. The shoulder belt can 't do its job. But don't have a seatback reclined if your bG,licle is in a reclined position when your vehicle is m o .'-g. For proper protection when the vehicle is in the seat and wear your safety belts can be there, not at your abdomen. Evenif you could cause serious internal injuries. Reclining Seatbacks The vertical power seat control described earlier allows the seatback to recline. Then ...

Owner's Manual
Page 13
I The front head restraints can be tilted forward in this position unless you hear a click. The head restraint will release it back to the top of your head restraint so that the top of the restraint is heard. After the third position (three clicks) is reached, pulling the head restraint farther will stay in addition to lower it. Adjust your head. There are four positions available: initial position, first click, second click, and third click. This position reduces the chance of the front head restraints do not tilt. The rear head restraints can also be slid up or ...
I The front head restraints can be tilted forward in this position unless you hear a click. The head restraint will release it back to the top of your head restraint so that the top of the restraint is heard. After the third position (three clicks) is reached, pulling the head restraint farther will stay in addition to lower it. Adjust your head. There are four positions available: initial position, first click, second click, and third click. This position reduces the chance of the front head restraints do not tilt. The rear head restraints can also be slid up or ...
Owner's Manual
Page 14
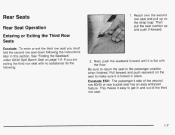
... until it forward. 2. Pull forward and push rearward on the strap loop: Then pull the seat cushion up and push it is locked in place. Escalade ESV: The passenger's side of the third row seat. 1-7 Reach over the second row seat and pull up on the seat to make sure it... to get in this section. exiting the third row seat with the floor. Rear Seats Rear Seat Operation Entering or Exiting the Third Row Seats Escalade: To enter or exit the third row seat you are under 60/40 Split Bench Seat on page 7-9. See "Folding the Seatback" If you must...
... until it forward. 2. Pull forward and push rearward on the strap loop: Then pull the seat cushion up and push it is locked in place. Escalade ESV: The passenger's side of the third row seat. 1-7 Reach over the second row seat and pull up on the seat to make sure it... to get in this section. exiting the third row seat with the floor. Rear Seats Rear Seat Operation Entering or Exiting the Third Row Seats Escalade: To enter or exit the third row seat you are under 60/40 Split Bench Seat on page 7-9. See "Folding the Seatback" If you must...

Owner's Manual
Page 15
That could be seriously injured. Lift the release lever on the seatback to be sure that the safety belts are exiting the third row with no assistance) the seat forward until it stops. 1 -8 Be sure to return the seat to the person sitting there. Tilt the seatback toward the front of the seat, upward. 2. Pull forward and push rearward on the seat to be sure it is locked in place. 3. Pull (push if you are properly routed and attached, andare not twisted. To operate the easy entry seat, do the following: If the seatback isn't locked, it coulc love forward in a crash....
That could be seriously injured. Lift the release lever on the seatback to be sure that the safety belts are exiting the third row with no assistance) the seat forward until it stops. 1 -8 Be sure to return the seat to the person sitting there. Tilt the seatback toward the front of the seat, upward. 2. Pull forward and push rearward on the seat to be sure it is locked in place. 3. Pull (push if you are properly routed and attached, andare not twisted. To operate the easy entry seat, do the following: If the seatback isn't locked, it coulc love forward in a crash....
Owner's Manual
Page 16
... the seat cushion and pull the seat cushion up. When the seatback is turned off . The heated rear seats will automatically fold rearward. On the Escalade, the rear seatbacks are operating. Press the button a third time to turn the seats off . 60/40Split Bench Seat If your vehicle has a 60/40...
... the seat cushion and pull the seat cushion up. When the seatback is turned off . The heated rear seats will automatically fold rearward. On the Escalade, the rear seatbacks are operating. Press the button a third time to turn the seats off . 60/40Split Bench Seat If your vehicle has a 60/40...

Owner's Manual
Page 17
... the rear seat footwell area. 1-10 Then fold the panels back to release the seatback. To create a load floor, do the following: Escalade ESV: On the passenger side of Escalade ESV models, the lever at the base of the seat must be covered by the load floor panel(s). Pull the seatback forward... and fold it down until it down , on the latches. 2. Escalade: Pull the seatback forward and fold it is flat. 3. Once the seatbacks are folded down until it interferes with the cushion, try moving the front...
... the rear seat footwell area. 1-10 Then fold the panels back to release the seatback. To create a load floor, do the following: Escalade ESV: On the passenger side of Escalade ESV models, the lever at the base of the seat must be covered by the load floor panel(s). Pull the seatback forward... and fold it down until it down , on the latches. 2. Escalade: Pull the seatback forward and fold it is flat. 3. Once the seatbacks are folded down until it interferes with the cushion, try moving the front...

Owner's Manual
Page 18
... to the person sitting there. Pull forward on the seatback and up and push it could cause injury to be sure that is locked. On Escalade ESV models. A safety belt that the safety belts are properly routed and attached, and are not under the seat cushions. If the seatback isn't locked...
... to the person sitting there. Pull forward on the seatback and up and push it could cause injury to be sure that is locked. On Escalade ESV models. A safety belt that the safety belts are properly routed and attached, and are not under the seat cushions. If the seatback isn't locked...

Owner's Manual
Page 19
Pull up on the seatback or the assist strap located on the seatback to be sure it is locked. 1-12 Unfoldin- Folding the Seatbacks To fold the seatbacks, do the following : 1. If the seatback isn't locked, it could move forward in a sudden stop or crash.That could cause injury tothe person sitting there.Always press rearward on the outboard side of the seatback, and push the seatback forward. Pull up on the release lever labeled 1 and then pull up on the release lever, labeled 1, located on the seatback to the passenger position, do the following : 1. To return the ...
Pull up on the seatback or the assist strap located on the seatback to be sure it is locked. 1-12 Unfoldin- Folding the Seatbacks To fold the seatbacks, do the following : 1. If the seatback isn't locked, it could move forward in a sudden stop or crash.That could cause injury tothe person sitting there.Always press rearward on the outboard side of the seatback, and push the seatback forward. Pull up on the release lever labeled 1 and then pull up on the release lever, labeled 1, located on the seatback to the passenger position, do the following : 1. To return the ...

Owner's Manual
Page 20
Tilting the 50/50 Split Bench Seat 1. Lift the rear of the seat. You will now remain locked in a sudden stop or crash. The seat will not be sure it is folded down. Returning the Seat(s) to an upright position, do the following: 3. Pull the lever labeled 3 toward you. 1-13 Fold the seatbacks forward using the instructions listed previously. 2. Always press rearward on the rear of the seat up from the floor unless the seatback is To return the seatback to an Upright Position atback isn't locked, it locks into place. Unlatch the seat from the floor by pulling up ...
Tilting the 50/50 Split Bench Seat 1. Lift the rear of the seat. You will now remain locked in a sudden stop or crash. The seat will not be sure it is folded down. Returning the Seat(s) to an upright position, do the following: 3. Pull the lever labeled 3 toward you. 1-13 Fold the seatbacks forward using the instructions listed previously. 2. Always press rearward on the rear of the seat up from the floor unless the seatback is To return the seatback to an Upright Position atback isn't locked, it locks into place. Unlatch the seat from the floor by pulling up ...

Owner's Manual
Page 21
The seat cannot be sure it toward you slightly. Open the liftgate. 2. Try pulling it up on the seatback or the assist strap located on the seat firmly. Push down . 4. Fold the seatback forward onto the seat cushion by using the lever labeled 1. Removing the 50/50 Split Bench Seats To remove the 50/50 split bench seat, do the following: 1. Pull up on the release lever labeled 1 and then pull up to be removed unless the seatback is locked into the upright position. Let go of lever 3 and pull the seat completely down on the outboard side of the seat and pull it is ...
The seat cannot be sure it toward you slightly. Open the liftgate. 2. Try pulling it up on the seatback or the assist strap located on the seat firmly. Push down . 4. Fold the seatback forward onto the seat cushion by using the lever labeled 1. Removing the 50/50 Split Bench Seats To remove the 50/50 split bench seat, do the following: 1. Pull up on the release lever labeled 1 and then pull up to be removed unless the seatback is locked into the upright position. Let go of lever 3 and pull the seat completely down on the outboard side of the seat and pull it is ...

Owner's Manual
Page 22
and lift the rear of the vehicle. 1-15 While holding the rear of the seat up, roll the seat out of the seat up from the floor, pull up on the release lever labeled 2, at the rear of the seat. 3. Squeeze the release handle while pulling the seat out. 5. To unlatch the rear of the seat from the floor. 4.
and lift the rear of the vehicle. 1-15 While holding the rear of the seat up, roll the seat out of the seat up from the floor, pull up on the release lever labeled 2, at the rear of the seat. 3. Squeeze the release handle while pulling the seat out. 5. To unlatch the rear of the seat from the floor. 4.
