
Owner Manual
Page 10
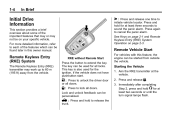
.... Lock and unlock feedback can be used for all locks. Immediately after completing Step 2, press and hold to release the trunk. Remote Vehicle Start RKE without Remote Start Press the button to cancel the panic alarm. This key is also used for the ignition, if the vehicle does not have pushbutton start...
.... Lock and unlock feedback can be used for all locks. Immediately after completing Step 2, press and hold to release the trunk. Remote Vehicle Start RKE without Remote Start Press the button to cancel the panic alarm. This key is also used for the ignition, if the vehicle does not have pushbutton start...
Owner Manual
Page 34
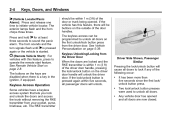
If the lock/unlock button is a key in the ignition, if equipped. The exterior lamps flash and the horn chirps three times. See Vehicle Personalization on the keys are disabled when there is pressed again within 1 m (3 ft) of the door or trunk being opened and all doors to initiate ...vehicle locator. Keyless Unlocking/Locking from the Driver Door When the doors are now closed. . . Press and hold 7 for at least three seconds to unlock all doors. Two lock/unlock button presses were used to sound the ...
If the lock/unlock button is a key in the ignition, if equipped. The exterior lamps flash and the horn chirps three times. See Vehicle Personalization on the keys are disabled when there is pressed again within 1 m (3 ft) of the door or trunk being opened and all doors to initiate ...vehicle locator. Keyless Unlocking/Locking from the Driver Door When the doors are now closed. . . Press and hold 7 for at least three seconds to unlock all doors. Two lock/unlock button presses were used to sound the ...

Owner Manual
Page 35
...vehicle door has opened and all doors are locked and the RKE transmitter is within 1 m (3 ft) of the door handle, pressing the lock/unlock button on . Passive Locking If the vehicle has the keyless access system, this feature allows you . 1. programmed through your dealer. Keys, Doors, and ...locking feature by pressing and holding the power door switch for several seconds with a door open the trunk if the RKE transmitter is within 1m (3 ft). The lock/unlock button was used to unlock all doors to select whether the doors automatically lock during normal vehicle exit. If...
...vehicle door has opened and all doors are locked and the RKE transmitter is within 1 m (3 ft) of the door handle, pressing the lock/unlock button on . Passive Locking If the vehicle has the keyless access system, this feature allows you . 1. programmed through your dealer. Keys, Doors, and ...locking feature by pressing and holding the power door switch for several seconds with a door open the trunk if the RKE transmitter is within 1m (3 ft). The lock/unlock button was used to unlock all doors to select whether the doors automatically lock during normal vehicle exit. If...
Owner Manual
Page 96
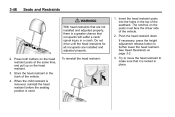
... child restraint is removed, reinstall the head restraint before the seating position is a greater chance that occupants will suffer a neck/ spinal injury in the trunk of the vehicle. 2. The notches on the posts must face the driver side of the vehicle. 4. Do not drive until the head restraints for... all occupants are not installed and adjusted properly, there is used. Press both buttons on the head restraint posts at the same time, and pull up on page 3‑2. 3. Store the head restraint in a crash. Insert the ...
... child restraint is removed, reinstall the head restraint before the seating position is a greater chance that occupants will suffer a neck/ spinal injury in the trunk of the vehicle. 2. The notches on the posts must face the driver side of the vehicle. 4. Do not drive until the head restraints for... all occupants are not installed and adjusted properly, there is used. Press both buttons on the head restraint posts at the same time, and pull up on page 3‑2. 3. Store the head restraint in a crash. Insert the ...
Owner Manual
Page 104
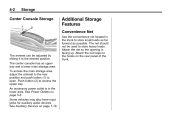
... store heavy loads. The center console has an upper tray and a lower main storage area. Push button (2) to open. See Power Outlets on the rear panel of the trunk. The armrest can be used to store small loads as far forward as possible. Some vehicles may also have input jacks for auxiliary... Net Use the convenience net located in the lower area. To access the main storage area, adjust the armrest to the rear position and push button (1) to access the upper tray. Attach the net loops to the desired position. The net should not be adjusted by sliding it to the hooks...
... store heavy loads. The center console has an upper tray and a lower main storage area. Push button (2) to open. See Power Outlets on the rear panel of the trunk. The armrest can be used to store small loads as far forward as possible. Some vehicles may also have input jacks for auxiliary... Net Use the convenience net located in the lower area. To access the main storage area, adjust the armrest to the rear position and push button (1) to access the upper tray. Attach the net loops to the desired position. The net should not be adjusted by sliding it to the hooks...
Owner Manual
Page 242
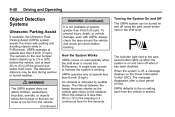
...warmer or humid weather. When the system is started. { WARNING The URPA system does not detect children, pedestrians, bicyclists, animals, or objects below trunk level. URPA defaults to the on setting each time the vehicle is off, a message displays on automatically when the shift lever is indicated by ...driver with URPA, always check the area around the vehicle and check all mirrors before backing. The indicator light next to the park assist button lights up to the shift lever. The interval between the beeps becomes shorter as the vehicle gets closer to indicate the system is a ...
...warmer or humid weather. When the system is started. { WARNING The URPA system does not detect children, pedestrians, bicyclists, animals, or objects below trunk level. URPA defaults to the on setting each time the vehicle is off, a message displays on automatically when the shift lever is indicated by ...driver with URPA, always check the area around the vehicle and check all mirrors before backing. The indicator light next to the park assist button lights up to the shift lever. The interval between the beeps becomes shorter as the vehicle gets closer to indicate the system is a ...
Owner Manual
Page 339
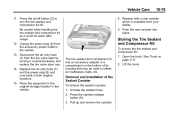
... the bottom of the Sealant Canister To remove the sealant canister: 1. Pull up and remove the canister. Press the on/off button (2) to inflate air mattresses, balls, etc. 10-79 4. Storing the Tire Sealant and Compressor Kit To access the tire sealant and compressor kit: ...1. Removal and Installation of its housing that may be warm after usage. 12. Open the trunk. Place the equipment in the original storage location in their original locations. 15. Disconnect the air only hose (7) from your dealer. 5. Replace the...
... the bottom of the Sealant Canister To remove the sealant canister: 1. Pull up and remove the canister. Press the on/off button (2) to inflate air mattresses, balls, etc. 10-79 4. Storing the Tire Sealant and Compressor Kit To access the tire sealant and compressor kit: ...1. Removal and Installation of its housing that may be warm after usage. 12. Open the trunk. Place the equipment in the original storage location in their original locations. 15. Disconnect the air only hose (7) from your dealer. 5. Replace the...

Owner Manual
Page 340
To store the tire sealant and compressor kit, reverse the steps. Tire Changing Removing the Spare Tire and Tools With Pressure Relief Button The equipment you need is located in the trunk. 1. Turn the retainer nut counterclockwise and remove the spare tire. 4. Remove the tire sealant and compressor kit. Remove the spare tire cover. 3. Place the spare tire next to remove it. 4. With Pressure Deflation Button Open the trunk. 2. Turn the wing nut counterclockwise to the tire being changed. 10-80 Vehicle Care 3.
To store the tire sealant and compressor kit, reverse the steps. Tire Changing Removing the Spare Tire and Tools With Pressure Relief Button The equipment you need is located in the trunk. 1. Turn the retainer nut counterclockwise and remove the spare tire. 4. Remove the tire sealant and compressor kit. Remove the spare tire cover. 3. Place the spare tire next to remove it. 4. With Pressure Deflation Button Open the trunk. 2. Turn the wing nut counterclockwise to the tire being changed. 10-80 Vehicle Care 3.


