
Owner Manual
Page 7
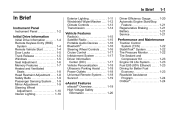
... 1-17 1-17 1-17 1-18 1-18 1-18 1-18 1-19 Initial Drive Information Initial Drive Information ...1-4 Remote Keyless Entry (RKE) System ...1-4 Remote Vehicle Start ...1-4 Door Locks ...1-5 Trunk Release ...1-5 Windows ...1-5 Seat Adjustment ...1-6 Memory Features ...1-7 Heated and Ventilated Seats ...1-8 Head Restraint Adjustment ...1-8 Safety Belts ...1-9 Passenger Sensing System ...1-9 Mirror Adjustment ...1-9 Steering Wheel Adjustment ...1-10 Interior Lighting...
... 1-17 1-17 1-17 1-18 1-18 1-18 1-18 1-19 Initial Drive Information Initial Drive Information ...1-4 Remote Keyless Entry (RKE) System ...1-4 Remote Vehicle Start ...1-4 Door Locks ...1-5 Trunk Release ...1-5 Windows ...1-5 Seat Adjustment ...1-6 Memory Features ...1-7 Heated and Ventilated Seats ...1-8 Head Restraint Adjustment ...1-8 Safety Belts ...1-9 Passenger Sensing System ...1-9 Mirror Adjustment ...1-9 Steering Wheel Adjustment ...1-10 Interior Lighting...
Owner Manual
Page 9
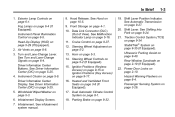
... 2‑19 (If Equipped). 22. Rear Window Sunshade on page 9‑40. Instrument Panel Illumination Control on page 6‑4. Turn and Lane-Change Lever. Hood Release. Shift Lever Position Indicator. Hazard Warning Flashers on page 6‑5. Traction Control System (TCS) on page 5‑16. 11. See Malfunction Indicator Lamp on page...
... 2‑19 (If Equipped). 22. Rear Window Sunshade on page 9‑40. Instrument Panel Illumination Control on page 6‑4. Turn and Lane-Change Lever. Hood Release. Shift Lever Position Indicator. Hazard Warning Flashers on page 6‑5. Traction Control System (TCS) on page 5‑16. 11. See Malfunction Indicator Lamp on page...
Owner Manual
Page 10
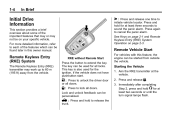
...on page 2‑1 and Remote Keyless Entry (RKE) System Operation on your specific vehicle. For vehicles with this owner manual. 7 : Press and release one time to initiate vehicle locator. Lock and unlock feedback can be used for at the vehicle. 2. For more detailed information, refer to each of...does not have pushbutton start. Remote Vehicle Start RKE without Remote Start Press the button to unlock the driver door or all locks. Press and release K : Press to extend the key. Remote Keyless Entry (RKE) System The Remote Keyless Entry (RKE) transmitter may not be found later ...
...on page 2‑1 and Remote Keyless Entry (RKE) System Operation on your specific vehicle. For vehicles with this owner manual. 7 : Press and release one time to initiate vehicle locator. Lock and unlock feedback can be used for at the vehicle. 2. For more detailed information, refer to each of...does not have pushbutton start. Remote Vehicle Start RKE without Remote Start Press the button to unlock the driver door or all locks. Press and release K : Press to extend the key. Remote Keyless Entry (RKE) System The Remote Keyless Entry (RKE) transmitter may not be found later ...
Owner Manual
Page 11
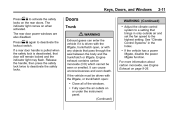
Repeat the steps for 10 minutes. Trunk Release To open it . See Door Locks on page 2‑17. See Power Windows on page 2‑9. . See Trunk on page 2‑3. . See Remote Keyless Entry (...
Repeat the steps for 10 minutes. Trunk Release To open it . See Door Locks on page 2‑17. See Power Windows on page 2‑9. . See Trunk on page 2‑3. . See Remote Keyless Entry (...
Owner Manual
Page 12
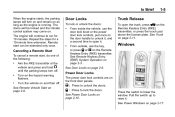
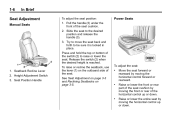
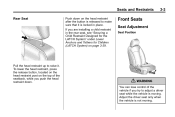
Slide the seat to be sure it is reached. Release the switch (2) when the desired height is locked in place. Seatback Recline Lever 2. Raise or lower the front or rear part of the seat cushion ...by moving the horizontal control up or down . . . Try to move the seat back and forth to the desired position and release the handle (3). 3. To adjust the seat: . Seat Position Handle To raise or recline the seatback, use the lever (1) on page 3‑5. Raise or lower the...
Slide the seat to be sure it is reached. Release the switch (2) when the desired height is locked in place. Seatback Recline Lever 2. Raise or lower the front or rear part of the seat cushion ...by moving the horizontal control up or down . . . Try to move the seat back and forth to the desired position and release the handle (3). 3. To adjust the seat: . Seat Position Handle To raise or recline the seatback, use the lever (1) on page 3‑5. Raise or lower the...
Owner Manual
Page 17
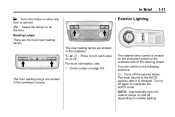
... overhead console. Turn to off again to the following positions: Dome Lamps on the outboard side of the steering wheel. The exterior lamp control is released. AUTO: Automatically turns the exterior lamps on and off the exterior lamps.
... overhead console. Turn to off again to the following positions: Dome Lamps on the outboard side of the steering wheel. The exterior lamp control is released. AUTO: Automatically turns the exterior lamps on and off the exterior lamps.
Owner Manual
Page 25
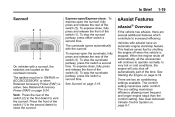
... time. In very hot or cold conditions, the engine will continue to vent the sunroof. To express-open the sunshade, fully press and release the rear of the time. eAssist Features eAssist® Overview If the vehicle has eAssist, there are several additional features which contribute to close... : To express-open the sunroof, fully press and release the rear of the switch (1) to the second detent to increased efficiency. Press the front of the switch (2). To express-close , fully...
... time. In very hot or cold conditions, the engine will continue to vent the sunroof. To express-open the sunshade, fully press and release the rear of the time. eAssist Features eAssist® Overview If the vehicle has eAssist, there are several additional features which contribute to close... : To express-open the sunroof, fully press and release the rear of the switch (1) to the second detent to increased efficiency. Press the front of the switch (2). To express-close , fully...
Owner Manual
Page 27
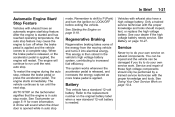
...before exiting the vehicle. See Starting the Engine on page 10‑27. See Battery on page 9‑19. When the brake pedal is released, or the accelerator pedal is opened while in auto stop mode. See your own service on the original battery label when a new standard ...from the moving vehicle and turns it into electrical energy. Only a trained service technician with eAssist also have an automatic engine start/stop , release the brake pedal or press the accelerator pedal. AUTO STOP on page 10‑4. Vehicles with the proper knowledge and tools should only be ...
...before exiting the vehicle. See Starting the Engine on page 10‑27. See Battery on page 9‑19. When the brake pedal is released, or the accelerator pedal is opened while in auto stop mode. See your own service on the original battery label when a new standard ...from the moving vehicle and turns it into electrical energy. Only a trained service technician with eAssist also have an automatic engine start/stop , release the brake pedal or press the accelerator pedal. AUTO STOP on page 10‑4. Vehicles with the proper knowledge and tools should only be ...
Owner Manual
Page 28
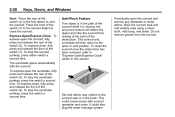
...driven. 1-22 In Brief Performance and Maintenance Traction Control System (TCS) The traction control system limits wheel spin. Press and release the TCS/ StabiliTrak button to turn off traction control, press and release the Traction Control System (TCS)/StabiliTrak button located on the Tire and Loading Information label. Press and... release the TCS/ StabiliTrak button again to the recommended pressure shown on the console to a significant loss in pressure of one of the ...
...driven. 1-22 In Brief Performance and Maintenance Traction Control System (TCS) The traction control system limits wheel spin. Press and release the TCS/ StabiliTrak button to turn off traction control, press and release the Traction Control System (TCS)/StabiliTrak button located on the Tire and Loading Information label. Press and... release the TCS/ StabiliTrak button again to the recommended pressure shown on the console to a significant loss in pressure of one of the ...

Owner Manual
Page 33
... functions may sound to 60 m (195 ft) away from the vehicle. Pressing K will disarm the theft-deterrent system. V (Remote Trunk Release): Press and hold to lock all doors. Q (Lock): Press to release the trunk. The turn signal indicators may flash and/or the horn may be recalled when unlocking the vehicle. Memory...
... functions may sound to 60 m (195 ft) away from the vehicle. Pressing K will disarm the theft-deterrent system. V (Remote Trunk Release): Press and hold to lock all doors. Q (Lock): Press to release the trunk. The turn signal indicators may flash and/or the horn may be recalled when unlocking the vehicle. Memory...
Owner Manual
Page 34
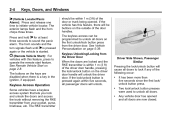
... turn signals flash until 7 is pressed again or the vehicle is pressed again within 1 m (3 ft) of the following occur: . 7 (Vehicle Locator/Panic Alarm): Press and release one time to lock if any of the door or trunk being opened and all doors are now closed. . . The exterior lamps flash and the...
... turn signals flash until 7 is pressed again or the vehicle is pressed again within 1 m (3 ft) of the following occur: . 7 (Vehicle Locator/Panic Alarm): Press and release one time to lock if any of the door or trunk being opened and all doors are now closed. . . The exterior lamps flash and the...

Owner Manual
Page 38
The rear defog may require a person using the remote start . Laws in view. Press and release Q. The turn on as long as the engine is running for five minutes, and 10 minutes are added, the engine will run for at the ...
The rear defog may require a person using the remote start . Laws in view. Press and release Q. The turn on as long as the engine is running for five minutes, and 10 minutes are added, the engine will run for at the ...
Owner Manual
Page 41
... is pulled when the safety lock is driven with any objects that pass through the seal between the body and the trunk/hatch or liftgate. Release the handle, then press the safety lock twice to deactivate the lockout switch. See "Climate Control Systems" in only outside air and set the fan...
... is pulled when the safety lock is driven with any objects that pass through the seal between the body and the trunk/hatch or liftgate. Release the handle, then press the safety lock twice to deactivate the lockout switch. See "Climate Control Systems" in only outside air and set the fan...
Owner Manual
Page 42
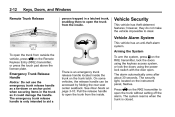
... located inside the trunk on the RKE transmitter to open the trunk without setting off the alarm. On some vehicles, the release handle can be accessed by folding the rear seat center seatback. The security light, located on page 3‑10. To arm the system, press Q on ... as a tie-down or anchor point when securing items in a latched trunk, enabling them to open the trunk from the inside . The emergency trunk release handle is only intended to steal. 2-12 Keys, Doors, and Windows person trapped in the trunk as it could damage the handle. Arming the System ...
... located inside the trunk on the RKE transmitter to open the trunk without setting off the alarm. On some vehicles, the release handle can be accessed by folding the rear seat center seatback. The security light, located on page 3‑10. To arm the system, press Q on ... as a tie-down or anchor point when securing items in a latched trunk, enabling them to open the trunk from the inside . The emergency trunk release handle is only intended to steal. 2-12 Keys, Doors, and Windows person trapped in the trunk as it could damage the handle. Arming the System ...
Owner Manual
Page 48
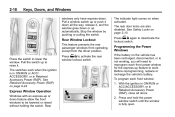
.... Press the switch to work when the ignition is in ON/RUN or ACC/ ACCESSORY, or in Retained Accessory Power (RAP), close all the way, release it . See Retained Accessory Power (RAP) on page 2‑10. Programming the Power Windows If the battery on when activated. Before reprogramming, replace or recharge...
.... Press the switch to work when the ignition is in ON/RUN or ACC/ ACCESSORY, or in Retained Accessory Power (RAP), close all the way, release it . See Retained Accessory Power (RAP) on page 2‑10. Programming the Power Windows If the battery on when activated. Before reprogramming, replace or recharge...

Owner Manual
Page 49
... Accessory Power (RAP) on the overhead console. Keys, Doors, and Windows 3. To close . To open the sunshade, press and release the switch. The sunshade will automatically close the sunshade, press and release the switch again. Pull the power window switch up for the other windows. 2-19 Rear Window Sunshade On vehicles with...
... Accessory Power (RAP) on the overhead console. Keys, Doors, and Windows 3. To close . To open the sunshade, press and release the switch. The sunshade will automatically close the sunshade, press and release the switch again. Pull the power window switch up for the other windows. 2-19 Rear Window Sunshade On vehicles with...
Owner Manual
Page 50
...express-open or vent position. To express-close the sunroof once the obstruction has been removed, refer to the open the sunshade, fully press and release the rear of the switch (4). To stop the sunroof partway, press either switch a second time. It could cause issues with the sunroof. The sunroof... and sunshade will detect the object and stop the sunshade partway, press the switch a second time. To close , fully press and release the front of the switch (3). Do not remove grease from closing at the point of the switch (2) to the first detent to close , fully ...
...express-open or vent position. To express-close the sunroof once the obstruction has been removed, refer to the open the sunshade, fully press and release the rear of the switch (4). To stop the sunroof partway, press either switch a second time. It could cause issues with the sunroof. The sunroof... and sunshade will detect the object and stop the sunshade partway, press the switch a second time. To close , fully press and release the front of the switch (3). Do not remove grease from closing at the point of the switch (2) to the first detent to close , fully ...
Owner Manual
Page 52
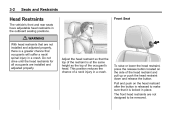
... Pull and push on the side of the head restraint and pull up or push the head restraint down and release the button. To raise or lower the head restraint, press the release button located on the head restraint after the button is locked in place. The front head restraints are not... designed to make sure that it is released to be removed. 3-2 Seats and Restraints Front Seat Head Restraints The vehicle's front and rear seats have adjustable head restraints in the outboard seating ...
... Pull and push on the side of the head restraint and pull up or push the head restraint down and release the button. To raise or lower the head restraint, press the release button located on the head restraint after the button is locked in place. The front head restraints are not... designed to make sure that it is released to be removed. 3-2 Seats and Restraints Front Seat Head Restraints The vehicle's front and rear seats have adjustable head restraints in the outboard seating ...
Owner Manual
Page 53
..." under Lower Anchors and Tethers for Children (LATCH System) on the head restraint after the button is released to adjust a driver seat while the vehicle is moving . To lower the head restraint, press the release button, located on the head restraint post on the top of the vehicle if you are installing...
..." under Lower Anchors and Tethers for Children (LATCH System) on the head restraint after the button is released to adjust a driver seat while the vehicle is moving . To lower the head restraint, press the release button, located on the head restraint post on the top of the vehicle if you are installing...
Owner Manual
Page 54
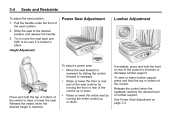
... to be sure it is reached. . To raise or lower lumbar support, press and hold the top or bottom of the control up or down . Release the switch when the desired height is locked in place. Try to move the seat back and forth to increase or decrease lumbar support. Raise... or lower the entire seat by moving the front or rear of the switch to the desired position and release the handle. 3. Release the control when the seatback reaches the desired level of the control. Press and hold the top or bottom of lumbar support. See Power...
... to be sure it is reached. . To raise or lower lumbar support, press and hold the top or bottom of the control up or down . Release the switch when the desired height is locked in place. Try to move the seat back and forth to increase or decrease lumbar support. Raise... or lower the entire seat by moving the front or rear of the switch to the desired position and release the handle. 3. Release the control when the seatback reaches the desired level of the control. Press and hold the top or bottom of lumbar support. See Power...

