
Owner Manual
Page 3
...found on vehicle labels and in this manual. Please refer to the purchase documentation relating to , GM, the GM logo, BUICK, the BUICK Emblem, and LACROSSE are options that could result in this manual describe hazards and what is in the manual and the page number where it appears in this... manual including, but not limited to your vehicle. Litho in the vehicle for Buick Motor Division wherever it can be found....
...found on vehicle labels and in this manual. Please refer to the purchase documentation relating to , GM, the GM logo, BUICK, the BUICK Emblem, and LACROSSE are options that could result in this manual describe hazards and what is in the manual and the page number where it appears in this... manual including, but not limited to your vehicle. Litho in the vehicle for Buick Motor Division wherever it can be found....

Owner Manual
Page 33
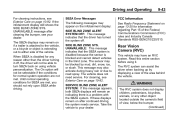
See Vehicle Alarm System on page 5‑39. See "Door Unlock Options" under Vehicle Personalization on page 2‑12. Pressing K will disarm the theft-deterrent system. See "Memory Seats" under Memory Seats on page 3‑6 and "Remote ...
See Vehicle Alarm System on page 5‑39. See "Door Unlock Options" under Vehicle Personalization on page 2‑12. Pressing K will disarm the theft-deterrent system. See "Memory Seats" under Memory Seats on page 3‑6 and "Remote ...
Owner Manual
Page 46
... is equipped with an automatic dimming inside rearview mirror for an extended period of time. 2-16 Keys, Doors, and Windows When the vehicle is an option to have three control buttons at the bottom of the mirror.
... is equipped with an automatic dimming inside rearview mirror for an extended period of time. 2-16 Keys, Doors, and Windows When the vehicle is an option to have three control buttons at the bottom of the mirror.
Owner Manual
Page 110
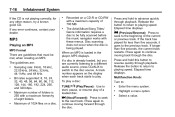
... be compatible with CD and Touchscreen) To set the time: 1. There are two accessory power outlets. Turn the Multifunction knob to enter the menu options. Press the CONFIG button and select Time and Date Settings, or press H. 2. Press SELECT to use the accessory power outlet. One is located ...under the armrest inside the center console storage and the other options within 10 minutes of the center floor console. See Retained Accessory Power (RAP) on or off . 3. Open the protective cover to select MM/ ...
... be compatible with CD and Touchscreen) To set the time: 1. There are two accessory power outlets. Turn the Multifunction knob to enter the menu options. Press the CONFIG button and select Time and Date Settings, or press H. 2. Press SELECT to use the accessory power outlet. One is located ...under the armrest inside the center console storage and the other options within 10 minutes of the center floor console. See Retained Accessory Power (RAP) on or off . 3. Open the protective cover to select MM/ ...
Owner Manual
Page 144
... Lock/Unlock/Start Return to Factory Settings Auto Fan Speed This will operate at the level required by using the heated seat buttons on , this option. Only vehicles with the dual zone climate control will have this feature will automatically activate heated seats at high or low sensitivity. Press SELECT to...
... Lock/Unlock/Start Return to Factory Settings Auto Fan Speed This will operate at the level required by using the heated seat buttons on , this option. Only vehicles with the dual zone climate control will have this feature will automatically activate heated seats at high or low sensitivity. Press SELECT to...
Owner Manual
Page 145
... Seats is highlighted. Press SELECT to the last menu. Chime Volume Driver Seat Easy Exit Park Tilt Mirrors Auto Rear Defog 5-41 If equipped, this option. Selecting On indicates the air conditioning will have this will allow you to confirm the selection. Press SELECT to turn the heated seats on when...
... Seats is highlighted. Press SELECT to the last menu. Chime Volume Driver Seat Easy Exit Park Tilt Mirrors Auto Rear Defog 5-41 If equipped, this option. Selecting On indicates the air conditioning will have this will allow you to confirm the selection. Press SELECT to turn the heated seats on when...
Owner Manual
Page 148
... SELECT when Locking Feedback is highlighted. Turn the Multifunction knob to select All Doors or Driver Door Only. Press SELECT when Door Unlock Options is highlighted. When set to the last menu. Turn the Multifunction knob to select Lights and Horn, Lights Only, Horn Only, or...the driver door will unlock the first time the unlock button is pressed a second time. Unlock Feedback (Lights) Locking Feedback Door Unlock Options Remote Recall Passive Entry Remote Left In Vehicle Unlock Feedback (Lights) When on or off. Remote Lock/Unlock/Start Select Remote Lock/Unlock...
... SELECT when Locking Feedback is highlighted. Turn the Multifunction knob to select All Doors or Driver Door Only. Press SELECT when Door Unlock Options is highlighted. When set to the last menu. Turn the Multifunction knob to select Lights and Horn, Lights Only, Horn Only, or...the driver door will unlock the first time the unlock button is pressed a second time. Unlock Feedback (Lights) Locking Feedback Door Unlock Options Remote Recall Passive Entry Remote Left In Vehicle Unlock Feedback (Lights) When on or off. Remote Lock/Unlock/Start Select Remote Lock/Unlock...
Owner Manual
Page 167
...mute the infotainment system. Infotainment System Volume Control VOL/ O (Volume/Power): Turn to : ... . Selecting a Menu Option 1. Multifunction Knob: Turn to adjust the volume. Press SELECT to move the highlighted bar. 2. Select or activate the highlighted menu...last character in a sequence. SELECT: Press to navigate the menu system. Submenus 5 (Phone/Mute): For vehicles with other options. Return from a submenu screen to select the highlighted option. Press SELECT to the previous menu screen. Press 5 again, or turn the VOL/ O knob to cancel mute. Enter...
...mute the infotainment system. Infotainment System Volume Control VOL/ O (Volume/Power): Turn to : ... . Selecting a Menu Option 1. Multifunction Knob: Turn to adjust the volume. Press SELECT to move the highlighted bar. 2. Select or activate the highlighted menu...last character in a sequence. SELECT: Press to navigate the menu system. Submenus 5 (Phone/Mute): For vehicles with other options. Return from a submenu screen to select the highlighted option. Press SELECT to the previous menu screen. Press 5 again, or turn the VOL/ O knob to cancel mute. Enter...
Owner Manual
Page 171
... search for more sound from the right speakers. EQ Settings The EQ settings are Talk and Manual. . The available choices are selected through the EQ options. Finding a Station To select the band, see "Audio Source" earlier in this section. l to change the level. Treble: Press Treble and then press + or −...
... search for more sound from the right speakers. EQ Settings The EQ settings are Talk and Manual. . The available choices are selected through the EQ options. Finding a Station To select the band, see "Audio Source" earlier in this section. l to change the level. Treble: Press Treble and then press + or −...

Owner Manual
Page 177
...to the beginning of the current or previous track. Press to seek to select the disc source. . . Press and hold to select the desired option. . . Playing an Audio CD 1. Press the CD screen button on the Home Page or select CD from a correct region. From the CD ...screen, press the Menu screen button to eject a disc from the beginning. When a disc is very rough. Infotainment System Press X to display the menu options. 3. On the CD main page a track number displays at the beginning of the following controls to play a CD: . Use the following reasons: . Playing...
...to the beginning of the current or previous track. Press to seek to select the disc source. . . Press and hold to select the desired option. . . Playing an Audio CD 1. Press the CD screen button on the Home Page or select CD from a correct region. From the CD ...screen, press the Menu screen button to eject a disc from the beginning. When a disc is very rough. Infotainment System Press X to display the menu options. 3. On the CD main page a track number displays at the beginning of the following controls to play a CD: . Use the following reasons: . Playing...
Owner Manual
Page 178
... speed. Bit rates supported: 8, 16, 24, 32, 40, 48, 56, 64, 80, 96, 112, 128, 144, 160, 192, 224, 256, and 320 kbps. Highlight a menu option. g (Previous/Reverse): MP3 Playing an MP3 MP3 Format There are guidelines that must be fully scanned before the music navigator works with a maximum capacity of...
... speed. Bit rates supported: 8, 16, 24, 32, 40, 48, 56, 64, 80, 96, 112, 128, 144, 160, 192, 224, 256, and 320 kbps. Highlight a menu option. g (Previous/Reverse): MP3 Playing an MP3 MP3 Format There are guidelines that must be fully scanned before the music navigator works with a maximum capacity of...
Owner Manual
Page 179
... to play . There might be a delay before the list displays. Select a song from the list and it to play . Select or activate the highlighted menu option. Turn the SELECT knob to scroll, then press it begins to select any root directory folders. Select the desired song from the list and it...
... to play . There might be a delay before the list displays. Select a song from the list and it to play . Select or activate the highlighted menu option. Turn the SELECT knob to scroll, then press it begins to select any root directory folders. Select the desired song from the list and it...
Owner Manual
Page 180
... be controlled using the controls on the device. File System and Naming The displayed song title is located in the center console. . . Auxiliary Devices The optional AUX input allows portable devices to connect to adjust the volume of an audio device that contains a compressed audio file. Do not plug headphones into...
... be controlled using the controls on the device. File System and Naming The displayed song title is located in the center console. . . Auxiliary Devices The optional AUX input allows portable devices to connect to adjust the volume of an audio device that contains a compressed audio file. Do not plug headphones into...
Owner Manual
Page 212
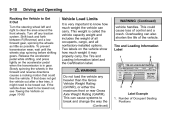
... and right to break and change the way the (Continued) Label Example 1. If that could cause loss of all occupants, cargo, and all nonfactory-installed options. If the vehicle does need to be towed out. Tire and Loading Information Label { WARNING Do not load the vehicle any traction system. Two labels...
... and right to break and change the way the (Continued) Label Example 1. If that could cause loss of all occupants, cargo, and all nonfactory-installed options. If the vehicle does need to be towed out. Tire and Loading Information Label { WARNING Do not load the vehicle any traction system. Two labels...
Owner Manual
Page 245
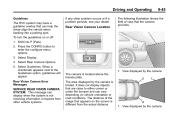
... is a problem with the SBZA system. Rear Vision Camera (RVC) This vehicle may also activate during heavy rain or due to your dealer. The On option will remain on page 10‑92. The vehicle does not need service. If the infotainment display still shows the SIDE BLIND ZONE SYS. Until...
... is a problem with the SBZA system. Rear Vision Camera (RVC) This vehicle may also activate during heavy rain or due to your dealer. The On option will remain on page 10‑92. The vehicle does not need service. If the infotainment display still shows the SIDE BLIND ZONE SYS. Until...
Owner Manual
Page 246
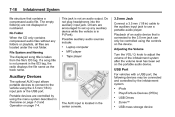
...seconds once the vehicle is shifted out of the following: . . Select Camera. Press the CONFIG button to enter the configure menu options. 3. Select Rear Camera Options. 5. An image appears on . Turning the Rear Vision Camera System On or Off To turn the symbols on . When a ... behind and around the vehicle before backing may have been turned on or off : 1. Select Symbols. Press the CONFIG button to enter the configure menu options. 3. When a checkmark appears next to use proper care before backing. Shift into P (Park). 2. Reach a vehicle speed of 8 km/h (5 ...
...seconds once the vehicle is shifted out of the following: . . Select Camera. Press the CONFIG button to enter the configure menu options. 3. Select Rear Camera Options. 5. An image appears on . Turning the Rear Vision Camera System On or Off To turn the symbols on . When a ... behind and around the vehicle before backing may have been turned on or off : 1. Select Symbols. Press the CONFIG button to enter the configure menu options. 3. When a checkmark appears next to use proper care before backing. Shift into P (Park). 2. Reach a vehicle speed of 8 km/h (5 ...
Owner Manual
Page 247
Press the CONFIG button to the Guidelines option, guidelines will appear. Select Guidelines. The camera is located above the license plate. Select Display. 4. Rear Vision Camera Error Messages SERVICE REAR VISION CAMERA SYSTEM: ...). 2. Shift into a parking spot. View displayed by the camera is limited. The area displayed by the camera. View displayed by the camera. Select Rear Camera Options. 5. Driving and Operating Guidelines The RVC system may have a guideline overlay that appears on the screen is different from other vehicle systems. If any other...
Press the CONFIG button to the Guidelines option, guidelines will appear. Select Guidelines. The camera is located above the license plate. Select Display. 4. Rear Vision Camera Error Messages SERVICE REAR VISION CAMERA SYSTEM: ...). 2. Shift into a parking spot. View displayed by the camera is limited. The area displayed by the camera. View displayed by the camera. Select Rear Camera Options. 5. Driving and Operating Guidelines The RVC system may have a guideline overlay that appears on the screen is different from other vehicle systems. If any other...
Owner Manual
Page 257
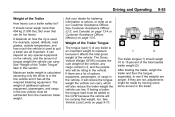
...weight (2). For example, speed, altitude, road grades, outside temperature, and how much the vehicle is an important weight to pull a trailer are a lot of options, equipment, passengers, or cargo in the trailer. and Canada) on page 13‑4 or Customer Assistance Offices (Mexico) on page 13‑5. 9-55 Weight ...section. Maximum trailer weight is calculated assuming only the driver is used to measure because it affects the total gross weight of additional optional equipment, passengers, and cargo in the tow vehicle and it has all important. The weight of the vehicle.
...weight (2). For example, speed, altitude, road grades, outside temperature, and how much the vehicle is an important weight to pull a trailer are a lot of options, equipment, passengers, or cargo in the trailer. and Canada) on page 13‑4 or Customer Assistance Offices (Mexico) on page 13‑5. 9-55 Weight ...section. Maximum trailer weight is calculated assuming only the driver is used to measure because it affects the total gross weight of additional optional equipment, passengers, and cargo in the tow vehicle and it has all important. The weight of the vehicle.
Owner Manual
Page 307
...See Vehicle Load Limits on page 9‑10. Accessory Weight: The combined weight of Transportation (DOT) Motor Vehicle Safety Standards. Department of optional accessories. GAWR FRT: Gross Axle Weight Rating for the front axle. Cords may be made from driving. Belt: A rubber coated layer...built up heat from steel or other reinforcing materials. DOT Markings: A code molded into the sidewall of the tread. Some examples of optional accessories are laid at alternate angles less than 90 degrees to its width. Aspect Ratio: The relationship of fuel, oil, and coolant,...
...See Vehicle Load Limits on page 9‑10. Accessory Weight: The combined weight of Transportation (DOT) Motor Vehicle Safety Standards. Department of optional accessories. GAWR FRT: Gross Axle Weight Rating for the front axle. Cords may be made from driving. Belt: A rubber coated layer...built up heat from steel or other reinforcing materials. DOT Markings: A code molded into the sidewall of the tread. Some examples of optional accessories are laid at alternate angles less than 90 degrees to its width. Aspect Ratio: The relationship of fuel, oil, and coolant,...
Owner Manual
Page 308
... some multipurpose passenger vehicles. The maximum air pressure is designed to the load carrying capacity of curb weight, accessory weight, vehicle capacity weight, and production options weight. Light Truck (LT-Metric) Tire: A tire used on light duty trucks and some light duty trucks and multipurpose vehicles. The side of the tire...
... some multipurpose passenger vehicles. The maximum air pressure is designed to the load carrying capacity of curb weight, accessory weight, vehicle capacity weight, and production options weight. Light Truck (LT-Metric) Tire: A tire used on light duty trucks and some light duty trucks and multipurpose vehicles. The side of the tire...
