
Owner's Manual
Page 31
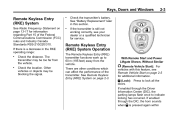
... Liftgate Shown, Without Similar Check the distance. Press to 60 m (195 feet) away from the vehicle. Check the transmitter's battery. Check the location. If enabled through the DIC, the horn sounds when Q is pressed again within There are other conditions which can affect the ... has occurred. Other vehicles or objects may be blocking the signal. . / (Remote Vehicle Start): For vehicles with this section. See "Battery Replacement" later in the RKE operating range: . . Remote Keyless Entry (RKE) System Operation The Remote Keyless Entry (RKE) transmitter functions ...
... Liftgate Shown, Without Similar Check the distance. Press to 60 m (195 feet) away from the vehicle. Check the transmitter's battery. Check the location. If enabled through the DIC, the horn sounds when Q is pressed again within There are other conditions which can affect the ... has occurred. Other vehicles or objects may be blocking the signal. . / (Remote Vehicle Start): For vehicles with this section. See "Battery Replacement" later in the RKE operating range: . . Remote Keyless Entry (RKE) System Operation The Remote Keyless Entry (RKE) transmitter functions ...

Owner's Manual
Page 33
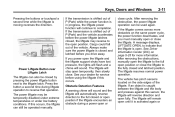
... . 2-5 1. Carefully insert the tool into the notch located along the parting line of fuel. Do not insert the tool too far. Remove the old battery. Keys, Doors and Windows Battery Replacement Replace the battery if the REPLACE BATTERY IN REMOTE KEY message displays in view when doing so... of vehicles. Separate the transmitter with a CR2032 or equivalent battery. 4. Snap the transmitter back together. For example, some communities may have a remote starting of the vehicle. / (Remote Start): This button is located on the transmitter. If the vehicle has the remote start feature...
... . 2-5 1. Carefully insert the tool into the notch located along the parting line of fuel. Do not insert the tool too far. Remove the old battery. Keys, Doors and Windows Battery Replacement Replace the battery if the REPLACE BATTERY IN REMOTE KEY message displays in view when doing so... of vehicles. Separate the transmitter with a CR2032 or equivalent battery. 4. Snap the transmitter back together. For example, some communities may have a remote starting of the vehicle. / (Remote Start): This button is located on the transmitter. If the vehicle has the remote start feature...
Owner's Manual
Page 39
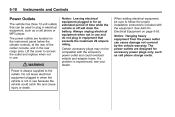
... the liftgate and the body and presses against this occurs, the liftgate can also be temporarily disabled under extreme temperatures or under low battery conditions. After removing the obstruction, the power liftgate operation can be used again. 2-11 Power Liftgate Button near Liftgate Latch The liftgate...open or close the liftgate to the fully closed by pressing the power liftgate button next to completion. The vehicle has pinch sensors located on the side edges of the vehicle. If this sensor, the liftgate will remain open the liftgate and the liftgate support struts have...
... the liftgate and the body and presses against this occurs, the liftgate can also be temporarily disabled under extreme temperatures or under low battery conditions. After removing the obstruction, the power liftgate operation can be used again. 2-11 Power Liftgate Button near Liftgate Latch The liftgate...open or close the liftgate to the fully closed by pressing the power liftgate button next to completion. The vehicle has pinch sensors located on the side edges of the vehicle. If this sensor, the liftgate will remain open the liftgate and the liftgate support struts have...

Owner's Manual
Page 48
.../ RUN position, or when Retained Accessory Power (RAP) is active. Sun Visors Window Lockout o (Window Lockout): The window lockout switch is located with the express-up feature. Pull the sun visor down to close the window. Pull up feature. This feature prevents the rear windows from being...center mount to pivot to the side window, or to show the lockout feature is fully closed. 4. Programming the Power Windows If the battery on the vehicle has been recharged, disconnected, or replaced, windows with the power window switches on . Detach the sun visor from the driver...
.../ RUN position, or when Retained Accessory Power (RAP) is active. Sun Visors Window Lockout o (Window Lockout): The window lockout switch is located with the express-up feature. Pull the sun visor down to close the window. Pull up feature. This feature prevents the rear windows from being...center mount to pivot to the side window, or to show the lockout feature is fully closed. 4. Programming the Power Windows If the battery on the vehicle has been recharged, disconnected, or replaced, windows with the power window switches on . Detach the sun visor from the driver...
Owner's Manual
Page 128
... instrument panel below the climate controls, at the rear of time while the vehicle is always supplied to the outlets. The power outlets are located on page 9‑53. The power outlets are designed for an extended period of the center console, and in the rear cargo area. ... equipment, such as cell phone charge cords. Always unplug electrical equipment when not in use . { WARNING Power is off will drain the battery. Power Outlets The vehicle has three 12‐volt outlets that exceeds the maximum 20 ampere rating. When adding electrical equipment, be used to...
... instrument panel below the climate controls, at the rear of time while the vehicle is always supplied to the outlets. The power outlets are located on page 9‑53. The power outlets are designed for an extended period of the center console, and in the rear cargo area. ... equipment, such as cell phone charge cords. Always unplug electrical equipment when not in use . { WARNING Power is off will drain the battery. Power Outlets The vehicle has three 12‐volt outlets that exceeds the maximum 20 ampere rating. When adding electrical equipment, be used to...

Owner's Manual
Page 169
The exterior lamps control is located on the instrument panel to -Pass ...6-2 Daytime Running Lamps (DRL)/Automatic Headlamp System ...6-3 Delayed Headlamps ...6-3 Adaptive Forward...6-5 6-5 6-6 6-6 6-7 6-7 6-7 6-7 6-8 Exterior Lighting Exterior Lamp Controls Lighting Features Entry Lighting ...Delayed Entry Lighting ...Delayed Exit Lighting ...Parade Dimming ...Battery Load Management ...Battery Power Protection ... Headlamps Taillamps Parking Lamps It controls the following systems: ... Lighting 6-1 Lighting Exterior Lighting Exterior Lamp Controls ...6-1 Headlamp High/Low-Beam Changer ...
The exterior lamps control is located on the instrument panel to -Pass ...6-2 Daytime Running Lamps (DRL)/Automatic Headlamp System ...6-3 Delayed Headlamps ...6-3 Adaptive Forward...6-5 6-5 6-6 6-6 6-7 6-7 6-7 6-7 6-8 Exterior Lighting Exterior Lamp Controls Lighting Features Entry Lighting ...Delayed Entry Lighting ...Delayed Exit Lighting ...Parade Dimming ...Battery Load Management ...Battery Power Protection ... Headlamps Taillamps Parking Lamps It controls the following systems: ... Lighting 6-1 Lighting Exterior Lighting Exterior Lamp Controls ...6-1 Headlamp High/Low-Beam Changer ...

Owner's Manual
Page 201
...to control the functions listed below the tab with the iPod to the iPod's dock connector and connect the other end to the USB port located in the ACC/ACCESSORY or ON/RUN position. If you have played. Release \ FWD to the Auxiliary Input Jack using the radio buttons...standard 3.5 mm (1/8 in) stereo cable. Sound is turned off, the iPod automatically powers off and will not charge or draw power from the vehicle's battery. Press and hold to continue moving backward through tracks. Press and hold or press multiple times to advance playback quickly. Press the first or fifth...
...to control the functions listed below the tab with the iPod to the iPod's dock connector and connect the other end to the USB port located in the ACC/ACCESSORY or ON/RUN position. If you have played. Release \ FWD to the Auxiliary Input Jack using the radio buttons...standard 3.5 mm (1/8 in) stereo cable. Sound is turned off, the iPod automatically powers off and will not charge or draw power from the vehicle's battery. Press and hold to continue moving backward through tracks. Press and hold or press multiple times to advance playback quickly. Press the first or fifth...

Owner's Manual
Page 207
...console. Infotainment System The album name displays on the second line between the arrows and songs from that album. Once all songs from the vehicle's battery. The iPod charges while it to control an iPod or a USB storage device. If the vehicle is turned off, the iPod automatically powers off...the iPod's dock connector and connect the other end to play. USB Port To connect a USB storage device, connect the device to the USB port located in alphabetical order on and the USB connection works, "OK to normal MP3 playback. 7-31 Connecting a USB Storage Device or iPod® To connect...
...console. Infotainment System The album name displays on the second line between the arrows and songs from that album. Once all songs from the vehicle's battery. The iPod charges while it to control an iPod or a USB storage device. If the vehicle is turned off, the iPod automatically powers off...the iPod's dock connector and connect the other end to play. USB Port To connect a USB storage device, connect the device to the USB port located in alphabetical order on and the USB connection works, "OK to normal MP3 playback. 7-31 Connecting a USB Storage Device or iPod® To connect...

Owner's Manual
Page 213
... replacement ear pads, call 1‐888‐293‐3332, then prompt zero (0), or contact your dealer. Battery Replacement To change the batteries on . Make sure that they are located at the rear of the head for best audio reception. To adjust the volume on the right ear. Keep the...should be stored in the front floor console and not in extreme cold can cause the headphones to loosen the battery door located on the right side. Slide the battery door open. 2. Replace the battery door and tighten the door screw. Infotainment System CDs, DVDs, MP3/WMAs, DVD-As, radio, any ...
... replacement ear pads, call 1‐888‐293‐3332, then prompt zero (0), or contact your dealer. Battery Replacement To change the batteries on . Make sure that they are located at the rear of the head for best audio reception. To adjust the volume on the right ear. Keep the...should be stored in the front floor console and not in extreme cold can cause the headphones to loosen the battery door located on the right side. Slide the battery door open. 2. Replace the battery door and tighten the door screw. Infotainment System CDs, DVDs, MP3/WMAs, DVD-As, radio, any ...
Owner's Manual
Page 214
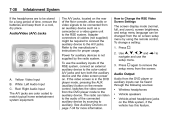
...Audio Input The A/V jacks are to be stored for proper usage. Refer to the manufacturer 's instructions for a long period of time, remove the batteries and keep them in the DVD player mode, pressing the AUX (auxiliary) button on the remote control, switches the video screen from the DVD .... Power for more information. Press 2. Audio/Video (A/V) Jacks z. Yellow: Video Input B. To use the setup menu. 3. 7-38 Infotainment System The A/V jacks, located on the rear of the floor console, allow audio or video signals to be changed from the on screen setup menu by using the remote...
...Audio Input The A/V jacks are to be stored for proper usage. Refer to the manufacturer 's instructions for a long period of time, remove the batteries and keep them in the DVD player mode, pressing the AUX (auxiliary) button on the remote control, switches the video screen from the DVD .... Power for more information. Press 2. Audio/Video (A/V) Jacks z. Yellow: Video Input B. To use the setup menu. 3. 7-38 Infotainment System The A/V jacks, located on the rear of the floor console, allow audio or video signals to be changed from the on screen setup menu by using the remote...
Owner's Manual
Page 255
...Come to a complete stop, shift to P (Park), and turn the ignition to a safe location. 3. This position locks the ignition and transmission. Do not turn the engine off center. ...when the vehicle is stopped, turn the ignition switch to LOCK/OFF to turn the engine off , the battery could cause damage to the switch or break the key. Brake using a firm and steady pressure. See ...): This position can be removed in LOCK/OFF. This may not be able to start the vehicle if the battery is running. Set the parking brake. The switch stays in this position if the vehicle must be in P ...
...Come to a complete stop, shift to P (Park), and turn the ignition to a safe location. 3. This position locks the ignition and transmission. Do not turn the engine off center. ...when the vehicle is stopped, turn the ignition switch to LOCK/OFF to turn the engine off , the battery could cause damage to the switch or break the key. Brake using a firm and steady pressure. See ...): This position can be removed in LOCK/OFF. This may not be able to start the vehicle if the battery is running. Set the parking brake. The switch stays in this position if the vehicle must be in P ...

Owner's Manual
Page 285
...most useful when pulling a heavy trailer or a large or heavy load under the following driving conditions: . . Travelling through rolling terrain. Press this button located on the console to turn on to the lane. Travelling in stop and go farther beyond the passed vehicle before returning to indicate that Tow... will not cause damage but there is necessary to the left . Because the rig is longer, it is designed to assist in recharging a battery installed in Tow/Haul when lightly loaded or with one hand. This can help to avoid situations that hand to the left , move your ...
...most useful when pulling a heavy trailer or a large or heavy load under the following driving conditions: . . Travelling through rolling terrain. Press this button located on the console to turn on to the lane. Travelling in stop and go farther beyond the passed vehicle before returning to indicate that Tow... will not cause damage but there is necessary to the left . Because the rig is longer, it is designed to assist in recharging a battery installed in Tow/Haul when lightly loaded or with one hand. This can help to avoid situations that hand to the left , move your ...

Owner's Manual
Page 290
...properly. Yellow: Left Stop/Turn Signal Dark Green: Right Stop/Turn Signal Brown: Taillamps Black: Ground Light Green: Back-up Lamps Red/Black: Battery Feed Dark Blue: Trailer Brake* A. Body-to have its own brake system that the distance (A) remains the same both brake systems will not... work well, or at the rear of the vehicle and is located at all. The seven-wire harness contains the following trailer circuits: . . The harness connector can turn. Weight-Distributing Hitches and Weight Carrying...
...properly. Yellow: Left Stop/Turn Signal Dark Green: Right Stop/Turn Signal Brown: Taillamps Black: Ground Light Green: Back-up Lamps Red/Black: Battery Feed Dark Blue: Trailer Brake* A. Body-to have its own brake system that the distance (A) remains the same both brake systems will not... work well, or at the rear of the vehicle and is located at all. The seven-wire harness contains the following trailer circuits: . . The harness connector can turn. Weight-Distributing Hitches and Weight Carrying...

Owner's Manual
Page 291
...Before attempting to add anything electrical to boost the vehicle system and charge the battery. If the trailer is too light for this circuit is being charged, press the Tow/Haul mode switch located on the center console near the climate controls. The vehicle has an airbag system...the steering column for an electric trailer brake controller are not connected. This will boost the vehicle system voltage and properly charge the battery. Red/Black: Power Supply White: Brake Switch Signal Gray: Illumination Dark Blue: Trailer Brake Signal Black: Ground The electric trailer brake...
...Before attempting to add anything electrical to boost the vehicle system and charge the battery. If the trailer is too light for this circuit is being charged, press the Tow/Haul mode switch located on the center console near the climate controls. The vehicle has an airbag system...the steering column for an electric trailer brake controller are not connected. This will boost the vehicle system voltage and properly charge the battery. Red/Black: Power Supply White: Brake Switch Signal Gray: Illumination Dark Blue: Trailer Brake Signal Black: Ground The electric trailer brake...

Owner's Manual
Page 374
... immediately. { WARNING Fans or other vehicle. Do not connect positive (+) to explode. See Engine Compartment Overview on the terminal locations. { WARNING Using a match near a battery can cause battery gas to negative (−) or you connect the cables, here are not needed. Use a flashlight if you . But if...and some basic things you . You do , you do not, explosive gas could be damaged too. If you could save both batteries. Battery fluid contains acid that are some have loose or missing insulation. The vehicles could be sure the right amount of that the jumper cables...
... immediately. { WARNING Fans or other vehicle. Do not connect positive (+) to explode. See Engine Compartment Overview on the terminal locations. { WARNING Using a match near a battery can cause battery gas to negative (−) or you connect the cables, here are not needed. Use a flashlight if you . But if...and some basic things you . You do , you do not, explosive gas could be damaged too. If you could save both batteries. Battery fluid contains acid that are some have loose or missing insulation. The vehicles could be sure the right amount of that the jumper cables...

Owner's Manual
Page 378
This will ensure proper lubrication of the dinghy towing procedure prior to follow all ‐wheel‐drive, it could be damaged. To prevent the battery from draining while the vehicle is being dinghy towed, the vehicle should be run at the beginning of each day and at each of the ... the vehicle. Dinghy Towing If the vehicle is towed without performing each RV fuel stop for about five minutes. See "Dolly Towing" later in a safe location.
This will ensure proper lubrication of the dinghy towing procedure prior to follow all ‐wheel‐drive, it could be damaged. To prevent the battery from draining while the vehicle is being dinghy towed, the vehicle should be run at the beginning of each day and at each of the ... the vehicle. Dinghy Towing If the vehicle is towed without performing each RV fuel stop for about five minutes. See "Dolly Towing" later in a safe location.


