

Owner's Manual
Page 1
2010 Buick LaCrosse Owner Manual M Keys, Doors and Windows ...1-1 Keys and Locks ...1-2 Doors ...1-11 Vehicle Security...1-13 Exterior Mirrors ...1-15 Interior Mirrors ...1-16 Windows ...1-17 Roof ...1-19 Seats and Restraints ...2-1 Head Restraints ...2-2 Front Seats ...2-3 Rear Seats ...2-9 Safety Belts ...2-10 Airbag System ...2-25 Child Restraints ...2-39 Storage ...3-1 Storage Compartments ...3-1 Additional Storage Features ...3-2 Instruments and Controls ...4-1 Instrument...
2010 Buick LaCrosse Owner Manual M Keys, Doors and Windows ...1-1 Keys and Locks ...1-2 Doors ...1-11 Vehicle Security...1-13 Exterior Mirrors ...1-15 Interior Mirrors ...1-16 Windows ...1-17 Roof ...1-19 Seats and Restraints ...2-1 Head Restraints ...2-2 Front Seats ...2-3 Rear Seats ...2-9 Safety Belts ...2-10 Airbag System ...2-25 Child Restraints ...2-39 Storage ...3-1 Storage Compartments ...3-1 Additional Storage Features ...3-2 Instruments and Controls ...4-1 Instrument...
Owner's Manual
Page 27
Seats and Restraints 2-1 Seats and Restraints Head Restraints Head Restraints ...2-2 Lap-Shoulder Belt ...Safety Belt Use During Pregnancy ...Safety Belt Extender ...Safety System Check ...Safety Belt Care ...Replacing Safety Belt System Parts After a Crash ... 2-...
Seats and Restraints 2-1 Seats and Restraints Head Restraints Head Restraints ...2-2 Lap-Shoulder Belt ...Safety Belt Use During Pregnancy ...Safety Belt Extender ...Safety System Check ...Safety Belt Care ...Replacing Safety Belt System Parts After a Crash ... 2-...
Owner's Manual
Page 28
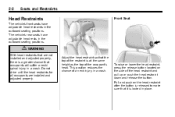
... and adjusted properly, there is a greater chance that occupants will suffer a neck/ spinal injury in a crash. To raise or lower the head restraint, press the release button located on the head restraint after the button is released to make sure that it is at the same height as the top of the... head restraint and pull up or push the head restraint down and release the button. This position reduces the chance of the restraint is locked in place. Pull and push on the...
... and adjusted properly, there is a greater chance that occupants will suffer a neck/ spinal injury in a crash. To raise or lower the head restraint, press the release button located on the head restraint after the button is released to make sure that it is at the same height as the top of the... head restraint and pull up or push the head restraint down and release the button. This position reduces the chance of the restraint is locked in place. Pull and push on the...
Owner's Manual
Page 29
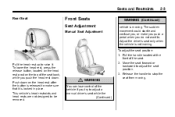
...) 3. The sudden movement could startle and confuse you do not want to make you push a pedal when you , or make sure that it . Pull the head rest up to raise it is released to . Push down . Pull the handle located at the front of the seat. This vehicle...'s head restraints and head rests are not designed to stop the seat from moving. Adjust the driver's seat only when the vehicle is moving. Seats and Restraints Rear Seat 2-3 ...
...) 3. The sudden movement could startle and confuse you do not want to make you push a pedal when you , or make sure that it . Pull the head rest up to raise it is released to . Push down . Pull the handle located at the front of the seat. This vehicle...'s head restraints and head rests are not designed to stop the seat from moving. Adjust the driver's seat only when the vehicle is moving. Seats and Restraints Rear Seat 2-3 ...

Owner's Manual
Page 43
.... It should go over an armrest like your belt goes over the shoulder and across the chest. Also, the belt would increase the chance of head and neck injury. You could cause serious or fatal injuries. Q: What is worn under the arm. Seats and Restraints 2-17 { WARNING You can slide under...
.... It should go over an armrest like your belt goes over the shoulder and across the chest. Also, the belt would increase the chance of head and neck injury. You could cause serious or fatal injuries. Q: What is worn under the arm. Seats and Restraints 2-17 { WARNING You can slide under...

Owner's Manual
Page 44
.... That could move too far forward increasing the chance of the belt to fix it. The belt force would not have the full width of head and neck injury. In a crash, you would not be restrained by a twisted belt. Q: What is wrong with this ? The shoulder belt should go over the...
.... That could move too far forward increasing the chance of the belt to fix it. The belt force would not have the full width of head and neck injury. In a crash, you would not be restrained by a twisted belt. Q: What is wrong with this ? The shoulder belt should go over the...
Owner's Manual
Page 47
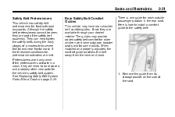
...;24. 2-21 Rear Safety Belt Comfort Guides This vehicle may provide added safety belt comfort for some adults. Remove the guide from the neck and head. They can help tighten the safety belts during the early stages of the safety belt assembly. If the pretensioners activate in the rear seat. Pretensioners...
...;24. 2-21 Rear Safety Belt Comfort Guides This vehicle may provide added safety belt comfort for some adults. Remove the guide from the neck and head. They can help tighten the safety belts during the early stages of the safety belt assembly. If the pretensioners activate in the rear seat. Pretensioners...
Owner's Manual
Page 54
...-rail airbag will or should deploy is not based on what you do not attach or put anything to the driver's or right front passenger's head and chest. Deployment thresholds are only designed to be blocked. { WARNING If something is traveling. Rear Seat Driver Side Shown, Passenger Side Similar If the...
...-rail airbag will or should deploy is not based on what you do not attach or put anything to the driver's or right front passenger's head and chest. Deployment thresholds are only designed to be blocked. { WARNING If something is traveling. Rear Seat Driver Side Shown, Passenger Side Similar If the...
Owner's Manual
Page 61
Also make sure that the vehicle seatback is not trapped under the vehicle head restraint. If, after the on indicator is still lit, secure the child in the child restraint in a rear seat position in the vehicle, and check ..., Have the person sit upright in the fully upright position. 4. If the on indicator is not sitting properly in the seat. Seats and Restraints 5. See Head Restraints on the seat cushion, with your dealer/retailer. 2-35 If the Off Indicator is Lit for two to make sure the child restraint is...
Also make sure that the vehicle seatback is not trapped under the vehicle head restraint. If, after the on indicator is still lit, secure the child in the child restraint in a rear seat position in the vehicle, and check ..., Have the person sit upright in the fully upright position. 4. If the on indicator is not sitting properly in the seat. Seats and Restraints 5. See Head Restraints on the seat cushion, with your dealer/retailer. 2-35 If the Off Indicator is Lit for two to make sure the child restraint is...

Owner's Manual
Page 66
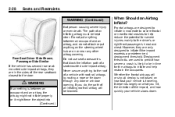
... belt force would not be thrown out of (Continued) Never allow two children to wear the same safety belt. 2-40 Seats and Restraints WARNING (Continued) head and neck injury. In a crash, children who are not buckled up can strike other people who are buckled up, or can be applied right on...
... belt force would not be thrown out of (Continued) Never allow two children to wear the same safety belt. 2-40 Seats and Restraints WARNING (Continued) head and neck injury. In a crash, children who are not buckled up can strike other people who are buckled up, or can be applied right on...
Owner's Manual
Page 69
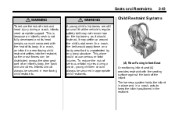
...be secured in rear-facing child restraints. { WARNING A young child's hip bones are still so small that is not fully developed and its head weighs so much compared with the seating surface against the back of the infant. To reduce the risk of serious or fatal injuries during a ...crash, infants need complete support. Seats and Restraints 2-43 { WARNING To reduce the risk of neck and head injury during a crash, young children should always be secured in appropriate child restraints. In a crash, the belt would apply force on the hip bones,...
...be secured in rear-facing child restraints. { WARNING A young child's hip bones are still so small that is not fully developed and its head weighs so much compared with the seating surface against the back of the infant. To reduce the risk of serious or fatal injuries during a ...crash, infants need complete support. Seats and Restraints 2-43 { WARNING To reduce the risk of neck and head injury during a crash, young children should always be secured in appropriate child restraints. In a crash, the belt would apply force on the hip bones,...

Owner's Manual
Page 78
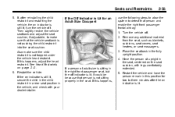
... tighten the top tether according to the child restraint instructions and the following instructions: If the position you are using does not have a headrest or head restraint and you are using a single tether, route the tether over the seatback. Find the top tether anchor. Open the cover to the top tether..., attach and tighten the top tether to expose the anchor. 2.2. 2-52 Seats and Restraints 2. If the position you are using does not have a headrest or head restraint and you are using a dual tether, route the tether over the seatback.
... tighten the top tether according to the child restraint instructions and the following instructions: If the position you are using does not have a headrest or head restraint and you are using a single tether, route the tether over the seatback. Find the top tether anchor. Open the cover to the top tether..., attach and tighten the top tether to expose the anchor. 2.2. 2-52 Seats and Restraints 2. If the position you are using does not have a headrest or head restraint and you are using a dual tether, route the tether over the seatback.

Owner's Manual
Page 79
...necessary replacements made as soon as possible. If the position you are using has an adjustable headrest or head restraint and you are using a dual tether route the tether around the headrest or head restraint. 3. Seats and Restraints 2-53 Replacing LATCH System Parts After a Crash { WARNING A crash ...can damage the LATCH system in between the headrest or head restraint posts. To help make sure the LATCH system is secure. Push and pull the child restraint in a crash. If the position you...
...necessary replacements made as soon as possible. If the position you are using has an adjustable headrest or head restraint and you are using a dual tether route the tether around the headrest or head restraint. 3. Seats and Restraints 2-53 Replacing LATCH System Parts After a Crash { WARNING A crash ...can damage the LATCH system in between the headrest or head restraint posts. To help make sure the LATCH system is secure. Push and pull the child restraint in a crash. If the position you...
Owner's Manual
Page 91
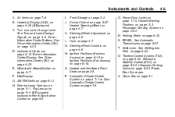
.... Info‐Display. H. Cruise Control on page 7‑8. Steering Wheel Adjustment on page 8‑35. Electronic Stability Control (ESC) on page 4‑6. Power Rear Sunshade. Head-Up Display (HUD) on page 6‑12. Driver Information Center Display. AM-FM Radio on page 4‑29 (If Equipped). Fog Lamps on page 3‑...
.... Info‐Display. H. Cruise Control on page 7‑8. Steering Wheel Adjustment on page 8‑35. Electronic Stability Control (ESC) on page 4‑6. Power Rear Sunshade. Head-Up Display (HUD) on page 6‑12. Driver Information Center Display. AM-FM Radio on page 4‑29 (If Equipped). Fog Lamps on page 3‑...
Owner's Manual
Page 94
... on the Driver Information Center (DIC). Windshield Washer Pull the windshield wiper lever to run until the windshield is restored and provide a heading again. See Washer Fluid on page 9‑24 for information about how to receive a satellite signal. The compass system will restart and...are performing wipes due to windshield wash, the wipers continue to spray windshield washer fluid and activate the wipers. The compass receives its heading and other information from the GPS satellites. See Operation on 1, 2 or &, they will continue until the lever is released or ...
... on the Driver Information Center (DIC). Windshield Washer Pull the windshield wiper lever to run until the windshield is restored and provide a heading again. See Washer Fluid on page 9‑24 for information about how to receive a satellite signal. The compass system will restart and...are performing wipes due to windshield wash, the wipers continue to spray windshield washer fluid and activate the wipers. The compass receives its heading and other information from the GPS satellites. See Operation on 1, 2 or &, they will continue until the lever is released or ...
Owner's Manual
Page 115
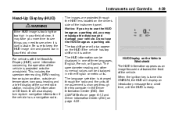
... vehicle is changed through the HUD lens located on the HUD if the vehicle has tap shift and it is dark outside air temperature, compass heading and a brief display of the current radio station, including XM information or CD track. The language selection is changed through the trip computer in ...Center (DIC) on the Vehicle Windshield The HUD information appears as an image focused out toward the front of the vehicle. Instruments and Controls 4-29 Head-Up Display (HUD) { WARNING If the HUD image is too bright or too high in your field of view, it may misjudge the distance and...
... vehicle is changed through the HUD lens located on the HUD if the vehicle has tap shift and it is dark outside air temperature, compass heading and a brief display of the current radio station, including XM information or CD track. The language selection is changed through the trip computer in ...Center (DIC) on the Vehicle Windshield The HUD information appears as an image focused out toward the front of the vehicle. Instruments and Controls 4-29 Head-Up Display (HUD) { WARNING If the HUD image is too bright or too high in your field of view, it may misjudge the distance and...

Owner's Manual
Page 117
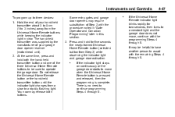
... distance bar that will show the turn-by-turn signal indication, high beam indication, transmission positions, outside air temperature and compass heading. Format Three: This display includes all the information in Format One along with a circular tachometer, but without the transmission information,... the outside air temperature, and compass heading. Instruments and Controls The three formats are as follows: 4-31 Format One: This display gives the speedometer reading (in English...
... distance bar that will show the turn-by-turn signal indication, high beam indication, transmission positions, outside air temperature and compass heading. Format Three: This display includes all the information in Format One along with a circular tachometer, but without the transmission information,... the outside air temperature, and compass heading. Instruments and Controls The three formats are as follows: 4-31 Format One: This display gives the speedometer reading (in English...

Owner's Manual
Page 132
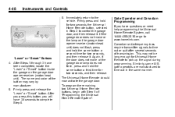
... Universal Home Remote. Otherwise, the device will time out and the procedure will see these buttons with and facing the garage door opener motor-head or gate motor-head. Read the instructions completely before attempting to www.homelink.com. When programming a garage door, park outside of the garage door or gate that...
... Universal Home Remote. Otherwise, the device will time out and the procedure will see these buttons with and facing the garage door opener motor-head or gate motor-head. Read the instructions completely before attempting to www.homelink.com. When programming a garage door, park outside of the garage door or gate that...
Owner's Manual
Page 133
... "Gate Operator and Canadian Programming" later in view. Some entry gates and garage door openers may require substitution of your garage door opener receiver (motor-head unit). 2. It may release both the hand-held transmitter button until the indicator light changes from Step 2) while observing the indicator light and garage door...
... "Gate Operator and Canadian Programming" later in view. Some entry gates and garage door openers may require substitution of your garage door opener receiver (motor-head unit). 2. It may release both the hand-held transmitter button until the indicator light changes from Step 2) while observing the indicator light and garage door...
Owner's Manual
Page 134
...hold for two seconds, and then release it . Again, if the door does not move or the lamp on the garage door opener receiver (motor-head unit). To program the remaining two Universal Home Remote buttons, begin with Step 1 of the button may not be long enough for two seconds, ... release it . After Steps 1 through 3 have been completed, locate the "Learn" or "Smart" button inside the garage on the garage door opener receiver (motor-head unit) does not flash, press and hold the same button a third time for Universal Home Remote to complete Step 6. Firmly press and release the "Learn...
...hold for two seconds, and then release it . Again, if the door does not move or the lamp on the garage door opener receiver (motor-head unit). To program the remaining two Universal Home Remote buttons, begin with Step 1 of the button may not be long enough for two seconds, ... release it . After Steps 1 through 3 have been completed, locate the "Learn" or "Smart" button inside the garage on the garage door opener receiver (motor-head unit) does not flash, press and hold the same button a third time for Universal Home Remote to complete Step 6. Firmly press and release the "Learn...

