
Owner's Manual
Page 1
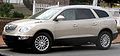
2010 Buick Enclave Owner Manual M In Brief ...1-1 Instrument Panel ...1-2 Initial Drive Information ...1-3 Vehicle Features ...1-14 Performance and Maintenance ...1-18 Keys, Doors and Windows ...2-1 Keys and Locks ...2-2 Doors ...2-9 Vehicle Security...2-12 Exterior Mirrors ...2-15 Interior Mirrors ...2-18 Windows ...2-18 Roof ...2-21 Seats and Restraints ...3-1 Head Restraints ...3-2 Front Seats ...3-3 Rear Seats ...3-8 Safety Belts ...3-13 Airbag System ...3-29 Child Restraints ...3-44 Storage ...4-1 Storage Compartments ...4-1 Additional Storage Features ...4-3 Roof Rack System ...4-4 ...
2010 Buick Enclave Owner Manual M In Brief ...1-1 Instrument Panel ...1-2 Initial Drive Information ...1-3 Vehicle Features ...1-14 Performance and Maintenance ...1-18 Keys, Doors and Windows ...2-1 Keys and Locks ...2-2 Doors ...2-9 Vehicle Security...2-12 Exterior Mirrors ...2-15 Interior Mirrors ...2-18 Windows ...2-18 Roof ...2-21 Seats and Restraints ...3-1 Head Restraints ...3-2 Front Seats ...3-3 Rear Seats ...3-8 Safety Belts ...3-13 Airbag System ...3-29 Child Restraints ...3-44 Storage ...4-1 Storage Compartments ...4-1 Additional Storage Features ...4-3 Roof Rack System ...4-4 ...

Owner's Manual
Page 7
... for Passenger Airbag ...1-8 Mirror Adjustment ...1-9 Steering Wheel Adjustment ...1-10 Interior Lighting ...1-11 Exterior Lighting ...1-11 Windshield Wiper/Washer ...1-12 Climate Controls ...1-13 Performance and Maintenance Vehicle Features Radio(s) ...Satellite Radio ...Portable Audio Devices ...Bluetooth® ...Steering Wheel Controls ...Navigation System ...Cruise Control ...Storage Compartments ...Power Outlets ...Sunroof ...1-14 1-15 1-15 1-15 1-16 1-16 1-17 1-17 1-18 1-18 StabiliTrak® ...1-18 Tire Pressure Monitor ...1-19 Tire Sealant and Compressor Kit ...1-19 Engine Oil Life...
... for Passenger Airbag ...1-8 Mirror Adjustment ...1-9 Steering Wheel Adjustment ...1-10 Interior Lighting ...1-11 Exterior Lighting ...1-11 Windshield Wiper/Washer ...1-12 Climate Controls ...1-13 Performance and Maintenance Vehicle Features Radio(s) ...Satellite Radio ...Portable Audio Devices ...Bluetooth® ...Steering Wheel Controls ...Navigation System ...Cruise Control ...Storage Compartments ...Power Outlets ...Sunroof ...1-14 1-15 1-15 1-15 1-16 1-16 1-17 1-17 1-18 1-18 StabiliTrak® ...1-18 Tire Pressure Monitor ...1-19 Tire Sealant and Compressor Kit ...1-19 Engine Oil Life...
Owner's Manual
Page 9
... features which can be found later in this owner manual. K. Air Vents on page 5‑9. Clock on page 8‑9. Hood Release. Center Console Shift Lever. Rear Window Wiper/Washer on page 5‑5. Windshield Wiper/Washer on page 5‑6. D. F. AM-FM Radio on page 8‑1. L. Dual Automatic Climate Control System on page 7‑6. E. Exterior Lamp Controls on page 6‑5. H. Instrument Panel Illumination Control on page 6‑1. Steering Wheel Controls on page 3‑7. O. S. Heated Front Seats on page 5‑3. Passenger...
... features which can be found later in this owner manual. K. Air Vents on page 5‑9. Clock on page 8‑9. Hood Release. Center Console Shift Lever. Rear Window Wiper/Washer on page 5‑5. Windshield Wiper/Washer on page 5‑6. D. F. AM-FM Radio on page 8‑1. L. Dual Automatic Climate Control System on page 7‑6. E. Exterior Lamp Controls on page 6‑5. H. Instrument Panel Illumination Control on page 6‑1. Steering Wheel Controls on page 3‑7. O. S. Heated Front Seats on page 5‑3. Passenger...

Owner's Manual
Page 11
... liftgate handle. Press and hold / until the parking lamps turn the key toward the front or rear of the vehicle, or press the Q or " button on the front doors. From the inside use the pull cup or pull strap as an aid. See Power Door Locks on page 2‑5. See Remote Vehicle Start on page 2‑7. Press the liftgate button on the Remote Keyless Entry (RKE...
... liftgate handle. Press and hold / until the parking lamps turn the key toward the front or rear of the vehicle, or press the Q or " button on the front doors. From the inside use the pull cup or pull strap as an aid. See Power Door Locks on page 2‑5. See Remote Vehicle Start on page 2‑7. Press the liftgate button on the Remote Keyless Entry (RKE...

Owner's Manual
Page 21
... the Clock To set the time and date for the vehicles specific audio system, see Clock on page 5‑9. 1-15 Satellite Radio Vehicles with an XM™ Satellite Radio tuner and a valid XM Satellite Radio subscription can be changed. 4. Turn the ignition key to ACC/ ACCESSORY or ON/RUN, then press O , to the auxiliary port using the vehicle's audio system, microphone and controls. Press G to : . For more...
... the Clock To set the time and date for the vehicles specific audio system, see Clock on page 5‑9. 1-15 Satellite Radio Vehicles with an XM™ Satellite Radio tuner and a valid XM Satellite Radio subscription can be changed. 4. Turn the ignition key to ACC/ ACCESSORY or ON/RUN, then press O , to the auxiliary port using the vehicle's audio system, microphone and controls. Press G to : . For more...

Owner's Manual
Page 26
... "Change Engine Oil Soon" message goes off . 2. See Engine Oil Life System on page 10‑10. Always follow posted speed limits or drive more slowly when conditions require. Turn the ignition to get the best fuel economy possible. . . When road and weather conditions are available 24 hours a day, 365 days a year, minor repair information or towing arrangements. Follow recommended scheduled maintenance. . Driving for long periods of a new Buick...
... "Change Engine Oil Soon" message goes off . 2. See Engine Oil Life System on page 10‑10. Always follow posted speed limits or drive more slowly when conditions require. Turn the ignition to get the best fuel economy possible. . . When road and weather conditions are available 24 hours a day, 365 days a year, minor repair information or towing arrangements. Follow recommended scheduled maintenance. . Driving for long periods of a new Buick...
Owner's Manual
Page 29
... ...Remote Vehicle Start ...Door Locks ...Power Door Locks ...Delayed Locking ...Automatic Door Locks ...Lockout Protection ...Safety Locks ...2-2 2-2 2-3 2-5 2-7 2-7 2-7 2-8 2-8 2-8 Doors Liftgate ...2-9 Interior Mirrors Automatic Dimming Rearview Mirror ...2-18 Vehicle Security Vehicle Security ...Anti-Theft Alarm System ...Immobilizer ...Immobilizer Operation ...2-12 2-12 2-13 2-13 2-15 2-16 2-16 2-17 2-17 Windows Windows ...2-18 Power Windows ...2-19 Sun Visors ...2-21 Exterior Mirrors Convex Mirrors ...Power Mirrors ...Folding Mirrors ...Heated Mirrors ...Park Tilt Mirrors ... Roof...
... ...Remote Vehicle Start ...Door Locks ...Power Door Locks ...Delayed Locking ...Automatic Door Locks ...Lockout Protection ...Safety Locks ...2-2 2-2 2-3 2-5 2-7 2-7 2-7 2-8 2-8 2-8 Doors Liftgate ...2-9 Interior Mirrors Automatic Dimming Rearview Mirror ...2-18 Vehicle Security Vehicle Security ...Anti-Theft Alarm System ...Immobilizer ...Immobilizer Operation ...2-12 2-12 2-13 2-13 2-15 2-16 2-16 2-17 2-17 Windows Windows ...2-18 Power Windows ...2-19 Sun Visors ...2-21 Exterior Mirrors Convex Mirrors ...Power Mirrors ...Folding Mirrors ...Heated Mirrors ...Park Tilt Mirrors ... Roof...

Owner's Manual
Page 31
... are other conditions which can affect the performance of the transmitter. Q (Lock): the doors. when Q is turned on page 2‑5 for 20 seconds or until the ignition is pressed again within five seconds, all If enabled through the Driver Information Center (DIC), the parking lamps flash once to lock all remaining doors unlock. With Remote Start and Power Liftgate Shown, Without Similar / (Remote Vehicle Start): For vehicles with...
... are other conditions which can affect the performance of the transmitter. Q (Lock): the doors. when Q is turned on page 2‑5 for 20 seconds or until the ignition is pressed again within five seconds, all If enabled through the Driver Information Center (DIC), the parking lamps flash once to lock all remaining doors unlock. With Remote Start and Power Liftgate Shown, Without Similar / (Remote Vehicle Start): For vehicles with...

Owner's Manual
Page 32
... transmitters to this vehicle. & (Power Liftgate): Press and hold L for 30 seconds. See "Relearn Remote Key" under Driver Information Center (DIC) on the transmitter. The parking lamps flash and the horn sounds three times. Programming Transmitters to the Vehicle Only RKE transmitters programmed to open or close the liftgate. The ignition must also be reprogrammed. Insert the new battery, positive side facing...
... transmitters to this vehicle. & (Power Liftgate): Press and hold L for 30 seconds. See "Relearn Remote Key" under Driver Information Center (DIC) on the transmitter. The parking lamps flash and the horn sounds three times. Programming Transmitters to the Vehicle Only RKE transmitters programmed to open or close the liftgate. The ignition must also be reprogrammed. Insert the new battery, positive side facing...

Owner's Manual
Page 34
... coolant temperature gets too high or if the oil pressure gets low. Vehicles that have DIC buttons, see your dealer/retailer to run time by 10 minutes, repeat Steps 1 though 3 while the engine is the first remote start system. Turn the ignition switch on the hazard warning flashers. For example, if the lock button and then the remote start buttons are shipped from the factory with the remote vehicle start...
... coolant temperature gets too high or if the oil pressure gets low. Vehicles that have DIC buttons, see your dealer/retailer to run time by 10 minutes, repeat Steps 1 though 3 while the engine is the first remote start system. Turn the ignition switch on the hazard warning flashers. For example, if the lock button and then the remote start buttons are shipped from the factory with the remote vehicle start...

Owner's Manual
Page 48
... battery on windows with the express-up feature. Press or pull the window switch fully and release it briefly after the window is located with the express-up feature need to be raised or lowered without holding the switch. Anti-Pinch Feature The anti-pinch feature is on or off. Window Lockout o (Window Lockout): The window lockout switch is fully closed. 4. See Retained Accessory Power (RAP) on the driver door...
... battery on windows with the express-up feature. Press or pull the window switch fully and release it briefly after the window is located with the express-up feature need to be raised or lowered without holding the switch. Anti-Pinch Feature The anti-pinch feature is on or off. Window Lockout o (Window Lockout): The window lockout switch is fully closed. 4. See Retained Accessory Power (RAP) on the driver door...
Owner's Manual
Page 137
... Tire Performance Criteria (TPC) can affect the vehicle's emission controls and can prevent more serious damage to costly repairs not covered by the vehicle warranty. This light comes on when the ignition is on , after a while, the emission controls might not work as a check to pass a required Emission Inspection/ Maintenance test. See Accessories and Modifications on , while the engine is required. If it is not running...
... Tire Performance Criteria (TPC) can affect the vehicle's emission controls and can prevent more serious damage to costly repairs not covered by the vehicle warranty. This light comes on when the ignition is on , after a while, the emission controls might not work as a check to pass a required Emission Inspection/ Maintenance test. See Accessories and Modifications on , while the engine is required. If it is not running...

Owner's Manual
Page 194
...vehicle speakers. this section, or "Audio/Video (A/V) Jacks" under, Rear Seat Entertainment (RSE) System on page 7‑36 for CDs is damaged, such as DVD slot, CD slot, XM, FM/AM, Front Auxiliary Jack, or Rear Auxiliary Jack. Press O to turn on the video screen and use the remote control to only navigate the CD tracks through the speakers...disc is inserted into the top DVD slot, the rear seat operator can be heard through the remote control. See "Using the Auxiliary Input Jack(s)" later in their original cases or other protective cases and away from the center to a CD, it ; ...
...vehicle speakers. this section, or "Audio/Video (A/V) Jacks" under, Rear Seat Entertainment (RSE) System on page 7‑36 for CDs is damaged, such as DVD slot, CD slot, XM, FM/AM, Front Auxiliary Jack, or Rear Auxiliary Jack. Press O to turn on the video screen and use the remote control to only navigate the CD tracks through the speakers...disc is inserted into the top DVD slot, the rear seat operator can be heard through the remote control. See "Using the Auxiliary Input Jack(s)" later in their original cases or other protective cases and away from the center to a CD, it ; ...
Owner's Manual
Page 245
... Tank ...9-45 Filling a Portable Fuel Container ...9-46 Automatic Transmission Automatic Transmission ...9-24 Manual Mode ...9-26 Tow/Haul Mode ...9-27 Drive Systems All-Wheel Drive ...9-28 Brakes Antilock Brake System (ABS) ...9-28 Parking Brake ...9-29 Brake Assist ...9-30 Towing General Towing Information ...Driving Characteristics and Towing Tips ...Trailer Towing ...Towing Equipment ...9-47 9-47 9-52 9-56 Starting and Operating New Vehicle Break-In ...Ignition Positions ...Retained Accessory Power (RAP) ...Starting the Engine ...Engine Heater ...9-17 9-18 9-19 9-19 9-20 Ride Control...
... Tank ...9-45 Filling a Portable Fuel Container ...9-46 Automatic Transmission Automatic Transmission ...9-24 Manual Mode ...9-26 Tow/Haul Mode ...9-27 Drive Systems All-Wheel Drive ...9-28 Brakes Antilock Brake System (ABS) ...9-28 Parking Brake ...9-29 Brake Assist ...9-30 Towing General Towing Information ...Driving Characteristics and Towing Tips ...Trailer Towing ...Towing Equipment ...9-47 9-47 9-52 9-56 Starting and Operating New Vehicle Break-In ...Ignition Positions ...Retained Accessory Power (RAP) ...Starting the Engine ...Engine Heater ...9-17 9-18 9-19 9-19 9-20 Ride Control...

Owner's Manual
Page 263
... of time, by turning the ignition switch to warm up and lubricate all the doors and turn the ignition to START. The vehicle has a Computer-Controlled Cranking System. components. Engine cranking can be stopped by returning the key to P (Park) or N (Neutral). Starting the Engine Move the shift lever to the START position immediately after cranking has ended, can overheat and damage the cranking motor, and drain the battery. This feature...
... of time, by turning the ignition switch to warm up and lubricate all the doors and turn the ignition to START. The vehicle has a Computer-Controlled Cranking System. components. Engine cranking can be stopped by returning the key to P (Park) or N (Neutral). Starting the Engine Move the shift lever to the START position immediately after cranking has ended, can overheat and damage the cranking motor, and drain the battery. This feature...
Owner's Manual
Page 323
... to -use engine coolant (antifreeze) in wear indicators that soon the brakes will not work well. Properly torqued wheel nuts are needed. Add washer fluid until the tank is wrong with ready-to an accident. This does not mean something is full. Brakes This vehicle has disc brakes. Do not mix water with the brakes. Do not use washer fluid. Disc brake pads have the vehicle serviced.
... to -use engine coolant (antifreeze) in wear indicators that soon the brakes will not work well. Properly torqued wheel nuts are needed. Add washer fluid until the tank is wrong with ready-to an accident. This does not mean something is full. Brakes This vehicle has disc brakes. Do not mix water with the brakes. Do not use washer fluid. Disc brake pads have the vehicle serviced.

Owner's Manual
Page 343
... accessories are laid at alternate angles less than 90 degrees to its width. The DOT code includes the Tire Identification Number (TIN), an alphanumeric designator which the plies are , automatic transmission, power steering, power brakes, power windows, power seats, and air conditioning. Bead: The tire bead contains steel wires wrapped by steel cords that the tire is located between the plies and the tread. GAWR FRT: Gross Axle Weight Rating for the front axle...
... accessories are laid at alternate angles less than 90 degrees to its width. The DOT code includes the Tire Identification Number (TIN), an alphanumeric designator which the plies are , automatic transmission, power steering, power brakes, power windows, power seats, and air conditioning. Bead: The tire bead contains steel wires wrapped by steel cords that the tire is located between the plies and the tread. GAWR FRT: Gross Axle Weight Rating for the front axle...

Owner's Manual
Page 354
... affect the braking and handling performance of your vehicle, including brake system performance, ride and handling, traction control, and tire pressure monitoring performance. You can see the indicators at three or more information. 10-52 Vehicle Care wear out before they get tires with the same TPC Spec rating. GM's TPC Spec number is not being used. GM recommends replacing tires in tires degrades over a dozen critical specifications that are...
... affect the braking and handling performance of your vehicle, including brake system performance, ride and handling, traction control, and tire pressure monitoring performance. You can see the indicators at three or more information. 10-52 Vehicle Care wear out before they get tires with the same TPC Spec rating. GM's TPC Spec number is not being used. GM recommends replacing tires in tires degrades over a dozen critical specifications that are...

Owner's Manual
Page 370
... Shaft Assembly Removing the Spare Tire The compact spare tire is located under the vehicle. Open the carpet cutout that is located through the hole of the rear bumper. Hoist Shaft E. Compact Spare Tire F. Turn the lug wrench counterclockwise to lower the spare tire to the ground. A. Lug Wrench C. Attach the lug wrench into the hoist shaft. Open the storage compartment door of the convenience center...
... Shaft Assembly Removing the Spare Tire The compact spare tire is located under the vehicle. Open the carpet cutout that is located through the hole of the rear bumper. Hoist Shaft E. Compact Spare Tire F. Turn the lug wrench counterclockwise to lower the spare tire to the ground. A. Lug Wrench C. Attach the lug wrench into the hoist shaft. Open the storage compartment door of the convenience center...

Owner's Manual
Page 387
For vehicles being towed, remove the 50 amp BATT1 fuse from the underhood fuse block and store in a safe location. Position the vehicle to be towed, shift the transmission to P (Park), and turn the ignition to LOCK/OFF. 2. See Engine Compartment Fuse Block on the ground if one of the front tires is a compact spare tire. Release the parking brake. Reinstall the 50 amp BATT1 fuse to start the vehicle. Notice: Do not tow a vehicle with...
For vehicles being towed, remove the 50 amp BATT1 fuse from the underhood fuse block and store in a safe location. Position the vehicle to be towed, shift the transmission to P (Park), and turn the ignition to LOCK/OFF. 2. See Engine Compartment Fuse Block on the ground if one of the front tires is a compact spare tire. Release the parking brake. Reinstall the 50 amp BATT1 fuse to start the vehicle. Notice: Do not tow a vehicle with...


