Owner's Manual
Page 103
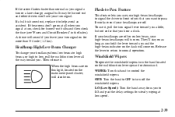
... drivers won't see "Fuses and Circuit Breakers" in front of you that you signal a turn or a lane change your turn on as long as you hear a click. Headlamp High/Low-Beam Changer To change , a signal bulb may be on for burned-out bulbs and then check the fuse (see your headlamps from you to help avoid...
... drivers won't see "Fuses and Circuit Breakers" in front of you that you signal a turn or a lane change your turn on as long as you hear a click. Headlamp High/Low-Beam Changer To change , a signal bulb may be on for burned-out bulbs and then check the fuse (see your headlamps from you to help avoid...

Owner's Manual
Page 216
... jerky or sudden maneuvers. Signal well in contact with a trailer, make wider turns than normal. Avoid making very sharp turns while trailering. Do this so your instrument panel will flash for turns even if the bulbs on your vehicle may think drivers behind you are not. Thus, you may need a different turn signal flasher and/or extra...
... jerky or sudden maneuvers. Signal well in contact with a trailer, make wider turns than normal. Avoid making very sharp turns while trailering. Do this so your instrument panel will flash for turns even if the bulbs on your vehicle may think drivers behind you are not. Thus, you may need a different turn signal flasher and/or extra...

Owner's Manual
Page 286
Front Parking and Turn Signal Lamps 1. Twist the sidemarker lamp socket, located on the outboard side of the bulb, pull the old bulb from the headlamp assembly. 4. Push the new bulb into the socket. 6. Turn the vertical aiming screw until the indicator is adjusted, then adjust the ...5. Reverse Steps 1 through 3 to the removal procedure earlier in this section. 2. Turn the horizontal aiming screw until the level bubble is lined up with zero. 2. Remove the rubber bulb access cover. Passenger's Side Headlamp Shown A. Horizontal Aim Adjustment Screw B. Vertical Aiming ...
Front Parking and Turn Signal Lamps 1. Twist the sidemarker lamp socket, located on the outboard side of the bulb, pull the old bulb from the headlamp assembly. 4. Push the new bulb into the socket. 6. Turn the vertical aiming screw until the indicator is adjusted, then adjust the ...5. Reverse Steps 1 through 3 to the removal procedure earlier in this section. 2. Turn the horizontal aiming screw until the level bubble is lined up with zero. 2. Remove the rubber bulb access cover. Passenger's Side Headlamp Shown A. Horizontal Aim Adjustment Screw B. Vertical Aiming ...

Owner's Manual
Page 288
... is one wing nut located on the outside of the vehicle. 5. Push in a new bulb. 9. The other two are two bulbs on the socket and turn the socket counterclockwise. 6. There is equipped with a convenience net, remove it. 3. Tail/Stop/Turn Signal Lamps 1. Reverse these steps to reinstall the lamp assembly. 6-38 Squeeze the tab on...
... is one wing nut located on the outside of the vehicle. 5. Push in a new bulb. 9. The other two are two bulbs on the socket and turn the socket counterclockwise. 6. There is equipped with a convenience net, remove it. 3. Tail/Stop/Turn Signal Lamps 1. Reverse these steps to reinstall the lamp assembly. 6-38 Squeeze the tab on...
Owner's Manual
Page 316
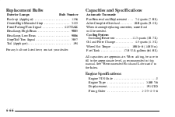
... to the approximate level, as recommended in the Index. Replacement Bulbs Exterior Lamps Bulb Number Back-up (Applique) ...1156 Center High-Mounted Stop ...3155 Front Parking/Turn Signal ...4157NAK Headlamp, High Beam ...9005 Headlamp, Low Beam ...9006 Stop/Tail/Turn Signal ...3057 Tail (Applique) ...194 For any bulb not listed here, contact your dealer. When adding, be...
... to the approximate level, as recommended in the Index. Replacement Bulbs Exterior Lamps Bulb Number Back-up (Applique) ...1156 Center High-Mounted Stop ...3155 Front Parking/Turn Signal ...4157NAK Headlamp, High Beam ...9005 Headlamp, Low Beam ...9006 Stop/Tail/Turn Signal ...3057 Tail (Applique) ...194 For any bulb not listed here, contact your dealer. When adding, be...


