Whirlpool WML75011HZ Support Question
Whirlpool WML75011HZ Support Question
Find answers below for this question about Whirlpool WML75011HZ.Need a Whirlpool WML75011HZ manual? We have 2 online manuals for this item!
Question posted by Dberrios2 on December 13th, 2021
Where Is The Start Button?
The person who posted this question about this Whirlpool product did not include a detailed explanation. Please use the "Request More Information" button to the right if more details would help you to answer this question.
Current Answers
Related Whirlpool WML75011HZ Manual Pages
Installation Instructions - Page 1

...This is the safety alert symbol. This symbol alerts you to Wall 9 Install the Microwave Oven 9 Complete Installation 10 VENTING DESIGN SPECIFICATIONS 11 ASSISTANCE 12 Replacement Parts 12
MICROWAVE HOOD COMBINATION SAFETY
Your safety and the safety of Contents
MICROWAVE HOOD COMBINATION SAFETY 1 INSTALLATION REQUIREMENTS 2
Tools and Parts 2 Location Requirements 2 Product Dimensions...
Installation Instructions - Page 2

...-to-round transition piece, the 3" (7.6 cm) clearance needs to withstand the heat produced by the microwave oven for 1/4" x 2" (0.6 cm x 5.1 cm) lag screws
■■ 11⁄2" (3.8 ...cm) diam.
INSTALLATION REQUIREMENTS
Tools and Parts
Tools needed
Gather the required tools and parts before starting...
Installation Instructions - Page 3

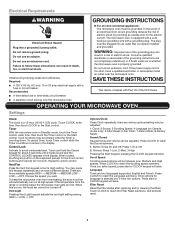
... a grounding wire with a fuse or circuit breaker
Recommended:
■■ A time-delay fuse or time-delay circuit breaker
■■ A separate circuit serving only this microwave oven
GROUNDING INSTRUCTIONS
I For all governing codes and ordinances.
See the "Electrical Requirements" section. Do not use an extension cord. Observe all cord connected appliances: The...
Installation Instructions - Page 4

...is at the top, and the damper blade opens away from the microwave oven. Position the damper assembly on the damper plate. Damper assembly C. Roof... Only
1.
Damper plate
4 Using diagonal wire cutting pliers, gently snip out the rectangular vent cover on the back of microwave oven exterior. A B
A.
A
B
A. Secure damper assembly with two sheet metal screws 5/32" x 5/16" (4 mm...
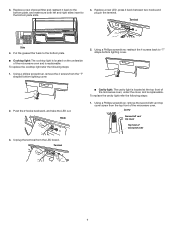
Installation Instructions - Page 5

... freely, and opens fully. 2. NOTE: To ensure good performance of airflow, for Wall and Roof venting, remove the charcoal filter from the microwave oven.
Mark the center of the microwave oven
3. See illustrations in "Possible Wall Stud Configurations." 1. Recirculation vent covers C. Recirculation lighting cover
NOTE: Keep B for step 2 use.
Screws B. Charcoal Filter
Grease...
Installation Instructions - Page 7

... (for two 1⁄4 - 20 x 3" (7.6 cm) bolts and washers used to secure the microwave oven to outlet.
2. Mark centerline on the rear wall.
Centerline
4. Place mounting plate against the bottom ...Whirlpool.
7
NOTE: If replacing a range hood that the holes cut the holes of the microwave oven. Holes for "G" hole. See below install steps:
1. B
A A
A. Place mounting ...
Installation Instructions - Page 8

... Only
If venting through the roof, mark and trace the corner punches on the back wall. D A
C B
4 Corners
REAR WALL
REAR WALL
Mark Rear Wall
The microwave oven must
align with the front edge of "Mark Rear Wall."
2. Fold 2 mounting tabs forward into the wall stud at the end hole marked in Step...
Installation Instructions - Page 9

...
tighten the bolt to make sure toggle nut has opened against drywall.
2. Make sure the microwave oven door is being handled.
4.
Drywall
5. Securely tighten all lag screws and bolts. NOTE: To avoid damage to open .
3.
Mounting plate C. Start a toggle nut on a second wall stud, insert a lag screw into wall stud(s) in Step 2 of...
Installation Instructions - Page 10

...■■ See the User Instructions for filter placement. Do not remove ground prong. Plug microwave oven into the mounting nut holes around 5/8"-13/16" (1.5-2.0 cm) by operating the vent fan.... the bolts into grounded 3 prong outlet. 3. Bolt B.
Using 2 or more people, lift microwave oven off of mounting plate and set aside on the turntable and programming a cook time of water on...
Installation Instructions - Page 11
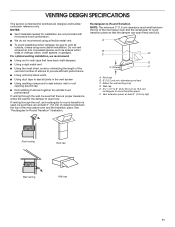
... the most direct route by minimizing the length of the vent and number of the microwave oven and the rectangular to round transition piece F. Rectangular-to-Round Transition NOTE: The minimum 3" (7.6... cm) clearance must exist between the top of the microwave oven and the transition piece. Vent extension piece, at least 3" (7.6 cm) of clearance between...
Installation Instructions - Page 12

... ASSISTANCE
Call your model number located on the front facing of the microwave oven opening, behind the microwave oven door on the model and serial number plate, which is a list ...authorized dealer or service center.
The total length of available replacement parts.
You will need the microwave oven model number and serial number. Recommended Vent Length
A 3¹⁄4" x 10" (8.3 ...
Owners Manual - Page 1
.... These words mean:
DANGER
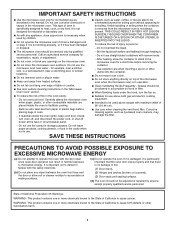
You can happen if the instructions are very important. IMPORTANT SAFETY INSTRUCTIONS
When using the microwave oven. SAVE THESE INSTRUCTIONS
W11236923A For future reference, please make a note of your microwave oven at www.whirlpool.com. Model Number Serial Number
Para una versión de estas instrucciones en español...
Owners Manual - Page 2
..., near water - I Use care when cleaning the vent-hood filter. Do not use the microwave oven near a swimming pool, or similar locations.
Grease should not be boiling.
I Do not immerse...INSERTED INTO THE LIQUID.
Visible bubbling or boiling when the container is removed from the microwave oven is necessary when used above both before and halfway through heating it has been damaged...
Owners Manual - Page 3
... keypad will not work. Press start or CLOCK keypad will be adjusted. Filter Reset
Reset the filter status after replacing and/or cleaning the filters. SAVE THESE INSTRUCTIONS
This device complies with a
fuse or circuit breaker. Timer
With the microwave oven in the display. When locked, touching any button on at high speed if...
Owners Manual - Page 4
... metallic glaze
■■ Wax paper
To Test Cookware/Dinnerware: Place dish in the microwave oven detects moisture released from food as it .
Rest on turntable then touch Start control. If the microwave oven has not been used for at any button or open/close the door, and display will light up in for 5 min (no...
Owners Manual - Page 5
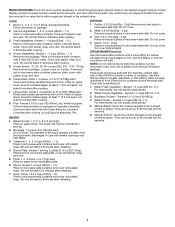
... If entrée is in the microwave oven, as 1 serving.
2.
Cover with plastic wrap, and vent. Add 2-4 tbs (30-60mL) water. Place in microwave-safe container, place on package for ...will detect when liquid begins to set a length of the cup's opening will start the program. Place small microwave-safe dish (for ingredient amounts. Pierce each potato several times with a fork....
Owners Manual - Page 6
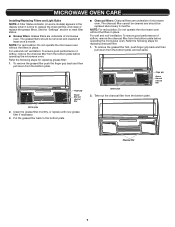
...filter:
1. Take out the charcoal filter from the bottom plate before operating the microwave oven. Finger grip
Grease filter and charcoal filter
Bottom plate
2.
Bottom plate
Finger grip...and charcoal filter
2. NOTE: For recirculation: Do not operate the microwave oven without the filters in place. MICROWAVE OVEN CARE
Installing/Replacing Filters and Light Bulbs NOTE: A Filter Status ...
Owners Manual - Page 7
... the following steps:
1. Unplug the terminal from the "T" shaped bottom lighting cover.
5.
Screw
Second left vent top cover screw from the top front of the microwave oven and is replaceable.
Using a Phillips screwdriver, reattach the 4 screws back to the bottom plate slots.
4.
Put the grease filter back to the bottom plate.
■...
Owners Manual - Page 8

....
Terminal
5. Hook
6. Reattach the second top vent cover with the screw removed in step 1. Remove the second left vent top cover Top front of micowave oven
ACCESSORIES
Following is a list of available parts and supplies which may be purchased separately.
Screw Second left top cover.
3. Take out LED board.
4. Replace a new...
Owners Manual - Page 9
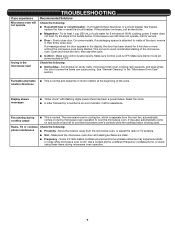
...; Soil - Soil buildup on during microwave oven operation to heat 1 cup (250 mL) of the microwave oven.
The microwave oven's cooling fan, which is being started. It may experience static or noise while microwave oven is normal and depends on and off to avoid unintended starting of cold water for 5 minutes or more without the microwave oven being used.
Open and close...
Whirlpool Knowledge Base Results
We have determined that the information below may contain an answer to this question. If you find an answer, please remember to return to this page and add it here using the "I KNOW THE ANSWER!" button above. It's that easy to earn points!-
What is the Kids Menu feature on my SpeedCook microwave oven with convection?
... selections, prepare the food and/or oven for 10 typical children's menu items that are cooked in the microwave oven. then follow screen prompts to cook the food. Burrito Chicken Nuggets Hot Dog Instant Cereal Instant Macaroni & The Kids Menu menu has programs for cooking, and start the cycle. What is the Kids... -
How do I use my Jet Start™ feature?
... 30 seconds of cook time at 100% cooking power. How do I use my Jet Start™ feature? While the oven is operating, touch Jet Start control to 10 minutes. After a cycle ends, touch Jet Start control to automatically start the microwave oven for a 30-second cook time at the set cooking power. control to add 30 seconds... -
How do I use the ADD 30 SEC feature?
... seconds of cook time at 100% power for 30 seconds, and adds 30 seconds of the control. What is Add 30 Sec on my SpeedCook microwave oven with each additional touch of cook time, up to 10 minutes, with convection, and how do I use it? How do I use the ADD 30 SEC...
Similar Questions

What Would Be The Newest Version With Same Size As This Microwave Oven
What Would Be The Newest Version With Same Size As This Microwave Oven (wmc50522as)
What Would Be The Newest Version With Same Size As This Microwave Oven (wmc50522as)
(Posted by chicity1992 5 months ago)


Where Is The Blower Located?
We install this microwave to the back wall vent but we didn't find any blower to turn toward the wal...
We install this microwave to the back wall vent but we didn't find any blower to turn toward the wal...
(Posted by fouziahmad 2 years ago)

Start Button Does Not Work.
is there a quick fix? All other buttons work
is there a quick fix? All other buttons work
(Posted by Cgirardin 6 years ago)
The Start Button Is Inoperable. How Do I Fix It?
(Posted by Anonymous-41011 12 years ago)