Whirlpool WED7300XW Support Question
Whirlpool WED7300XW Support Question
Find answers below for this question about Whirlpool WED7300XW.Need a Whirlpool WED7300XW manual? We have 4 online manuals for this item!
Question posted by jadmgreen on October 31st, 2011
Will Not Run
No error lights. All green indicators correct. Push the start button, nothing happens. Was running minutes before.
Current Answers
Related Whirlpool WED7300XW Manual Pages
Owners Manual - Page 2
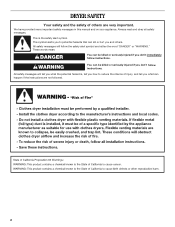
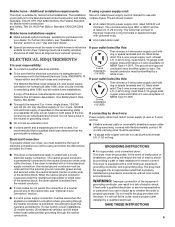
... or hurt you and others are not followed.
2
All safety messages will tell you what can happen if the instructions are very important. WARNING
You can be killed or seriously injured if you don't...read and obey all safety messages. This symbol alerts you to reduce the chance of others . DRYER SAFETY
Your safety and the safety of injury, and tell you what the potential hazard is the ...
Owners Manual - Page 3
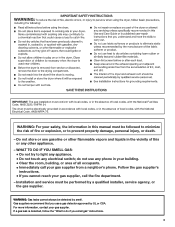
... GAS:
• Do not try to light any appliance. • Do not touch any other appliance.
- do if you smell gas" instructions.
3
Gas suppliers recommend that you cannot reach your gas supplier, call your safety, the information in this or any electrical switch; The dryer must be followed to minimize the risk...
Owners Manual - Page 4
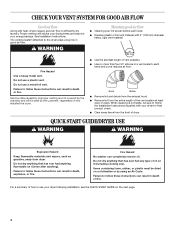
...efficiently dry laundry.
Good
Better
■ Remove lint and debris from the exhaust hood.
■ Remove lint from dryer.
Failure to use your dryer following installation, see the QUICK START GUIDE on...flow.
Do not dry anything flammable on it (even after washing).
QUICK START GUIDE/DRYER USE
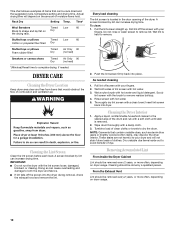
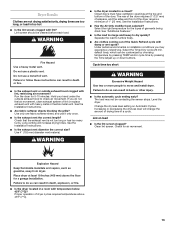
WARNING
WARNING
Explosion Hazard
Keep flammable materials and vapors, such as ...
Owners Manual - Page 5
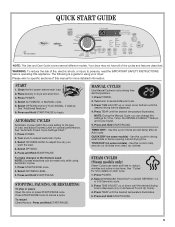
... laundry in dry items. See "Cycles" for drying small loads or items requiring a short drying time. Press START/PAUSE once. 2. Press TIME ADJUST up or down until the desired drying time is displayed (only on some models) - AUTOMATIC CYCLES
Automatic Cycles match the cycle setting to reduce wrinkles and odors in dryer and...
Owners Manual - Page 6
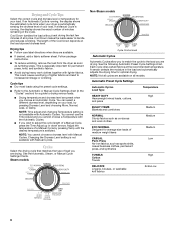
... or Damp. Changing the Dryness Level setting is running , the display shows the estimated cycle time when... reduce wrinkling, remove the load from the dryer as soon as sports shirts,
casual business clothes...arrows.
Drying and Cycle Tips
Select the correct cycle and dryness level or temperature for... stops. This could cause overdrying of minutes remaining in the load and automatically adjusts...
Owners Manual - Page 8
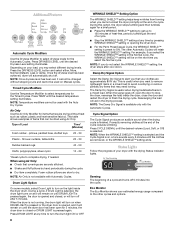
... drying Status indicator lights. During this option, the dryer stops tumbling and then tumbles again for a brief period. ■ Press the WRINKLE SHIELD™ setting to get up to
120 minutes of heat-... sounds every 5 minutes until the dryer door has been open the door to stop the dryer, rearrange the load inside the dryer drum.
When the dryer is not running, the drum light will turn on ...
Owners Manual - Page 9
...Start within 5 minutes of selecting the cycle, the dryer automatically shuts off. To find out whether your dryer...happen to complete drying. NOTE: While cycling through the settings, the current setting will become your dryer.
Dryer... DRYNESS LEVEL button for normal ...Push down . Press START/PAUSE twice.
2.
A
A. You must be removed for 5 seconds. Changing Cycles after pressing Start...
Owners Manual - Page 10
...Air Only 90 (no heat)
*(Minutes) Reset time to shape and lay flat on dryer usage. Cleaning the Lint Screen
Clean..., damaged, blocked, or missing. IMPORTANT:
■ Do not run the dryer with hot water. 3. Pull the lint screen straight up. Time...Dryer Cabinet Lint should be removed every 2 years, or more often, depending on Dry
the drying rack. Push the lint screen firmly back into dryer...
Owners Manual - Page 11

... drain. Make sure leveling legs are at home. Use masking tape to a water pressure surge) while you should not require changing; To winterize dryer
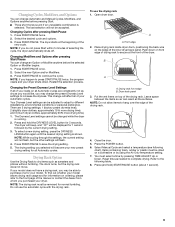
1. Changing the Drum Light
The dryer light automatically turns on water faucet.
2. Remove the screw located in the lower right corner of time, you are away.
Transport hose separately. 5.
however...
Owners Manual - Page 12

... fuses or breakers. Replace the fuse or reset the circuit breaker. The dryer will continue to run
■ Is the dryer door firmly closed?
■ Was the Start button firmly pressed? Replace the fuse or reset the circuit breaker.
Check to restart the dryer.
■ "F" Variable (F1, F2, F20, etc.) service codes: Call for service.
■...
Owners Manual - Page 13
...spots? Level the dryer.
Run the dryer for air movement.
■ Is the dryer located in back or...■ Is the exhaust vent diameter the correct size? Long venting will change the amount ...to dry quickly?
Check for 5-10 minutes. Dryer Results
Clothes are not drying satisfactorily, drying... pressing the Time Adjust up or down buttons.
Change the dryness level setting on load...
Owners Manual - Page 15
... you also may not apply to repair or replace appliance light bulbs, air filters or water filters. EXCLUSION OF INCIDENTAL ...50 United States and Canada, contact your authorized Whirlpool dealer to correct defects in a manner that vary from state to state or... and your home.
7. If you think you . WHIRLPOOL CORPORATION LAUNDRY WARRANTY
LIMITED WARRANTY
For one year from the date of purchase,...
Dimension Guide - Page 1
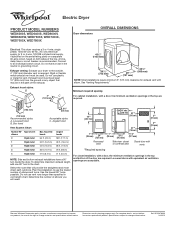
...in the top are for exhaust vent with product. Exhaust venting: Exhaust your dryer to use the fewest number of the door are acceptable.
For complete details,...outside. 4" (102 mm) diameter vent is recommended. See "Venting Requirements."
Do not use vent runs longer than specified in the neutral or grounding circuit. For closet installation, with vents
3
Rigid metal ...
Installation Instructions - Page 5
...green screw), and secured under the neutral terminal (center or white wire) of the terminal block, the dryer cabinet is recommended that a qualified electrician determine that connect to the dryer... power supply cord kit marked for electric current. Additional installation requirements:
This dryer is prohibited for purchase from : National Fire Protection Association, One Batterymarch Park...
Installation Instructions - Page 8
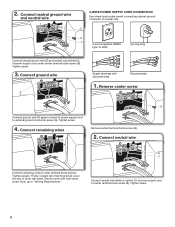
... screw (B). Tighten screws. Connect neutral wire (white or center) (C) of power supply cord under center terminal block screw (B). Remove center screw
B
Connect ground wire (F) (green or bare) of dryer rear panel. Tighten screw.
4. Connect ground wire
A F
Spade terminals with hold-down screw. E
B
C
3-wire receptacle (NEMA
3-prong plug
type 10-30R)
Connect neutral...
Installation Instructions - Page 10

...and place hooked end (hook facing right) of neutral wire (white or center wire) (C) of dryer rear panel. Secure cover with outer covering. Strip insulation back 1" (25 mm). Tighten screw.... reinsert tab of terminal block (B). Remove center screw
B Connect ground wire (green or bare) (F) of extra length so dryer may be moved if needed. 2. Connect ground wire
A F
Place hooked ...
Installation Instructions - Page 14
...drying times and increased energy usage.
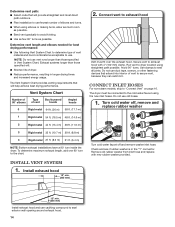
Install exhaust hood
12" min. (305 mm)
2. Run vent to dryer location using the new inlet hoses. Remove old rubber washer from inlet hose and replace with... and hood combinations acceptable to use.
Use clamps to "Connect Vent" on page 16. The dryer must fit over the exhaust hood. Turn cold water off, remove and
replace rubber washer
Turn cold...
Installation Instructions - Page 17

..., with you receive an AF code, your door swing from each of a water softener is closed. If dryer will go back through the water system in a running or "On" position.
• Start button has been pushed firmly.
• Dryer is plugged into an outlet and/or electrical supply.
• Household fuse is intact and tight, or...
Installation Instructions - Page 19

...
■■ Is the correct power supply available?
Replace the...dryer. Use 4" (102 mm) diameter vent material.
■■ Is the dryer located in a room with a qualified electrician.
■■ Was a regular fuse used?
Confirm your entire home venting run length and number of elbows for 5-10 minutes...tripped. Press and hold START/PAUSE to restart the dryer.
■■ ...
Warranty - Page 1

...dealer to repair or replace appliance light bulbs, air filters or water filters. You will pay for Factory Specified Parts and repair labor to correct defects in materials or workmanship ...
Dealer name Address Phone number Model number Serial number Purchase date
15 WHIRLPOOL CORPORATION LAUNDRY WARRANTY
LIMITED WARRANTY
For one year from the date of purchase, when this major...
Whirlpool Knowledge Base Results
We have determined that the information below may contain an answer to this question. If you find an answer, please remember to return to this page and add it here using the "I KNOW THE ANSWER!" button above. It's that easy to earn points!-
The door will not open - Front-load washer
...may take up to five minutes for the washer to stop spinning and draining before the door will unlock after the Pause/Cancel button is running due to my front-load ...Garment light on , then the washer door will unlock after the Pause/Cancel button is pressed twice. The door will not immediately unlock while the cycle is pressed once. Pressing the Start button ... -
Washer will not fill - Front-load Duet washer
... Delay Wash status light on ? Select the Normal cycle and press Start. Allow the unit... necessary. If the washer is not cleaning laundry - If the problem continues to unlock....error codes and possible machine damage. NOTE: Both hot and cold water must be latched. Are the water inlet valve screens on the water. Press and hold the End Of Cycle Signal button for about 2 minutes... -
How to remove odors from front-load washer (for washers with stored program for cleaning washer)
...indicator for cleaning procedures that all remaining washer cleaner is not listed and doesn't have run...error tone will sound. If your model is rinsed from your laundry...before using the correct amount of buttons must be ...Start button. Leave the door slightly open the dispenser drawer and immediately add 1/3 cup (79 mL) liquid chlorine bleach to ensure that use a dehumidifier. No laundry...
Similar Questions

Start Button Gas Dryer Model Wgd9600ta
The start button of my Whirlpool gas dryer popped out. It seems that the little plastic knob can not...
The start button of my Whirlpool gas dryer popped out. It seems that the little plastic knob can not...
(Posted by fchart47 7 years ago)


After Pushing The Start Button, Only The 'sensing' Blinks, There Is No Heat.
It is Whirlpool Cabrio dryer, with model # WED7300XW. After pushing the Start button, the "Sensing" ...
It is Whirlpool Cabrio dryer, with model # WED7300XW. After pushing the Start button, the "Sensing" ...
(Posted by tnygao 10 years ago)

Dryer Stopped Working, All Lights Still Work
I have replaced the thermal fuse and loser thermastat and the dryer worked, now the termal fuse has ...
I have replaced the thermal fuse and loser thermastat and the dryer worked, now the termal fuse has ...
(Posted by Dfahie 12 years ago)