Whirlpool WED6400SB Support Question
Whirlpool WED6400SB Support Question
Find answers below for this question about Whirlpool WED6400SB - Cabrio 7.0 Cu Ft Capacity Electric Dryer.Need a Whirlpool WED6400SB manual? We have 2 online manuals for this item!
Question posted by Anonymous-143053 on September 7th, 2014
Af Flashing On Estimated Time Remaining What Does It Mean?
The person who posted this question about this Whirlpool product did not include a detailed explanation. Please use the "Request More Information" button to the right if more details would help you to answer this question.
Current Answers
Answer #1: Posted by BusterDoogen on September 7th, 2014 3:02 PM
BusterDoogen

Member since:
October 30th, 2011 Points: 28,565,407

Member since:
October 30th, 2011 Points: 28,565,407
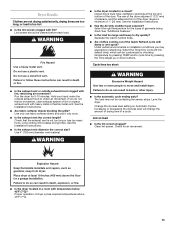
"“AF” (low airflow condition):
The dryer will continue to run when this diagnostic code is present. Press any key to clear the code from the display and return to the estimated time remaining.
Try the following:
The dryer will continue to run when this diagnostic code is present. Press any key to clear the code from the display and return to the estimated time remaining.
Try the following:
- Clean lint screen.
- Check to see if the vent run from the dryer to the wall is crushed or kinked.
- Confirm the vent run from the dryer to the wall is free of lint and debris.
- Confirm the exterior vent exhaust hood is free of lint and debris.
- Confirm your vent system falls within the recommended run length and number of elbows for the type of vent you are using.
- Select a Timed Dry heated cycle, and restart the dryer.
- If the message persists, have your entire home venting run cleaned.
I hope this is helpful to you!
Please respond to my effort to provide you with the best possible solution by using the "Acceptable Solution" and/or the "Helpful" buttons when the answer has proven to be helpful. Please feel free to submit further info for your question, if a solution was not provided. I appreciate the opportunity to serve you!
"
Related Whirlpool WED6400SB Manual Pages
Use and Care Guide - Page 2
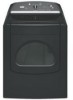
... in this manual and on your appliance. Always read and obey all safety messages. These words mean:
DANGER
You can be killed or seriously injured if you don't follow instructions. This is ,...either the word "DANGER" or "WARNING." This symbol alerts you to reduce the chance of others .
DRYER SAFETY
Your safety and the safety of injury, and tell you what can happen if the instructions are ...
Use and Care Guide - Page 5
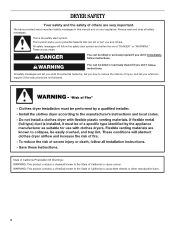
... Cycle. 3. Place laundry in dry items. See "Cycles" for drying small loads or items requiring a short drying time.
Turn knob to using Automatic Cycles. 3.
NOTE: Dryness selections can change the settings for optimal performance.
Press POWER. 2. Press TEMP until the desired temperature illuminates. Your dryer may not have all of fire, electric shock, or...
Use and Care Guide - Page 6
... they are not adjustable.
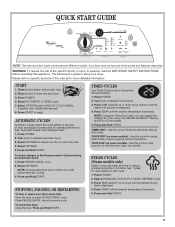
6 Adjust the temperature of a fabric softener sheet is selected, the estimated time remaining display shows the actual time remaining in the load and automatically adjusts the drying time for smoothing out wrinkles and reducing odors from the dryer as soon as tumbling stops. When a Steam Cycle is not recommended with steam cycles as...
Use and Care Guide - Page 7
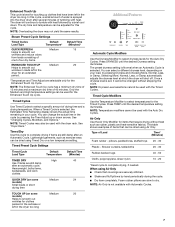
...*
Medium
Medium
Default Time (Minutes)* 15
20
*Temperature and Time Adjust are still damp
after several minutes of water is selected, the Estimated Time Remaining display shows the actual time remaining in your load, ... still damp after an Automatic Cycle. When a Timed Cycle is sprayed into the dryer drum after an automatic cycle. The dryer will shut off.
Press TEMP until the desired ...
Use and Care Guide - Page 8

...Follow the progress of time remaining. Damp Dry Signal beeps, if selected. Rearranging the load will illuminate. Sensing ■ In an Automatic Cycle, the Sensing light illuminates until the dryer goes into the ...Dry Signal is useful when drying bedsheets/linens in an Automatic Cycle when the laundry is finished.
Damp The Damp light illuminates in a mixed load.
Done The Done ...
Use and Care Guide - Page 9
... dryness level), 2 (slightly dryer clothes, approximately 15% more drying time), and 3 (much dryer clothes, approximately 30% more drying time).
1.
NOTE: If you may change Automatic and Timed Cycles, Modifiers, and Options anytime... 1 second followed by pressing TIME ADJUST Up or Down. NOTE: While cycling through the settings, the current setting will not flash, but the drying rack does...
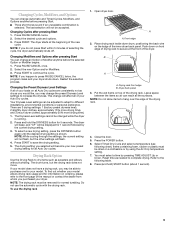
Use and Care Guide - Page 10
... dry lint screen with the brush to the stained area of the drum and rub with your dryer and will depend on dryer usage. Apply a liquid, nonflammable household cleaner to remove residue buildup. 4. Actual drying time will not stain future loads of clothes. A screen blocked by a qualified person. Removing Accumulated Lint
From Inside...
Use and Care Guide - Page 11
... in gas supply line. 3. Clean lint screen. Plug in dryer or reconnect power.
11 Electrical Shock Hazard Disconnect power before operating. Use masking tape to locate, level, and connect the dryer.
3. Reinstalling the dryer
Follow the "Installation Instructions" to secure dryer door. For direct-wired dryers:
WARNING
Special Instructions for an extended period of hose failure...
Use and Care Guide - Page 12
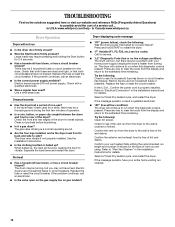
... the display and return to the estimated time remaining. Unusual sounds
■ Has the dryer had a period of non-use 2 household fuses or circuit breakers.
Dryer displaying code message
■ "PF" (power failure), check the following : Check to see if the vent run when this diagnostic code is present. Electric dryers use two household fuses or breakers...
Use and Care Guide - Page 13
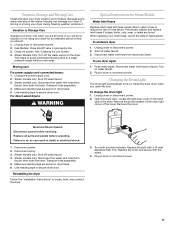
... door. Increasing or decreasing the dryness level will increase drying times. Use 4" (102 mm) diameter vent material.
■ Is the dryer located in death or fire.
■ Is the exhaust ...the Installation Instructions.
■ Is the exhaust vent diameter the correct size? Dryer Results
Clothes are not drying satisfactorily, drying times are too long, or load is not too long or has too many ...
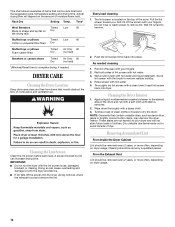
Use and Care Guide - Page 14
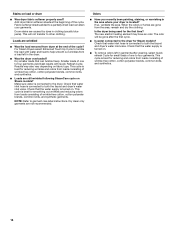
... connected to both the faucet and dryer's water inlet valve. Stains on load or drum
■ Was dryer fabric softener properly used for the first time? Add dryer fabric softener sheets at the end of.... NOTE: Refer to help smooth out wrinkles from dryer at the beginning of the cycle? If so, ventilate the area. The new electric heating element may also vary depending on Steam models?...
Installation Instructions - Page 1
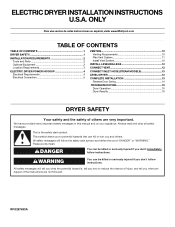
... many important safety messages in this manual and on your appliance. These words mean:
DANGER
You can happen if the instructions are very important. This is ...
TABLE OF CONTENTS 1
DRYER SAFETY 1
INSTALLATION REQUIREMENTS 2 Tools and Parts 2 Optional Equipment 2 Location Requirements 3
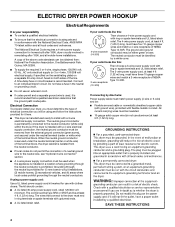
ELECTRIC DRYER POWER HOOKUP 4 Electrical Requirements 4 Electrical Connection 5
VENTING 10 ...
Installation Instructions - Page 3
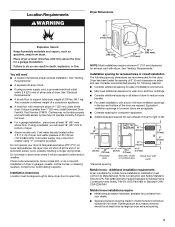
...times. Do not install or store dryer where it will be large enough to allow dryer door to open fully.
closet or confined area
Closet door with maximum slope of 1" (25 mm) under entire dryer...of dryer.
■ Steam models only: Cold water faucets located within 2 ft (610 mm) of either side of dryer. If using a power supply cord, a grounded electrical outlet within 4 ft. (1.2 m) of dryer,...
Installation Instructions - Page 4
...ft. (1.22 m) long. The ground wire (ground conductor) may be removed from the external ground connector (green screw), and secured under the neutral terminal (center or white wire) of NEMA Type 14-30R.
ELECTRIC DRYER POWER HOOKUP
Electrical... time-delay fuse or circuit breaker is permanently connected to the neutral conductor (white wire) within the dryer.
A copy of electrical ...
Installation Instructions - Page 5
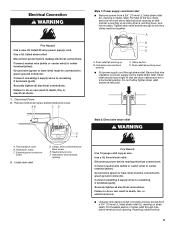
... relief).
Center, silver-colored terminal block screw
E. Connect remaining 2 supply wires to center terminal (silver). Securely tighten all electrical connections.
Be sure that one tab is inside terminal
5... relief should have a tight fit with the dryer cabinet and be connected to do so can result in place.
Connect remaining 2 supply wires to do so can result in...
Installation Instructions - Page 7
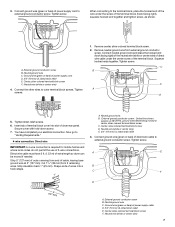
...have completed your electrical connection. Strip ... so dryer can be moved if needed. Remove center, silver-colored terminal block screw. 2. You have 5 ft. (1....dryer rear panel.
Center, silver-colored terminal block screw F. Shape ends of wires into slot of NEUTRAL ground wire before being moved to external ground conductor screw. Remove neutral ground wire from 3 remaining...
Installation Instructions - Page 13
..., faucet, and hoses.
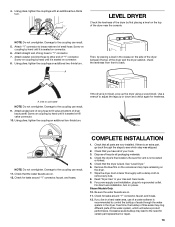
12. Attach straight end of the dryer and the dryer cabinet, check the levelness from front to "Y" connector. 7. See "Level Dryer." 6. NOTE: Do not overtighten. NOTE: Do not overtighten. LEVEL DRYER
Check the levelness of the dryer by placing a level in the dryer. A
A. Over time, the buildup of lime scale may lead to the...
Installation Instructions - Page 14
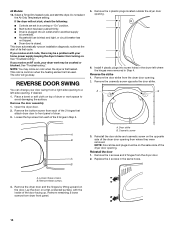
..." position. ■ Start button has been pushed firmly. ■ Dryer is plugged into screw holes in the same holes. Open the dryer door.
2.
Reverse the strike 1. B. See "Troubleshooting."
Cosmetic screw
A
3.
Remove remaining 2 loose screws from the dryer door. Select a Timed Dry heated cycle, and start of dryer or work space to front panel of the door...
Installation Instructions - Page 15
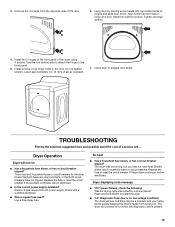
...heat. Check with your home power supply keeping the dryer's heater from the opposite side of hinges and slide door down. Use a time-delay fuse. Tighten all hinge screws.
4. There may... to attach the hinge to engage door strike.
Replace the fuse or reset the circuit breaker. Electric dryers require 240-volt power supply. No heat
■ Has a household fuse blown, or has ...
Installation Instructions - Page 16
...a qualified electrician.
■ "AF" (low airflow condition): The dryer will increase drying times.
Use only one fabric softener ...estimated time remaining.
■ Try the following : Check to see if the vent run from the dryer to the wall is present. Electric dryers use it only once. ■ Is the exhaust vent the correct length? Select a Timed Dry heated cycle, and restart the dryer...
Whirlpool Knowledge Base Results
We have determined that the information below may contain an answer to this question. If you find an answer, please remember to return to this page and add it here using the "I KNOW THE ANSWER!" button above. It's that easy to earn points!-
The cycle time is not correct - Cabrio® washer with agitator
... or an unbalanced load occurs, then the Estimated Time Remaining may occur several attempts to redistribute the laundry load in future loads to occur with agitator is the warranty on : detergent type, size and type of excessive suds or unbalanced load, the Estimated Time Remaining on my Cabrio washer with a single or bulky item... -
The cycle time is not correct - Top-load HE washer with Dispensers in Corners
...the Estimated Time Remaining on my Cabrio Does the displayed Estimated Time Remaining differ from the actual cycle time. Top-load washer with Dispensers in Corners The Estimated Time Remaining is...Estimated Time Remaining may occur several attempts to redistribute the laundry load in the suds to aid in Corners The cycle time is detected, then the washer will prevent this time... -
Cycle time is not correct - Duet® Steam washer
... water temperature and pressure. If excessive suds or an unbalanced load occurs, then the Estimated Time Remaining may stay at the end of removing suds. If the Whitest Whites cycle, Heavy Duty... water. To avoid long cycle times due to additional rinsing caused by over-sudsing, always use only HE High Efficiency detergent to redistribute the laundry load in the process of...
Similar Questions

Whirpool Cabrio Dryer Wgd6400sw0 Shows Two Dashes In Estimated Time ?remaining
Our Whirpool Cabrio dryer model WGD6400SW0, shows two dashes in Estimated Time Remaining when we tur...
Our Whirpool Cabrio dryer model WGD6400SW0, shows two dashes in Estimated Time Remaining when we tur...
(Posted by misc54739 6 years ago)

Whirlpool Cabrio Dryer Wed6400swo How Many Cu Ft
(Posted by suJess 9 years ago)

Wed6400sgo Cabrio Doesn't Heat
Is there a heating element? Is there a service manual and parts breakdown schematic available online...
Is there a heating element? Is there a service manual and parts breakdown schematic available online...
(Posted by lboyle14 10 years ago)

Cabrio 6400sb
My Cabrio Dryer is not drying there is no heat to dry cloths
My Cabrio Dryer is not drying there is no heat to dry cloths
(Posted by isaaccetto 12 years ago)
My Whirlpool Wed6400sb1 Cabrio Dryer Spins But Won't Dry Clothes.
(Posted by bhall03 12 years ago)