Whirlpool WED5500XW Support Question
Whirlpool WED5500XW Support Question
Find answers below for this question about Whirlpool WED5500XW.Need a Whirlpool WED5500XW manual? We have 4 online manuals for this item!
Current Answers


Related Whirlpool WED5500XW Manual Pages
Dimension Guide - Page 1

...door
*M ost intallations require a minimum 5 1/2" (140 mm) clearance behind the dryer for planning purposes only. See "Venting Requirements" in the top are required.
4"...(686 mm) (25 mm) (25 mm) (743 mm) (140 mm)
A
B
C
A.
Exhaust hood styles: B
4"
C
A
(102 mm)
Dryer dimensions
OVERALL DIMENSIONS
43 " (1092 mm)
23 ¾" (603 mm)
43 " (1092 mm)
13 ¾" (349 mm)
*29 1/2" (749...
Installation Instructions - Page 2
... others are not followed.
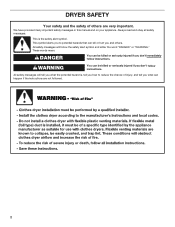
2 We have provided many important safety messages in this manual and on your appliance. Always read and obey all safety messages. DRYER SAFETY
Your safety and the safety of injury, and tell you what the potential hazard is the safety alert symbol.
Installation Instructions - Page 3

... strain relief.
If using a power supply cord: Use a UL listed power supply cord kit marked for purchase from the dealer from whom you purchased your dryer. Location Requirements
Adjustable wrench that all parts are included. The wires that connect to 1" (25 mm) or hex-head socket wrench
Utility knife
Tape measure...
Installation Instructions - Page 4

...HUD Part 280).
■■ Metal exhaust system hardware, which is recommended to introduce outside air into the dryer.
Dryer Dimensions
43 " (1092 mm)
23 ¾" (603 mm)
43 " (1092 mm)
13 ¾...dimensions shown following are for mobile home installations. Check code requirements. Contact your dryer at temperatures below 45°F (7°C).
Drying times can be obtained from ...
Installation Instructions - Page 5

...local codes prohibit grounding through the neutral is permanently connected to the neutral conductor (white wire) within the dryer.
The kit should be type SRD or SRDT and be at least 4 ft. (1.22 m) long...9632;■ At least 5 ft. (1.52 m) long. The wires that connect to the dryer must end in a location where grounding through the neutral conductor is installed with a 4-wire electrical...
Installation Instructions - Page 6

... Leveling Legs
WARNING
2. Screw legs into leg holes by hand, use a large flat piece of dryer. Slide the dryer until diamond marking is close to move and install dryer. Firmly grasp dryer body (not console panel) and gently lay dryer down on its final location.
Failure to do so can result in leveling legs
Excessive...
Installation Instructions - Page 8
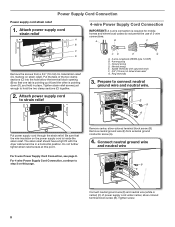
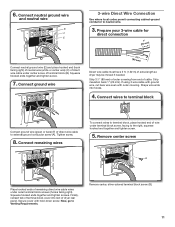
... up (A) and the other is inside the strain relief. Attach power supply cord
to connect neutral
ground wire and neutral wire. Spade terminals with the dryer cabinet and be in place. Do not further tighten strain relief screws at this page. Neutral prong E. Remove neutral ground wire (E) from a 3/4" (19 mm) UL...
Installation Instructions - Page 9
...wire
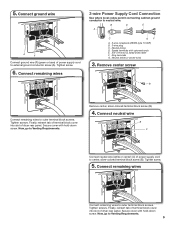
A
F
Connect ground wire (F) (green or bare) of dryer rear panel. Neutral prong D. Remove center screw
B
Connect remaining... go to center, silver-colored terminal block screw (B). Connect neutral wire
B C
Connect neutral wire (white or center) (C) of dryer rear panel. Tighten screws. Secure cover with upturned ends E. 3/4" (19 mm) UL listed strain relief F. Remove center, silver...
Installation Instructions - Page 10
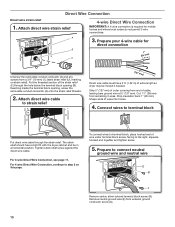
... tighten screw.
5. Strip insulation back 1" (25 mm).
A
3. Attach direct wire cable
to strain relief
(127
5" mm)
Direct wire cable must have a tight fit with the dryer cabinet and be moved if needed. Cut 11/2" (38 mm) from external ground conductor screw (A).
10
For 3-wire Direct Wire Connection, see page 11. For...
Installation Instructions - Page 11
...block screw, facing to terminal block, place hooked end of wire under center screw of dryer rear panel. Connect neutral ground wire
and neutral wire
B C E
3-wire Direct ...wire cable to terminal block
AF Connect ground wire (green or bare) (F) of extra length so dryer may be moved if needed. Connect wires to external ground conductor screw (A). Secure cover with outer covering...
Installation Instructions - Page 12
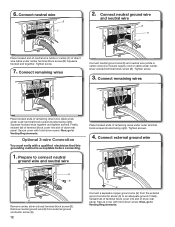
... together. Optional 3-wire Connection
You must verify with hold -down screw. Now, go to connect neutral
ground wire and neutral wire
Place hooked ends of dryer rear panel. Connect neutral wire
B
C
2.
Tighten screws.
4. Finally, reinsert tab of terminal block cover into slot of remaining direct wire cable wires under outer terminal...
Installation Instructions - Page 13

...4" (102 mm) heavy metal exhaust vent and clamps may be fully extended and supported in final dryer location. ■■ Remove excess to avoid sagging and kinking that may result in:
Moisture damage ... and to woodwork, furniture, paint, wallpaper, carpets, etc. Do not use duct tape. Dryer exhaust must not be connected into any object that extend into interior of the system and make...
Installation Instructions - Page 14
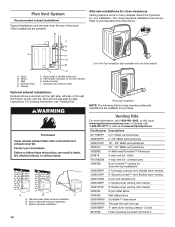
...Select the type best for purchase. Two close clearance alternate installations are available for your installation. C
D E A F G
Over-The-Top installation (also available with clamps
4396004
Dryer offset elbow
4396005
Wall offset elbow
4396006RW DuraSafe™ close clearances
Venting systems come in many varieties. Exhaust hood E. Optional side exhaust outlet
Optional exhaust...
Installation Instructions - Page 15
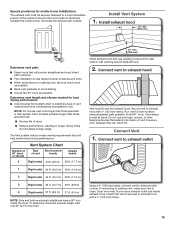
... 90° turns or elbows
Type of vent to existing vent, make sure vent is secured to exhaust hood
Vent must fit over dryer exhaust outlet and inside the dryer. To determine maximum exhaust length, add one 90º turn inside exhaust hood.
Avoid 90° turns. Connect vent to exhaust outlet...
Installation Instructions - Page 16

... check the following : ■■ Controls are snug against the ground before tightening them.
Tighten and adjust leveling legs
Move dryer to final location
2.
Repeat from under the dryer. q Dispose of dryer from side to
remove any tape remaining on a full heat cycle (not an air cycle) for
20 minutes and start , check...
Owners Manual - Page 4
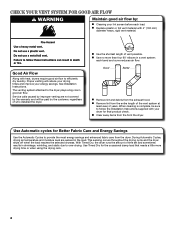
...dryers require good air flow to efficiently dry laundry. Good Air Flow
Along with 4" (102 mm)
diameter heavy, rigid vent material. See Installation Instructions. Service calls caused by improper venting are sensed in shrinkage, wrinkling, and static due to the dryer... Cycles to follow the Installation Instructions supplied with your dryer for the occasional damp load that needs a little more...
Owners Manual - Page 5

... features and options are unsure of cycles. If you want to select available cycles on your laundry load. The WRINKLE SHIELD™ feature periodically tumbles, rearranges, and fluffs the load to help keep wrinkles from the dryer as soon as it .
4 OPTIONS AND SETTINGS
Temp Select a drying temperature based on the fabrics...
Owners Manual - Page 7
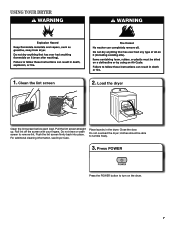
... POWER
Press the POWER button to remove lint. Place laundry in the dryer. Do not overload the dryer; Do not rinse or wash screen to turn on the dryer.
7 For additional cleaning information, see Dryer Care. Roll lint off the screen with your fingers. Load the dryer
Clean the lint screen before each load. Clean the...
Owners Manual - Page 9

..., if it becomes clogged due to a residue buildup. Reinstall screen in front of the dryer. This includes clearing piles of laundry in dryer.
9 To clean: 1. Pull the lint screen straight up on dryer usage. Wet lint is located in the dryer. NOTE: Garments that would block the air flow for your clothes, or cause the...
Owners Manual - Page 12
... area.
Increasing or decreasing the dryness level will be cleaned before removing laundry from the area, rewash and dry the clothing.
Change the dryness level setting on load or drum
Dryer fabric softener not properly used for very small loads. Dryer overloaded. The new electric heating element may have an odor. All cycles...
Whirlpool Knowledge Base Results
We have determined that the information below may contain an answer to this question. If you find an answer, please remember to return to this page and add it here using the "I KNOW THE ANSWER!" button above. It's that easy to earn points!-
Lint is on the load - Front-load washer
... you line dry the load of a dryer removes lint from lint takers (corduroys, synthetics, permanent press). Turn denim jeans and khaki pants inside out to trap lint. Consider reducing your laundered items when line drying. The air movement and tumbling of laundry? Front-load washer Lint is on... -
Fabric is too hot - Dryer
... Cool Down part of the cycle? Were laundry items removed from the dryer before the end of the cycle before removing the laundry items from the dryer. Was a high temperature cycle used, or was a separate temperature control set on high? Dryer Loads are damp; Fabric is increasing - Dryer Select a lower temperature, and use an... -
Lint is on the load - Top-load washer
... loads before starting a new load of a dryer removes lint from lint takers (corduroys, synthetics, permanent press). The air movement and tumbling of laundry. The load must move freely. Was tissue...action cycle or a long wash time? Did you line dry the load of laundry? Lint is not cleaning laundry - Did you use high-speed wash action and long wash times for sturdy ...
Similar Questions

Dryer Will Not Turn On.
my dryer wil not turn on. I have checked a fuses and they are good. What's next?
my dryer wil not turn on. I have checked a fuses and they are good. What's next?
(Posted by Dtidavid54 7 years ago)

Dryer Won't Shut Off.
My dryer is OFF but will not stop tumbling. I'm trying to find out what could be causing this??? Any...
My dryer is OFF but will not stop tumbling. I'm trying to find out what could be causing this??? Any...
(Posted by lmbutler73 8 years ago)


Can The Whirlpool Wed5500xw Dryer Be Converted To Use The Side Vent?
I purchased the whirlpool side vent kit, but there is not access to the vent on the rear of this dry...
I purchased the whirlpool side vent kit, but there is not access to the vent on the rear of this dry...
(Posted by rmoors 12 years ago)