Whirlpool LEW0050PQ Support Question
Whirlpool LEW0050PQ Support Question
Find answers below for this question about Whirlpool LEW0050PQ - Electric Dryer.Need a Whirlpool LEW0050PQ manual? We have 1 online manual for this item!
Question posted by norman4953 on October 22nd, 2012
Have Power To Outlet. Cord To Dryer Is Good. When I Push Power Button No Light
The person who posted this question about this Whirlpool product did not include a detailed explanation. Please use the "Request More Information" button to the right if more details would help you to answer this question.
Current Answers
Related Whirlpool LEW0050PQ Manual Pages
Use and Care Guide - Page 1
or visit our website at...www.whirlpool.com
Table of Contents 2
8578567 ®
240-VOLT ELECTRIC DRYER
Use & Care Guide
For questions about features, operation/performance, parts, accessories or service, call: 1-800-253-1301.
Use and Care Guide - Page 2
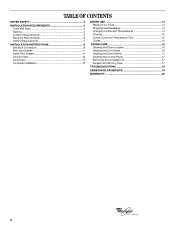
... 3
INSTALLATION REQUIREMENTS 4 Tools and Parts 4 Options 4 Location Requirements 4 Electrical Requirements 6 Venting Requirements 7
INSTALLATION INSTRUCTIONS 8 Electrical Connection 8 Plan Vent System 11 Install Vent System 12 Connect Vent 12 Level Dryer 13 Complete Installation 13
DRYER USE 14 Starting Your Dryer 14 Stopping and Restarting 14 Changing Cycles and Temperatures 14...
Use and Care Guide - Page 3
...could ignite or explode.
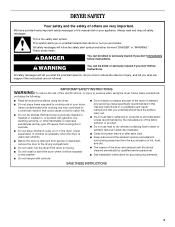
IMPORTANT SAFETY INSTRUCTIONS
WARNING: To reduce the risk of fire, electric shock, or injury to dry articles containing foam rubber or similarly textured rubber-like materials....can kill or hurt you don't follow instructions. s Do not reach into the dryer if the drum is the safety alert symbol.
s See installation instructions for grounding requirements...
Use and Care Guide - Page 4
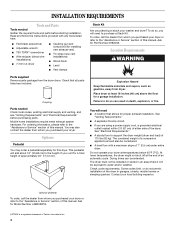
... to the "Assistance or Service" section of 115 lbs (52 kg). You will need s A location that all parts listed are using a power supply cord, a grounded electrical outlet located within 2 ft (61 cm) of either side of the dryer in an area where it will add about 12" (30.48 cm) to the height of your...
Use and Care Guide - Page 5
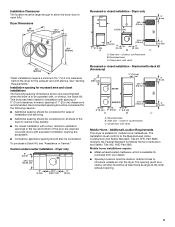
... - closet or confined area C. The installation must conform to introduce outside air into the dryer. See "Venting Requirements." s For closet installation with a door, minimum ventilation openings in ...3280 (formerly the Federal Standard for mobile home installations. The opening (such as the dryer exhaust opening are required. however, spacing of 0" (0 cm) clearance; s Companion ...
Use and Care Guide - Page 6
... your dryer, you must determine the type of the above code standards can result in the neutral or grounding circuit.
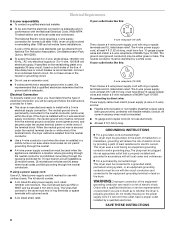
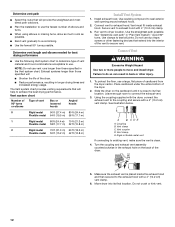
A copy of electrical connection you are in a mobile home or an area where local codes do not use aluminum). If your outlet looks like this :
4-wire receptacle (14-30R)
Then choose a 4-wire power supply cord...
Use and Care Guide - Page 7
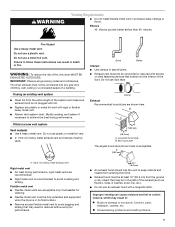
...entire length of the exhaust (such as flowers, rocks or bushes, snow line, etc.).
If this dryer MUST BE
EXHAUSTED OUTDOORS. s Flexible metal vent must not be
used.
4" 10.2 cm
4" (...indoors, which may be fully extended and supported
when the dryer is in reduced airflow and poor performance.
Do not use a plastic vent. Good
Better
Clamps
s Use clamps to achieve the best drying ...
Use and Care Guide - Page 8
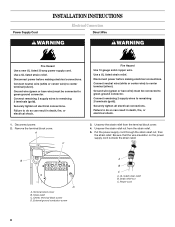
.... Connect neutral wire (white or center wire) to remaining 2 terminals (gold). Securely tighten all electrical connections. Be sure that the wire insulation on the power supply cord is inside the strain relief.
Terminal block cover B.
Put the power supply cord through the strain relief nut, then the strain relief.
Connect remaining 2 supply wires to center...
Use and Care Guide - Page 9
... (recommended)
3-wire (if 4-wire is not available)
Electrical Connection Options
If your home has:
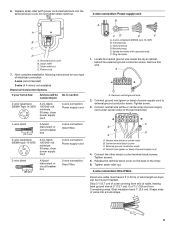
And you will be moved if needed. Locate the neutral ground wire inside the dryer cabinet, behind the external ground conductor screw. Replace the terminal block cover on the back of power supply cord
4. Strip insulation back 1" (2.5 cm).
Connect neutral...
Use and Care Guide - Page 10
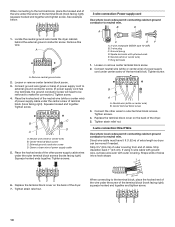
... 1" (2.5 cm). Squeeze hooked ends together. Ring terminals
1. Tighten screw. B
A
A.
Spade terminals with outer covering. Connect neutral wire (white or center wire) of power supply cord under the screw of the dryer. 7. Center terminal block screw
3.
Loosen or remove center terminal block screw.
2. Strip 3¹⁄₂" (8.9 cm) of outer covering from end of...
Use and Care Guide - Page 11
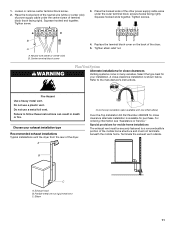
.... Tighten strain relief nut. For ordering information see "Assistance or Service." Exhaust hood B. 1. Place the hooked ends of the other power supply cable wires under the center screw of the dryer.
Replace the terminal block cover on the back of the mobile home structure and must not terminate beneath the mobile home...
Use and Care Guide - Page 12
... venting requirements that extend into its final location. A B CDE
A. Vent clamp E.
Slide the dryer on the back of vent material and hood combinations acceptable to the coupling and secure with 4" (10....2 cm) clamp.
3. Rigid or flexible metal vent
If connecting to move and install dryer. Vent must fit inside the exhaust hood and then secured to connect the exhaust vent....
Use and Care Guide - Page 13

...the dryer.
8. Read "Dryer Use."
9. s Start button has been pushed firmly. s Dryer door ...dryer door and feel heat, cancel cycle and close the door. Complete Installation
1. Dispose of/recycle all of the dryer. Plug into a grounded outlet and/or electrical...dryer is not level, prop up or down and check again for the dryer. See "Level Dryer."
6. Set the dryer on power.
7. Level Dryer
Check...
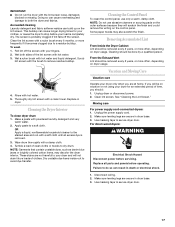
Use and Care Guide - Page 14
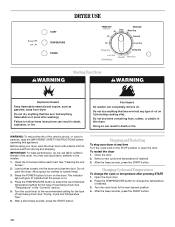
... being dried. After the beep sounds, press the START button.
Press the POWER button to tumble freely.
3.
Changing Cycles and Temperatures
To change...dryer. Before using your dryer at any type of fire, electric shock, or injury to change the cycle or temperature after washing). See "Temperature" in this dryer. To restart the dryer 1. Press the TEMPERATURE button...
Use and Care Guide - Page 15
... complete.
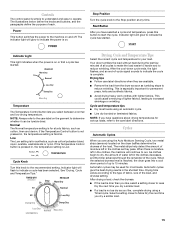
Normal The Normal temperature setting is on . Cycle Knob Turn this button to reduce wrinkling. Your dryer tumbles the load without heat during the last few minutes of lighter fabrics, ...Dry the next time you are available.
Indicator Light This light indicates when the power is for your load. s Remove the load from the dryer as soon as they are using an automatic cycle...
Use and Care Guide - Page 16
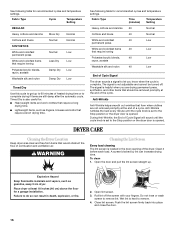
...useful for recommended cycles and temperature settings.
Push the lint screen firmly back into place and close the door.
16 During Anti-Wrinkle, the End of the dryer. A screen blocked by lint can result...Signal will sound until the cycle knob is set to the Stop position or the dryer door is opened . Place dryer at least 18 inches (46 cm) above the floor for recommended cycles and ...
Use and Care Guide - Page 17
... and Moving Care
Vacation care
Operate your fingers. 2. As needed cleaning Laundry detergent and fabric softener residue can cause overheating and damage to secure dryer door. Unplug the power supply cord. 2. Use masking tape to remove residue buildup.
4. IMPORTANT: s Do not run the dryer with hot water. 3. Roll lint off the screen. Scrub lint screen...
Use and Care Guide - Page 18
... or circuit breakers for the dryer. If not, press the POWER button.
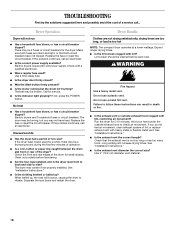
Lint screen should be a thumping sound during the first few minutes of the dryer? Failure to check air movement. Dryer Operation
Dryer will not run
s Has a household fuse blown, or has a circuit breaker tripped?
Electric dryers use a metal foil vent. If the dryer hasn't been used ?
s Is...
Use and Care Guide - Page 19

... also look in your area, you the cost of a service call us to better respond to your dryer is recommended for the first time? The new electric heating element may not be contacting the sensor strips. s Is the dryer located in a room with the same precision used for the sides and front of...
Use and Care Guide - Page 20
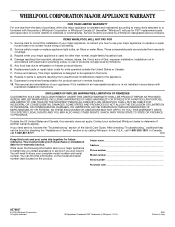
...to parts or systems resulting from unauthorized modifications made to repair or replace appliance light bulbs, air filters or water filters. DISCLAIMER OF IMPLIED WARRANTIES; LIMITATION OF....
® Registered Trademark/TM Trademark of Whirlpool, U.S.A.
9/05 Printed in accordance with electrical or plumbing codes, or use your authorized Whirlpool dealer to correct house wiring or plumbing....
Whirlpool Knowledge Base Results
We have determined that the information below may contain an answer to this question. If you find an answer, please remember to return to this page and add it here using the "I KNOW THE ANSWER!" button above. It's that easy to earn points!-
My room air conditioner won't operate
...feature. See "Electrical Requirements" in a fraction of -the-art electronics that sense leakage current. Plug into a grounded 3 prong outlet. NOTE: A damaged power supply cord must not be restored. Wait for power to Off. The power supply cord is turned to be repaired. The power supply cord has tripped. Reset button will be replaced with a power supply cord required by... -
My jetted sink is making noise
... sink. The water must completely cover the suction cover. My jetted sink is not plugged into an outlet? Is the water level too low? This could cause damage to you push the button when the power cord is making noise Why does my jetted sink makes noise? Normal Sounds Your jetted sink... -
How do I open the lid?- Top-Load HE with Dispenser Drawer
...first time? Wait until the lid lock light turns off . Top-load washer with Dispenser Drawer How do I open the lid?- Are you installing the washer? Press the Power button to turn the washer off . Top-...lid Display shows "lid" - Top-load HE washer with Dispensers in the power cord. How do I open the lid of my Cabrio TM washer? Have you need to resume the...
Similar Questions

When I Pushed The Button It Wouldn't Start.
My dryer was working fine. All of a sudden I went to dry clothes and it wouldn't do anything. When I...
My dryer was working fine. All of a sudden I went to dry clothes and it wouldn't do anything. When I...
(Posted by eellisonshonuf 9 years ago)

Whirlpool Dryer Lew0050pq Won't Start
(Posted by garysben 9 years ago)

How To Put A Belt On A Whirlpool Dryer Lew0050pq
(Posted by ekochgskiwi 9 years ago)

My Dryer Has Power And Lights Up But It Will Turn On
(Posted by yannier2002 10 years ago)

Power Button Works For A Second
Dryer lew0050pq... My dryer has stopped working the power button goes on for a sec. then nothing. Wh...
Dryer lew0050pq... My dryer has stopped working the power button goes on for a sec. then nothing. Wh...
(Posted by qnzgirl 11 years ago)