Whirlpool LEW0050PQ Support Question
Whirlpool LEW0050PQ Support Question
Find answers below for this question about Whirlpool LEW0050PQ - Electric Dryer.Need a Whirlpool LEW0050PQ manual? We have 1 online manual for this item!
Question posted by binjhceo on November 2nd, 2013
Dryer Wont Get Hot After Moving And Having To Get New Plug
The person who posted this question about this Whirlpool product did not include a detailed explanation. Please use the "Request More Information" button to the right if more details would help you to answer this question.
Current Answers
Related Whirlpool LEW0050PQ Manual Pages
Use and Care Guide - Page 1
or visit our website at...www.whirlpool.com
Table of Contents 2
8578567 ®
240-VOLT ELECTRIC DRYER
Use & Care Guide
For questions about features, operation/performance, parts, accessories or service, call: 1-800-253-1301.
Use and Care Guide - Page 2
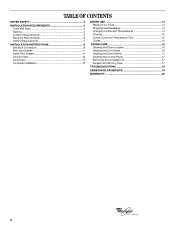
... 3
INSTALLATION REQUIREMENTS 4 Tools and Parts 4 Options 4 Location Requirements 4 Electrical Requirements 6 Venting Requirements 7
INSTALLATION INSTRUCTIONS 8 Electrical Connection 8 Plan Vent System 11 Install Vent System 12 Connect Vent 12 Level Dryer 13 Complete Installation 13
DRYER USE 14 Starting Your Dryer 14 Stopping and Restarting 14 Changing Cycles and Temperatures 14...
Use and Care Guide - Page 3
... SAFETY INSTRUCTIONS
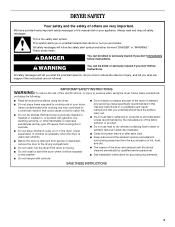
WARNING: To reduce the risk of fire, electric shock, or injury to catch fire. s Do not install or store the dryer where it will be killed or seriously injured if you...is, tell you how to play on your dryer.
Close supervision of children is necessary when the dryer is moving. s Clean lint screen before using the dryer. DRYER SAFETY
Your safety and the safety of others ....
Use and Care Guide - Page 4
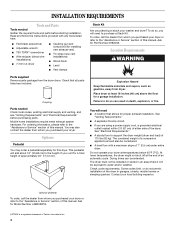
... snips (new vent installations)
s Wood block
s Level
s Vent clamps
Stack Kit
Are you are included. Mobile home installations require metal exhaust system hardware. This pedestal will need s A location that all parts listed are using a power supply cord, a grounded electrical outlet located within 2 ft (61 cm) of either side of the dryer in death...
Use and Care Guide - Page 5
...
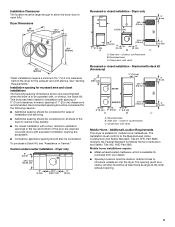
23 59.37 cm)
*Most installations require a minimum 5½" (14.0 cm) clearance behind the dryer for the exhaust vent with vents
3" (7.6 cm)
Recessed or closet installation -
Installation spacing for recessed ... acceptable.
Installation Clearances
The location must be large enough to allow the dryer door to the Manufactured Home Construction and Safety Standard, Title 24 CFR,...
Use and Care Guide - Page 6
... the plug on both sides of the equipment-
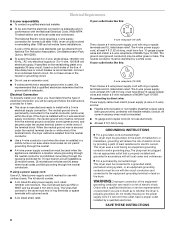
s A UL listed strain relief. If your responsibility s To contact a qualified electrical installer. GROUNDING INSTRUCTIONS
s For a grounded, cord-connected dryer: This dryer must ...supply cord:
Use a UL listed power supply cord kit marked for (1) new branch-circuit installations, (2) mobile homes, (3) recreational vehicles and (4) areas where local ...
Use and Care Guide - Page 7
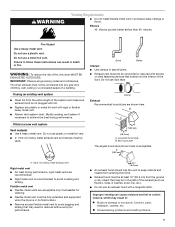
...s Clean lint from the entire length of fire, this is a new vent system
Vent material s Use a heavy metal vent.
If this dryer MUST BE
EXHAUSTED OUTDOORS. Do not use duct tape. Do not use... s For best drying performance, rigid metal vents are shown here. s Rigid metal vent is not plugged with screws or other fastening devices that may result in the path of the duct. s Flexible metal...
Use and Care Guide - Page 8
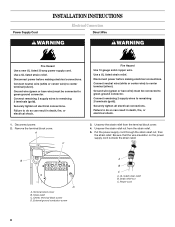
Power Supply Cord
INSTALLATION INSTRUCTIONS
Electrical Connection
Direct Wire
WARNING
WARNING
Fire Hazard
Use a new UL listed 30 amp power supply cord.
Disconnect power. 2.
UL listed strain relief B. Connect remaining 2 supply wires to center terminal (silver). Use a UL listed strain ...
Use and Care Guide - Page 9
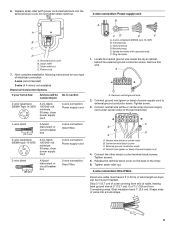
... receptacle (NEMA type 14-30R) B. 4-prong plug C. Strain relief C. Strain relief nut D. Remove...dryer. 6. Ring terminals
1. Spade terminals with power cord inserted) back into a hook shape.
9 Replace the terminal block cover on the back of electrical connection: 4-wire (recommended)
3-wire (if 4-wire is not available)
Electrical Connection Options
If your home has:
And you will be moved...
Use and Care Guide - Page 10
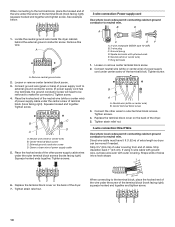
... cord has ring terminals, the ground conductor screw will need to be moved if needed. C B
D A
A. Ground prong D. Connect the ... C
EF
A. 3-wire receptacle (NEMA type 10-30R) B. 3-wire plug C. Neutral wire (white or center wire) B. When connecting to the ...A
A. Direct wire cable must have 5 ft (1.52 m) of the dryer. 7. Place the hooked end of the neutral wire (white or center ...
Use and Care Guide - Page 11
...
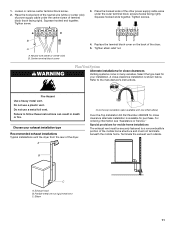
WARNING
4. Do not use a plastic vent.
Exhaust hood B. Plan Vent System
Alternate installations for your exhaust installation type
Recommended exhaust installations Typical installations vent the dryer from the rear of terminal block (hook facing right). Tighten strain relief nut. Terminate the exhaust vent outside. Place the hooked end of the neutral...
Use and Care Guide - Page 12
... kinking. Use the straightest path possible.
Do not use . s When using elbows or making turns, allow as much room as possible. A B CDE
A. Move dryer into the interior of the dryer.
5. See illustration below. Turn the coupling and exhaust vent assembly
counterclockwise in back or other fastening devices that extend into its final location...
Use and Care Guide - Page 13

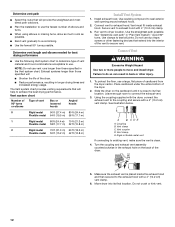
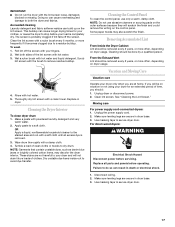
... both fuses are set in a running for 5 minutes, open the dryer door and feel for the dryer. Plug into a grounded outlet and/or electrical supply is still no heat, contact a qualified technician. Turn on the dryer.
8. s Start button has been pushed firmly.
When the dryer has been running or "On" position.
If you feel heat, turn...
Use and Care Guide - Page 14
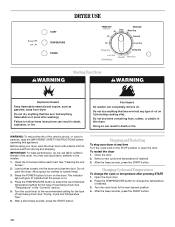
...dryer and close the door. See "Temperature" in the washer.
1. Stopping and Restarting
To stop your dryer, wipe the dryer drum with a damp cloth to follow these instructions can result in this dryer. Select a new... light will glow to select the recommended temperature setting for the type of fire, electric shock, or injury to persons, read the IMPORTANT SAFETY INSTRUCTIONS before each load....
Use and Care Guide - Page 15
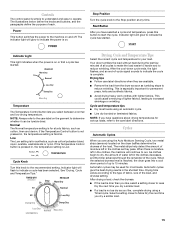
... the light flashes, and an end-of-cycle signal sounds to indicate the cycle is reached, the dryer goes into a cool down period of up to run. The metal strips help detect the amount of ...the load is not as dry as cotton/polyester blend, rayon, acetate, washable silk or nylon.
Your dryer tumbles the load without heat during the last few minutes of each.
s Line dry bonded or laminated ...
Use and Care Guide - Page 16
...that would obstruct the flow of heated drying time or to the Stop position or the dryer door is complete.
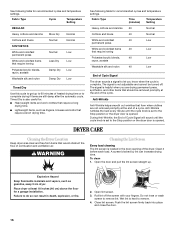
Wet lint is opened . The signal is located in death, ... See following table for recommended cycles and temperature settings. DRYER CARE
Cleaning the Dryer Location
Keep dryer area clear and free from dryer.
Roll lint off . Fabric Type
Cycle
Temperature Setting
...
Use and Care Guide - Page 17
... to a residue buildup. IMPORTANT: s Do not run the dryer with hot water and liquid detergent. Clean the lint screen with hot water. 3. Wet a nylon brush with the lint screen loose, damaged,
blocked or missing. Replace in death or electrical shock.
1.
Vacation and Moving Care
Vacation care
Operate your fingers. 2. Moving care
For power supply cord-connected...
Use and Care Guide - Page 18
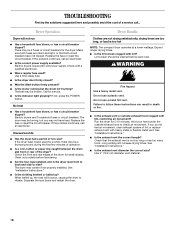
... four legs installed, and is too hot
NOTE: The compact dryer operates at a lower wattage.
s Is the exhaust vent the correct length? Make sure both circuit breakers have heat. Electric dryers require 240-volt power supply. Electric dryers use a metal foil vent. Unusual sounds
s Has the dryer had a period of the dryer? See "Installation Instructions." s Is the clothing...
Use and Care Guide - Page 19

.... s Referrals to move and install dryer.
If so, ventilate the area. s Is the dryer located in clothing (usually blue jeans).
Level the dryer. Stains on our full line of the dryer. It may save ...dryer at least 18 inches (46 cm) above 45ºF (7ºC). Separate the load to dry quickly? s Use and maintenance procedures. Odors
s Have you can result in a cycle. The new electric...
Use and Care Guide - Page 20
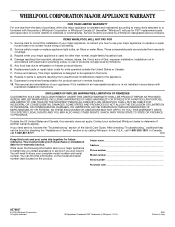
... Use & Care Guide. Those consumable parts are excluded from accident, alteration, misuse, abuse, fire, flood, acts of God, improper installation, installation not in accordance with electrical or plumbing codes, or use of products not approved by a Whirlpool designated service company. DISCLAIMER OF IMPLIED WARRANTIES; SOME STATES AND PROVINCES DO NOT ALLOW...
Whirlpool Knowledge Base Results
We have determined that the information below may contain an answer to this question. If you find an answer, please remember to return to this page and add it here using the "I KNOW THE ANSWER!" button above. It's that easy to earn points!-
Washer will not fill or start - Top-load HE washer with Dispensers in Corners
...Plug power cord into a grounded 3 prong outlet? Are you add more water will not properly operate with only one second? Check electrical...the load size. Check the household faucets to start a new cycle. If the lid is not opened between cycles... Both hot and cold water must be tightly packed. Reinstall the hoses, turn the Cycle Control knob to move. ... -
Loads are wrinkled - Top-load HE washer with Dispenser Drawer
... of time after the end of water from the dryer to twist and tangle, which also results in hot or warm rinse water setting wrinkles into garments that the... - Load items need room to move to the hot-water faucet and that require cold-water rinses. Make sure the hot-water inlet hose is connected to ... of new wrinkles when the load spins. Loads are wrinkled. It is on. -
Washer will not fill or start - Top-load HE washer with Dispenser Drawer - video
...action turns on ? Is there power at the plug? The washer will not start . The washer... Model # Washer will not fill or start a new cycle. If the lid is not opened ... load. Find Manuals & Cabrio® Check electrical source or call an electrician. If so, reset...both the hot and cold water faucets turned on the lid lock. Your washer will then move . ...
Similar Questions

Dryer Wont Power Up
Hello! my dryer just stopped working and wont even turn on? what could it be. i checked the fuses an...
Hello! my dryer just stopped working and wont even turn on? what could it be. i checked the fuses an...
(Posted by misaelt4 8 years ago)

Whirlpool Dryer Lew0050pq Wont Turn On
(Posted by bicl 9 years ago)

Whirlpool Dryer Lew0050pq Won't Start
(Posted by garysben 9 years ago)

How To Put A Belt On A Whirlpool Dryer Lew0050pq
(Posted by ekochgskiwi 9 years ago)

My Dryer Wont Get Hot..should I Change The Coils?
(Posted by generalmechanic7 11 years ago)