Whirlpool LEW0050PQ Support Question
Whirlpool LEW0050PQ Support Question
Find answers below for this question about Whirlpool LEW0050PQ - Electric Dryer.Need a Whirlpool LEW0050PQ manual? We have 1 online manual for this item!
Question posted by lndcsrz1265 on April 10th, 2021
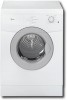
Need Door Handle Asap
My dryer handle broke off so I need another one.. are these still available?
Current Answers
Answer #1: Posted by Troubleshooter101 on April 13th, 2021 8:29 AM
Troubleshooter101

Member since:
September 30th, 2015 Points: 2,927,050

Member since:
September 30th, 2015 Points: 2,927,050
Door handle is not available any where please check this link below:-
Please respond to my effort to provide you with the best possible solution by using the "Acceptable Solution" and/or the "Helpful" buttons when the answer has proven to be helpful. Please feel free to submit further info for your question, if a solution was not provided. I appreciate the opportunity to serve you!
Troublshooter101
Related Whirlpool LEW0050PQ Manual Pages
Use and Care Guide - Page 1
®
240-VOLT ELECTRIC DRYER
Use & Care Guide
For questions about features, operation/performance, parts, accessories or service, call: 1-800-253-1301.
or visit our website at...www.whirlpool.com
Table of Contents 2
8578567
Use and Care Guide - Page 2
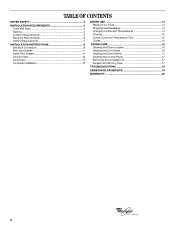
... 3
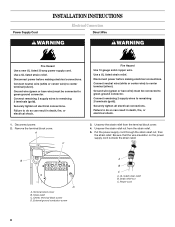
INSTALLATION REQUIREMENTS 4 Tools and Parts 4 Options 4 Location Requirements 4 Electrical Requirements 6 Venting Requirements 7
INSTALLATION INSTRUCTIONS 8 Electrical Connection 8 Plan Vent System 11 Install Vent System 12 Connect Vent 12 Level Dryer 13 Complete Installation 13
DRYER USE 14 Starting Your Dryer 14 Stopping and Restarting 14 Changing Cycles and Temperatures 14...
Use and Care Guide - Page 3
...
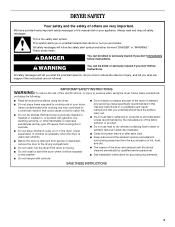
surrounding areas free from service or discarded, remove the door to play on or in this Use and Care Guide...dryer.
s Clean lint screen before using the dryer.
s See installation instructions for grounding requirements. All safety messages will tell you what the potential hazard is, tell you how to carry out. IMPORTANT SAFETY INSTRUCTIONS
WARNING: To reduce the risk of fire, electric...
Use and Care Guide - Page 4
... 8182452.
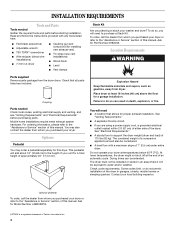
s A level floor with any tools listed here. INSTALLATION REQUIREMENTS
Tools and Parts
Tools needed Check local codes, existing electrical supply and venting, and see "Venting Requirements" and "Electrical Requirements" before starting installation. To do so, you purchased your dryer or refer to purchase a Stack Kit. To order, call the dealer from whom you...
Use and Care Guide - Page 5
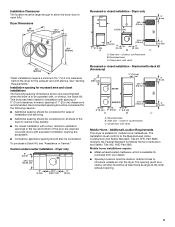
... homes to introduce outside air into the dryer. Louvered doors with spacing of the dryer to be at least twice as large as the dryer exhaust opening are acceptable. Dryer only
0" (0 cm)
33¹⁄...Special provisions must be considered for ease of 1" (2.5 cm) clearance is available for mobile home installations. Recommended spacing should be operated with elbows. s For closet installation with...
Use and Care Guide - Page 6
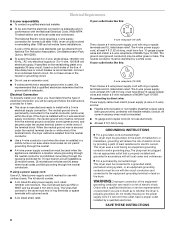
... connection of malfunction or breakdown, grounding will be run with the circuit conductors and connected to an individual branch circuit.
If the dryer is prohibited for use with a 4-wire electrical supply connection, the neutral ground wire must be removed from the neutral conductor. s A 4-wire power supply connection must be used , it here...
Use and Care Guide - Page 7
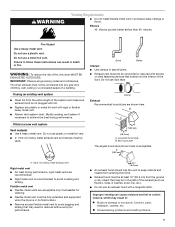
... Observe all joints.
s Flexible metal vent must not be fully extended and supported
when the dryer is not plugged with screws or other fastening devices that extend into any gas vent, chimney, ..., which may result in :
Moisture damage to seal all governing codes and ordinances. If this dryer MUST BE
EXHAUSTED OUTDOORS.
Do not use duct tape. s Replace any object that may result ...
Use and Care Guide - Page 8
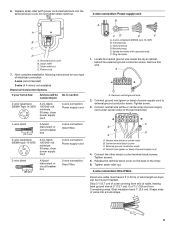
...nut, then the strain relief. External ground conductor screw
A
B
C
A. Power cord
8
Securely tighten all electrical connections. UL listed strain relief B. Use a UL listed strain relief.
B
D
A. Strain relief nut C.
...bare wire) must be connected to do so can result in death, fire, or electrical shock.
1. Be sure that the wire insulation on the power supply cord is ...
Use and Care Guide - Page 9
...: 4-wire (recommended)
3-wire (if 4-wire is not available)
Electrical Connection Options
If your home has:
And you will be moved if needed. Ring terminals
1. Remove this wire.
Remove neutral ground wire.
2. Connect neutral wire (white or center wire) of power supply cord under center screw of the dryer. 6. External ground conductor screw D. Strip 5" (12...
Use and Care Guide - Page 10
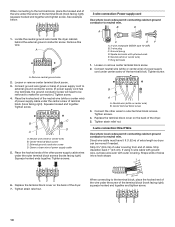
... screw. (If power supply cord has ring terminals, the ground conductor screw will need to be moved if needed.
C B
D A
A. Green or bare wire of terminal block (hook facing...
A
1. Center terminal block screw
3. Tighten screws.
A
A. Connect ground wire (green or bare) of the dryer. 5. C
EF
A. 3-wire receptacle (NEMA type 10-30R) B. 3-wire plug C. See example below.
3-wire...
Use and Care Guide - Page 11
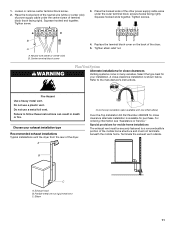
...-top installation (also available with one offset elbow)
Over-the-Top Installation Kit Part Number 4396028 for close clearance alternate installation is available for close -clearance .... Special provisions for your exhaust installation type
Recommended exhaust installations Typical installations vent the dryer from the rear of terminal block (hook facing right). Do not use a plastic...
Use and Care Guide - Page 12
... exhaust vent assembly
counterclockwise in "Plan Vent System." Determine vent path
s Select the route that will :
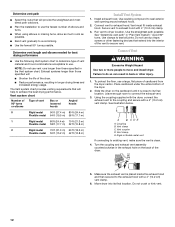
s Shorten the life of the dryer. s Use the fewest 90° turns possible. Determine vent length and elbows needed for best drying performance
s Use the following Vent system chart to determine type of cardboard from the...
Use and Care Guide - Page 13

...the legs up the dryer using a wood block. Dispose of/recycle all of the dryer. Plug into a grounded outlet and/or electrical supply is not crushed or kinked.
5.
When the dryer has been running ... fuses are now installed. If you do not feel for 5 minutes, open the dryer door and feel heat, turn off the dryer and check the following :
s Controls are set in a running or "On" ...
Use and Care Guide - Page 14
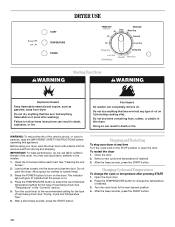
...lint screen before operating this appliance. Allow space for the type of fire, electric shock, or injury to turn on .
4. Press the POWER button to ...and Temperature Tips."
6. Close the door. 2. Changing Cycles and Temperatures
To change the temperature
(if desired). 3. Open the dryer door. 2. DRYER USE
WARNING
Starting Your Dryer
WARNING
Explosion Hazard
Keep flammable materials ...
Use and Care Guide - Page 15
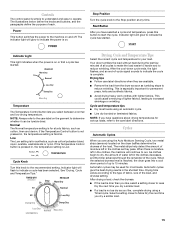
...The Temperature Control button lets you dry a similar load.
15 Cycles
Automatic Cycles
When you are available. As clothes begin to dry, the amount of water left in the clothes decreases, and the ...Moisture Sensing Cycle, two metal strips (sensors) located on the dryer baffles determine the dryness of all cycles to make the load easier to handle and to reduce wrinkling. s If the load is on ....
Use and Care Guide - Page 16
... the end of Cycle Signal will sound until the cycle knob is set to remove.
4.
The signal is hard to the Stop position or the dryer door is opened .
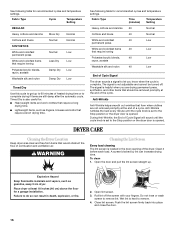
During Anti-Wrinkle, the End of a cycle. Open lint screen.
3.
To clean 1.
Close lint screen.
Anti-Wrinkle tumbles the load every minute until...
Use and Care Guide - Page 17
... surfaces because they will not stain future loads of the lint screen with hot water. 3.
These stains are secure in dryer base. 3.
Moving care
For power supply cord-connected dryers: 1. As needed cleaning Laundry detergent and fabric softener residue can cause longer drying times for an extended period of clean cloths or towels to...
Use and Care Guide - Page 18
... vent diameter the correct size? Electric dryers require 240-volt power supply. Electric dryers use a plastic vent.
Expect ...dryer door firmly closed? If not, press the POWER button. Lint screen should be turning, but the drum isn't turning? Check that both circuit breakers have heat. Dryer Operation
Dryer...available?
TROUBLESHOOTING
First try the solutions suggested here and possibly avoid the...
Use and Care Guide - Page 19

..., we recommend that can tumble freely. If you still need help us or your area, you need replacement parts If you can result in the area where your request.
The new electric heating element may save you can result in your appliance. s Is the dryer located in your nearest Whirlpool designated service center.
Dry...
Use and Care Guide - Page 20
...delivery.
After checking "Troubleshooting," additional help you obtain assistance or service if you ever need service, first see the "Troubleshooting" section of the Use & Care Guide. WHIRLPOOL ...in -warranty service. This major appliance is not installed in accordance with electrical or plumbing codes, or use .
4. Dealer name Address Phone number Model number Serial number...
Whirlpool Knowledge Base Results
We have determined that the information below may contain an answer to this question. If you find an answer, please remember to return to this page and add it here using the "I KNOW THE ANSWER!" button above. It's that easy to earn points!-
Product Registrations
... card if you be willing to take a moment to mail in Oven Combo Washer Dryer Compactor Cooktop Custom Laundry Option Dehumidifier Dishwasher Disposer Dryer - All Accessory Air Purifier Built-in your product online by visiting our web site Electric Dryer - Email: Your Feedback: The answer describes my issue, but does not solve my problem... -
Damp loads or long drying times - Dryer
...louvered hoods are damp; Dryers need good air movement to dry. Larger or smaller diameter material will result in an area where the air temperature is this answer. Electric dryer Or Dryer does not heat - ...rigid or flexible heavy metal vent. A load that the louvers or flapper door easily open and close. Dryer does not heat - Are fabric softener sheets blocking air flow? Lint should... -
Loads are damp; dryer does not dry
...Changing the Preset Dryness Level Settings (available on some models only) If all of your loads on all Automatic Dry or Accudry cycles are damp; Dryer Dryer does not heat - Your Dryness level.... Electric Dryer Dryer does not heat - Press and hold the Dryness button for 5 seconds. The dryer will beep, and "CF" will be changed while the dryer is running. Dryer does not heat - Dryer Poor...
Similar Questions

Whirlpool Wed5300sq0 Electric Dryer Heater Element Stays On.
My electric dryer heater element stays on even when the drum stops. It will only go off when the tim...
My electric dryer heater element stays on even when the drum stops. It will only go off when the tim...
(Posted by rcaspland 9 years ago)

How To Replace Door Switch On Whirlpool Dryer Model Wed7500vw
(Posted by kgarpa 10 years ago)

Electric Dryer Start Only When The Door Is Open
(Posted by joseGJM37 10 years ago)
What Year Was The Wed5200vq Electric Dryer Made?
what year was the WED5200VQ electric dryer made?
what year was the WED5200VQ electric dryer made?
(Posted by Anonymous-80437 11 years ago)

Does Whirlpool Electric Dryer Model Lew 0050pq Have A Thermal Fuse? Where Is It?
(Posted by sklogan 13 years ago)