Uniden UDW155 Support Question
Uniden UDW155 Support Question
Find answers below for this question about Uniden UDW155.Need a Uniden UDW155 manual? We have 3 online manuals for this item!
Question posted by stake2535 on February 22nd, 2016
Whats The Uid And Password?
Current Answers
Answer #1: Posted by aureliamarygrace on February 22nd, 2016 10:52 PM

Member since:
December 31st, 2012 Points: 1,682,568

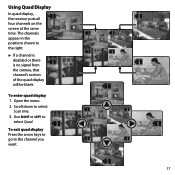
1. Tap the 3 circle tab on the left of the monitor screen
2. Tap the "i" in the box at the bottom
3. Tap the gear to the bottom right
4. Tap NETWORK SETUP
5. Tap NETWORK INFORMATION
6. You will see the UID/DID number and the security code on the last two lines on the left side of the screen
Changing Security code
If you wish to change the Security Code, please see below:
1. Tap the 3 circle tab on the left of the monitor screen
2. Tap the "i" in the box at the bottom
3. Tap the gear to the bottom right
4. Tap NETWORK SETUP
5. Tap SECURITY CODE
6. Tap the white bar that's to the right of the Change Code.
7. Type in the desired code & select Enter.
If you need Network's name & password, pls refer to the link below:
http://mycusthelp.net/UNIDEN/_cs/AnswerDetail.aspx?sSessionID=11219824624UOZSUYLGVCXJ[UWCU[QHGIQGQHLMI&inc=1649&caller=1&txtCriteria=UID
Related Uniden UDW155 Manual Pages

Similar Questions

alma Rhodes


i bought the uniden security cameras and cant get the program to record for more than 45 minutes, ho...