
Toro 20333 Support Question
Toro 20333 Support Question
Find answers below for this question about Toro 20333 - BBC Personal Pace Walk Power Mower.Need a Toro 20333 manual? We have 2 online manuals for this item!
Question posted by eljvu3 on April 26th, 2014
How To Replace Pivot For Toro 20333 Lawn Mower Rear Wheel
The person who posted this question about this Toro product did not include a detailed explanation. Please use the "Request More Information" button to the right if more details would help you to answer this question.
Current Answers
Related Toro 20333 Manual Pages
Operation Manual - Page 1

... genuine Toro parts, or additional information, contact an Authorized Service Dealer or Toro Customer ...violation of special attention.
This rotary-blade, walk-behind lawn mower is designed primarily for product and accessory information...Lawn Mower
Model No. 20333-Serial No. 312000001 and Up Model No. 20333C-Serial No. 312000001 and Up
Form No. 3371-840 Rev A
Operator's Manual
Replacement...
Operation Manual - Page 2
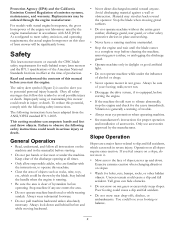
... SAE J1940. General Operation
• Read, understand, and follow this manual before operating. To reduce this mower could lose your footing; Safety
This lawn mower meets or exceeds the CPSC blade safety requirements for the cause immediately. Replacements may ricochet back toward anyone enters the area.
• Do not operate machine barefooted or while...
Operation Manual - Page 3

...vehicle before filling.
• Remove gas-powered equipment from a gasoline dispenser nozzle.
... object, stop and inspect the machine. Replace gas cap and tighten securely. General Service... manufacturer's recommended parts, when necessary.
• Mower blades are often attracted to prevent unintended starting ...the watchful care of Gasoline
To avoid personal injury or property damage, use a ...
Operation Manual - Page 4

...Replace damaged decals. Thrown object hazard-keep bystanders a safe distance from the original
machine manufacturer.
94-8072
114-7982
1. stop the engine before servicing or performing maintenance.
4. Cutting/dismemberment hazard of hand or foot, mower... and instruction decals are located near areas of hand or foot, mower blade-disconnect the spark plug wire and read the Operator's Manual....
Operation Manual - Page 7

A fire or explosion from igniting the gasoline, place the container and/or mower directly on the ground before filling, not in an approved fuel container, out... Do not put your fingers under the housing when adjusting the cutting height. Adjust the cutting height as the rear wheels (Figure 10).
7 Do not overfill. (Max.
Operation
Filling the Fuel Tank
DANGER
Gasoline is cold. If...
Operation Manual - Page 8
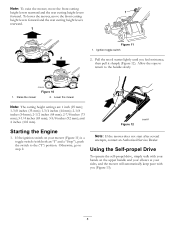
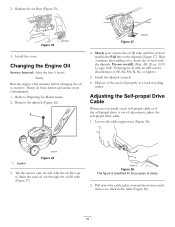
...raise the mower, move the front cutting height levers forward and the rear cutting height levers rearward. If the ignition switch on the upper handle and your elbows at your mower (Figure 11...-propel Drive
To operate the self-propel drive, simply walk with your hands on your sides, and the mower will automatically keep pace with both an "I" and a "Stop"), push the switch to the ("I") position...
Operation Manual - Page 9
...position. Note: If the mower does not freely roll backward after self-propelling, stop walking, hold down the switch in place, and allow the mower to disengage the wheel drive.
You must engage... 13
2. Figure 18
9
You can also try reaching just under the personal pace handle to the metal handle and push the mower forward a couple of inches (centimeters) forward to roll a couple of ...
Operation Manual - Page 10
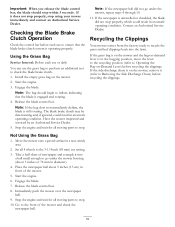
.... Place the newspaper ball about 3 inches or 76 mm in front of the mower.
5. Stop the engine and wait for all 4 wheels to the 3-1/4 inch (83 mm) cut setting.
3. Install the empty grass ...stop using your mower immediately and contact an Authorized Service Dealer. Start the engine.
6. Release the blade control bar.
8. Go to the front of newspaper and crumple it into the lawn. Checking the...
Operation Manual - Page 11
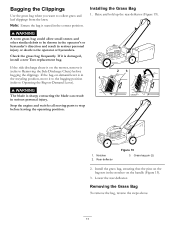
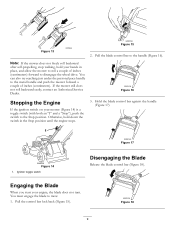
...mower, remove it (refer to be thrown in the operator's or bystander's direction and result in serious personal injury. Rear deflector
Figure 19 3. Grass bag pin (2)
2. Lower the rear...Note: Ensure the bag is damaged, install a new Toro replacement bag. Installing the Grass Bag
1. If it to the.... contacting the blade can result in serious personal injury or death to Operating the Bag-on...
Operation Manual - Page 12
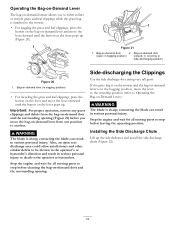
...wait for all moving parts to another. If the grass bag is on the mower and the bag-on-demand lever is in the bagging position, move the lever to the recycling position...).
Bag-on -demand door
(open rear discharge area could allow small stones and other similar debris to be thrown in the operator's or bystander's direction and result in serious personal injury. Operating the Bag-on-Demand ...
Operation Manual - Page 13
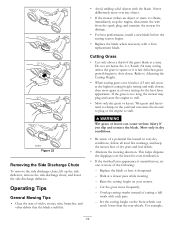
.... If the grass is unsatisfactory, try one notch lower than the rear wheels. Overlap cutting swaths instead of the grass blade at the highest cutting height setting and walk slower; This helps disperse the clippings over any object.
• If the mower strikes an object or starts to vibrate, immediately stop the engine, disconnect...
Operation Manual - Page 14
....
14
Cutting Leaves
• After cutting the lawn, ensure that half of leaves on the lawn, set the front wheels at 2-1/8-inch (54 mm) and the rear wheels at 2-1/2 inches (64 mm). You may need to make more than the rear cutting height.
• Slow down your mowing speed if the mower does not cut leaf cover.
Operation Manual - Page 15

Gasoline is flammable, explosive and can cause personal injury.
After performing the maintenance procedure(s), connect the spark plug wire to run dry through normal usage. Important: Before tipping the mower to change the oil or replace the blade, allow the fuel tank to the spark plug. Preparing for all moving parts to stop.
2. Always...
Operation Manual - Page 16
... or higher.)
5. Refer to warm it. Figure 27
4. Do not overfill. (Max. Tip the mower onto its side with the air filter up to check the oil level with an API service classification of...28 This figure is simplified for Maintenance. 2. Warm oil flows better and carries more contaminants. 1. 2. Replace the air filter (Figure 25). Wait 3 minutes after adding oil to drain the used oil properly at...
Operation Manual - Page 17

...is dull or nicked, have it sharpened and balanced, or replace it. contacting the blade can result in serious personal injury.
Remove the 2 blade nuts and the stiffener (Figure ...nuts
Figure 30 2.
Refer to Preparing for Maintenance. 2. Disk 6. If you previously removed. 7.
Tip the mower onto its side with the air filter up . 3. Stiffener 3. Remove the 2 blade nuts and the ...
Operation Manual - Page 20

...you , is covered under "Lawn Mowers") or access our web ...replacement or repair due to accidents or lack of your country, province, or state. The Toro Total Coverage Guarantee
A 2-Year Full Warranty (45 Day Limited Warranty for Commercial Use)
The Toro GTS Starting Guarantee
A 3-Year Full Warranty (Not Applicable for Commercial Use)
22 in Recycler® 20 in Mulcher/Bagger
Walk Power Mowers...
Parts Catalog - Page 1

Form No. 3371-848 Rev A
22in Recycler® Lawn Mower
Model No. 20333-Serial No. 312000001 and Up
Parts Catalog
Register at www.Toro.com. Original Instructions (EN)
Parts Catalog - Page 2

...Replacement Parts
To order replacement parts, please supply the part number, the quantity, and the description of the entire service assembly and the b represents a sequential number unique to indicate the quantity of the parts identified by reference number 37 are indicated.
For example, a wheel...: assembly BBC: blade ...power-take-off RH: right hand ROPS: roll-over protection system
RRB: rear...
Parts Catalog - Page 3

... Reserved Contents
Deck, Side Chute and Rear Door Assembly 4 Rear Bag Assembly 5 Engine and Blade Assembly 6 Front Wheel and Height-of-Cut Assembly 7 Transmission and Rear Wheel Drive Assembly 8 Upper Handle Assembly 9 Upper Handle Component Assembly 10 Attachments and Accessories 11
© 2011-The Toro® Company
Contact us at www.Toro.com.
8111 Lyndale Avenue South...
Parts Catalog - Page 8

...-Lock, NI
5 108-9779
2 Retainer-Bushing, HOC
6 104-8699
2 Bearing-Ball
7 108-9782
2 Bushing-Sleeve
8 108-9781
2 Arm-Pivot, Rear
9 108-9780
2 Arm-Spring
10 110-0549
2 Knob-HOC
11 115-4652
1 Transmission
12 115-4669
1 Belt-V
13 114-7977-03 1 Bracket-Transmission
Ref. Transmission and Rear Wheel Drive Assembly
Ref. Part Number Qty.
Similar Questions

Rear Wheels Lock
My rear wheels on my Toro Personal Pace 20333 lock when I pull it backward. What would cause this an...
My rear wheels on my Toro Personal Pace 20333 lock when I pull it backward. What would cause this an...
(Posted by weks3 9 years ago)

How Do I Replace The Drive Belt On Rear Wheel Drive Personal Pace
(Posted by jchabek 9 years ago)

How To Replace Pivot In Toro 20333 Lawn Mower
(Posted by JRidougla 10 years ago)

How To Replace Toro 20333 Lawn Mower Control Cable
(Posted by jn967pa 10 years ago)
Blade For Model 20037 Personal Pace Lawn Mower
where can i buy a replacement 21 inch bladefor my 2003 Toro model 20037 personal Pace lawn mower???
where can i buy a replacement 21 inch bladefor my 2003 Toro model 20037 personal Pace lawn mower???
(Posted by lynnegrede 12 years ago)