
Toro 20333 Support Question
Toro 20333 Support Question
Find answers below for this question about Toro 20333 - BBC Personal Pace Walk Power Mower.Need a Toro 20333 manual? We have 2 online manuals for this item!
Question posted by GJFavero on October 11th, 2014
How Do I Re-install The Spring For Toro 20334 Side Deflector Flap?
The spring of my Toro 20334 side deflector flap came loose. How do I flex the spring and hold it against the deck while the other end of the spring is in the hole in the side deflector flap so that I can re-install the rod that holds the assembly together?
Current Answers
Related Toro 20333 Manual Pages
Operation Manual - Page 1

...engine exhaust from an Authorized Service Dealer or at www.Toro.com for product and accessory information, help finding a ...walk-behind lawn mower is designed primarily for cutting grass on well-maintained lawns on the product. It is intended to highlight information. Other states or federal areas may contact Toro directly at www.shoptoro.com. 22in Recycler® Lawn Mower
Model No. 20333...
Operation Manual - Page 2
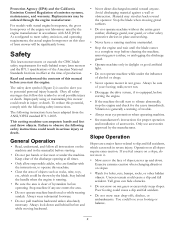
... engine and check for proper operation and installation of slopes; Stay behind the handle when...the manufacturer. Safety
This lawn mower meets or exceeds the CPSC blade safety requirements for holes, ruts, bumps, rocks,...personal injury hazards. Read and understand the contents of your footing or balance.
2
If you to alert you feel uneasy on slopes.
• Watch for walk...
Operation Manual - Page 5

... the engine.
1
Installing the Blade Control Bar
No Parts Required
Procedure
Install the blade control bar into the upper handle (Figure 3).
1.
Figure 3
Figure 4
2.
Important: Route the cables to the operating position. 3. Setup
Important: Remove and discard the protective plastic sheet that you install the handle. Remove the handle knobs from the mower housing (Figure 4).
Operation Manual - Page 6

... handle
7. Refer to check the oil level with the dipstick. Remove the dipstick (Figure 5). Side-discharge deflector
4. Handle knob (2)
6. Important: Change the engine oil after adding oil to Changing the Engine Oil.
1. Figure 6
1. Cutting height lever (4)
2. Install the dipstick securely. Air filter 10. Do not overfill. (Max. Side discharge chute
6
Bag-on...
Operation Manual - Page 7

... (Figure 9). Do not overfill. (Max. Install the dipstick securely.
Use unleaded regular gasoline suitable for all season, mixing it clean, and fully install
the dipstick (Figure 9).
1.
Wait 3 minutes...• To prevent a static charge from igniting the gasoline, place the container and/or mower directly on the ground before filling, not in an approved fuel container, out of the ...
Operation Manual - Page 9
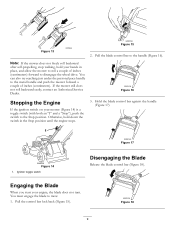
... (Figure 15). Otherwise, hold your hands in the Stop position until the engine stops.
3.
Engaging the Blade
When you start your mower (Figure 14) is a toggle switch (with both an "I" and a "Stop"), push the switch to disengage the wheel drive. You can also try reaching just under the personal pace handle to the metal...
Operation Manual - Page 10
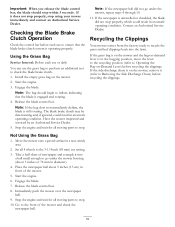
...may be deteriorating and, if ignored, could result in front of newspaper and crumple it into the lawn. Not Using the Grass Bag
1. Stop the engine and wait for all moving parts to stop ...the grass bag to perform an additional test to check the blade brake clutch. 1. Install the empty grass bag on the mower, remove it does not stop properly, stop properly, which could result in diameter)....
Operation Manual - Page 11
... bag pin (2)
2. WARNING
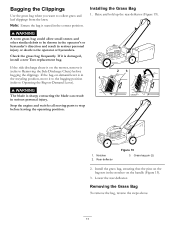
The blade is seated in serious personal injury or death to Operating the Bag-on the mower, remove it to the bagging position (refer to the operator or bystanders. Rear deflector
Figure 19 3. Installing the Grass Bag
1.
If it is in serious personal injury. Removing the Grass Bag
To remove the bag...
Operation Manual - Page 12
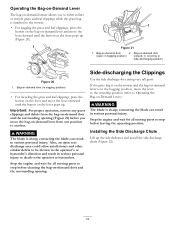
...mower.
• For bagging the grass and leaf clippings, press the button on the bag-on-demand lever and move the lever forward until the button on the lever pops up.
Installing the Side Discharge Chute
Lift up the side deflector and install...discharging position)
Figure 20
1. Bag-on -demand door
2. in serious personal injury or death to the operator or bystanders. Important: For proper ...
Operation Manual - Page 13
....
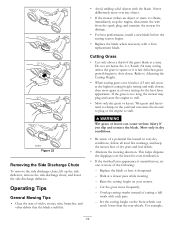
• Avoid striking solid objects with a Toro replacement blade. Operating Tips
General Mowing Tips
• Clear the area of the following:
- Refer to Adjusting the Cutting Height.
• When cutting grass over the lawn for even fertilization.
• If the finished lawn appearance is too long, the mower may plug and cause the engine...
Operation Manual - Page 16
...
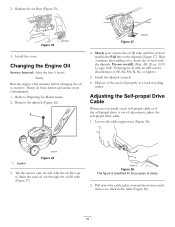
3. Warm oil flows better and carries more contaminants. 1. Adjusting the Self-propel Drive Cable
Whenever you install a new self-propel cable or if the self-propel drive is no slack in the cable (Figure 29...oil fill tube (Figure 27). Figure 28 This figure is simplified for Maintenance. 2.
Tip the mower onto its side with the air filter up to check the oil level with an API service ...
Operation Manual - Page 17

..., or replace it.
If the blade edge is dull or nicked, have it immediately. Install the stiffener you do not have a torque wrench or are uncomfortable performing this procedure, contact... Remove the blade driver and disk (Figure 31).
17 contacting the blade can result in serious personal injury. Tip the mower onto its side with the air filter up . 3. Remove the 2 blade nuts and the...
Operation Manual - Page 18

... handle) when the engine is connected to a water supply to the washout port on the mower housing (Figure 32).
1. Refer to the grass bag.
Install the blade and the stiffener that come out from under the rear deflector where the clippings go from rusting.
10.
Note: Wash out the area with the bag...
Operation Manual - Page 19
...of oil through the spark plug hole, and pull the starter rope ... • Do not store gasoline more than 30 days. • Do not store the mower in your automobile.
Figure 33
4.
Remove the spark plug, add 1 oz. (30 ml)... Old fuel in the fuel tank is the leading cause of any unused fuel properly. Install the spark plug and tighten it with a torque wrench to local codes, or use it...
Operation Manual - Page 20

... your telephone directory (look under "Lawn Mowers") or access our web site at their Toro Distributor (Dealer) to state. This...Walk Power Mowers
Conditions and Products Covered
The Toro Company and its affiliate, Toro Warranty Company, pursuant to an agreement between them, jointly promise to you are dissatisfied with your sole remedy under this warranty. contaminants in early spring...
Parts Catalog - Page 4

...
1 Rear Door ASM
19:2 114-7982
1 Decal-Warning
20 115-2859
1 Spring-Torsion
21 114-7924
1 Spring-Torsion
22 112-6400
1 Port-Washout
23 112-6401
1 Coupling-Hose, Washout ...Cover
11 99-5293
1 Spring-Torsion
12 115-8449
1 Deflector-Side
13 115-8447
1 Chute-Discharge, Side
14 114-7960
1 Deflector-Recycle
15 114-7958
1 Knob-Recycle
Ref. Part Number Qty. Deck, Side Chute and Rear ...
Parts Catalog - Page 6
...-3792
1 Spring-Tension, Brake
20 117-5970
1 Pulley-BBC
21 110-1790
1 Belt-BBC
22 107-0754
1 Drum
23 3211-42
2 Screw-HH
24 108-9342
1 Nut-Hex
25 115-2892
1 Cover-BBC
26 2412-72...54-9190
2 Nut-Lock
33 3229-5
1 Screw-CARR
34 106-6801 35 121-2371
1 Anchor-Cable, BBC 1 Decal-Shroud
● Not serviced separately
■ Obtain parts from www.briggsandstratton.com
3371-848A
6
B3...
Parts Catalog - Page 7

...-03 2 Plate-HOC, Front
2 322-3
4 Screw-HH
3 3296-29
6 Nut-Lock, NI
4 105-1818
2 Bushing-Mount, HOC
5 105-1807
2 Arm-Pivot, Front
6 105-1809
2 Arm-Spring
7 110-0549
2 Knob-HOC
8 105-3048
2 Washer-Flat
9 322-6
2 Screw-HH
10 40-1940
2 Washer
11 614650
2 Bolt-Shoulder
12 115-2894
2 8 Inch Wheel ASM...
Parts Catalog - Page 8

...-29
4 Nut-Lock, NI
5 108-9779
2 Retainer-Bushing, HOC
6 104-8699
2 Bearing-Ball
7 108-9782
2 Bushing-Sleeve
8 108-9781
2 Arm-Pivot, Rear
9 108-9780
2 Arm-Spring
10 110-0549
2 Knob-HOC
11 115-4652
1 Transmission
12 115-4669
1 Belt-V
13 114-7977-03 1 Bracket-Transmission
Ref. Transmission and Rear Wheel Drive...
Parts Catalog - Page 10

...
Ref. Description
1 117-5975
1 Switch Housing ASM
2 321-50
1 Screw-HH
3 108-3788-03 1 Bail-Brake
4 115-8439
1 Cable-Brake, BBC
5 3290-337
1 Nut-Speed
6 106-9169 7 107-7462
1 Screw-HWH 1 Spring-Torsion
8 107-7463
1 Spacer
9 106-6802
1 Lever
10 32128-17
1 Nut-Lock, Flange
11 112-8884 12 104-9368
1 Knob...
Similar Questions

Toro Recycler Personal Pace 20333 How To Clean Air Cooling System
(Posted by Michipgok 10 years ago)
What Is The Crankcase Capacity Toro Personal Pace Lawnmower?
(Posted by paradugeez 10 years ago)

How Do You Replace The Traction Bar On A Toro Personal Pace Mower
(Posted by pdfecool 10 years ago)

How To Drain The Oil On A Toro Personal Pace Lawnmower
(Posted by fgyuidal 10 years ago)

Person Pace Feature Stopped Working, Is There An Adjustment I Can Make?
The Personal Pace feature stopped within 10 minutes of first use. The grass was damp at the time. Is...
The Personal Pace feature stopped within 10 minutes of first use. The grass was damp at the time. Is...
(Posted by jhcook1755 12 years ago)