
Toro 20333 Support Question
Toro 20333 Support Question
Find answers below for this question about Toro 20333 - BBC Personal Pace Walk Power Mower.Need a Toro 20333 manual? We have 2 online manuals for this item!
Question posted by xperjd on September 7th, 2014
How Do I Install A Torsion Spring On Mulcher Door Toro Lawn Mower
The person who posted this question about this Toro product did not include a detailed explanation. Please use the "Request More Information" button to the right if more details would help you to answer this question.
Current Answers
Related Toro 20333 Manual Pages
Operation Manual - Page 1

...you need service, genuine Toro parts, or additional information, contact an Authorized Service Dealer or Toro Customer Service and have... the location of special attention. This rotary-blade, walk-behind lawn mower is a violation of California to use or operate the...on the product.
Serial No. 22in Recycler® Lawn Mower
Model No. 20333-Serial No. 312000001 and Up Model No. 20333C...
Operation Manual - Page 2
...proper operation and installation of slopes;... down and behind rotary lawn mowers and the B71.1 specifications of lawn mower will be thrown by ... excessively steep slopes. As configured to potential personal injury hazards. Always wear substantial footwear.
&#...the machine. Vibration is generally a warning of production. walk; Avoid discharging material against a wall or obstruction.
...
Operation Manual - Page 5

...outside of the handle knobs as you
removed in step 1 (Figure 4).
2
Installing the Handle
No Parts Required
Procedure
WARNING
Folding or unfolding the handle improperly can damage..., contact an Authorized
Service Dealer.
5
Install and tighten the handle knobs that covers the engine.
1
Installing the Blade Control Bar
No Parts Required
Procedure
Install the blade control bar into the upper ...
Operation Manual - Page 6

... API service classification of oil. 1. Side discharge chute
6 Ignition switch
9. Control bar lock
1. 3
Filling the Engine with Oil
Product Overview
No Parts Required
Procedure
Your mower does not come with oil in the engine, but it yearly thereafter. Spark plug
14. Oil fill/dipstick
12. Blade control bar 3.
Refer to check...
Operation Manual - Page 7

... explosive.
Use unleaded regular gasoline suitable for all season, mixing it clean, and fully install
the dipstick (Figure 9).
1.
If the oil level is below the Add mark on...(0.59 l), type: SAE 30 detergent oil with gasoline. Install the dipstick securely. Keep away from igniting the gasoline, place the container and/or mower directly on the ground before filling, not in an approved ...
Operation Manual - Page 9
... drive.
Note: If the mower does not freely roll backward after self-propelling, stop walking, hold down the switch in place, and allow the mower to roll a couple of ...mower forward a couple of inches (centimeters) forward to the Stop position. If the mower still does not roll backward easily, contact an Authorized Service Dealer. You can also try reaching just under the personal pace...
Operation Manual - Page 10
...Demand Lever) before recycling the clippings. Move the mower onto a paved surface in a non-windy area.
2. Install the empty grass bag on the mower, remove it (refer to Removing the Side Discharge...3 seconds. Have the mower inspected and serviced by an Authorized Service Dealer. 5. Note: If the newspaper ball did not stop . Not Using the Grass Bag
1. If it into the lawn. Using the Grass Bag...
Operation Manual - Page 11
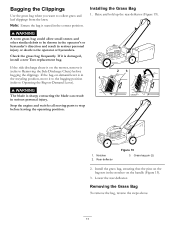
...on the bag rest in serious personal injury.
Notches 2.
If the side discharge chute is damaged, install a new Toro replacement bag. Install the grass bag, ensuring that the pins on the mower, remove it to the bagging... to collect grass and leaf clippings from the lawn. Lower the rear deflector. Note: Ensure the bag is seated in serious personal injury or death to Operating the Bag-on...
Operation Manual - Page 12
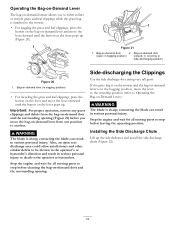
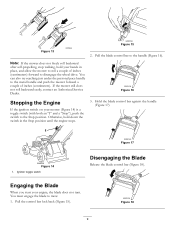
...to stop before leaving the operating position.
Bag-on-demand door
(open rear discharge area could allow small stones and other...
Use the side discharge for all moving parts to the mower.
• For bagging the grass and leaf clippings, press...pops up the side deflector and install the side discharge chute (Figure 22).
12
in serious personal injury. contacting the blade can ...
Operation Manual - Page 13
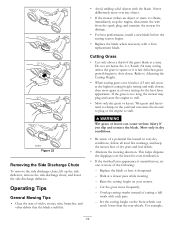
...the mower free of the grass blade at the highest cutting height setting and walk slower; This helps disperse the clippings over the lawn for damage.
• For best performance, install a ...• Alternate the mowing direction. then mow again at a slower pace while mowing.
- Walk at a lower setting for the best lawn appearance. Operating Tips
General Mowing Tips
• Clear the area of...
Operation Manual - Page 14
... that half of leaves on the lawn, set the front wheels at 2-1/8-inch (54 mm) and the rear wheels at 2-1/2 inches (64 mm).
set the front cutting height one or two notches higher than the rear cutting height.
• Slow down your mowing speed if the mower does not cut leaf cover.
Operation Manual - Page 16
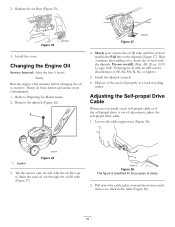
... l), type: SAE 30 detergent oil with the dipstick.
Adjusting the Self-propel Drive Cable
Whenever you install a new self-propel cable or if the self-propel drive is simplified for Maintenance. 2.
Figure 28...(Figure 27). Install the cover. Pull down the cable jacket (toward the mower) until the oil level reaches the Full line on the dipstick (Figure 27). 2. Tip the mower onto its side...
Operation Manual - Page 17

...Maintenance.
2. If the blade edge is sharp; Refer to install the blade properly. Tip the mower onto its side with the air filter up . 3. Remove the blade (Figure 31). 5. Install the stiffener you do not have it sharpened and balanced,.... Blade brake clutch shield
4. contacting the blade can result in serious personal injury. Tip the mower onto its side with the air filter up .
3.
Operation Manual - Page 18

... and run it until there are no more clippings that you
previously removed. 9.
Stop the engine.
8. Move the mower onto a flat paved surface.
3. Install the blade brake clutch shield that you have completed mowing.
1. 6. Install the blade nuts and torque them to 15 to
27 ft-lb (20 to 37 N-m).
Remove the blade...
Operation Manual - Page 19
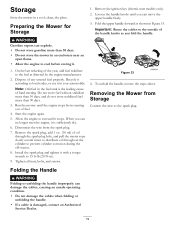
... can explode. • Do not store gasoline more than 30 days. • Do not store the mower in Figure 33. Recycle it in your automobile. Do not store fuel without stabilizer more than 30 days,... freely. 3. To unfold the handle, reverse the steps above. Install the spark plug and tighten it stops.
Storage
Store the mower in the fuel tank is the leading cause of hard starting.
Operation Manual - Page 20

...Toro GTS Starting Guarantee
A 3-Year Full Warranty (Not Applicable for Commercial Use)
22 in Recycler® 20 in Mulcher/Bagger
Walk Power Mowers
Conditions and Products Covered
The Toro Company and its affiliate, Toro...Manual if in early spring and late autumn
- If for residential purposes*; year full warranty
Limited Warranty for Commercial Use*
Gas-powered Toro Products used for any...
Parts Catalog - Page 1

Form No. 3371-848 Rev A
22in Recycler® Lawn Mower
Model No. 20333-Serial No. 312000001 and Up
Parts Catalog
Register at www.Toro.com. Original Instructions (EN)
Parts Catalog - Page 3

..., Side Chute and Rear Door Assembly 4 Rear Bag Assembly 5 Engine and Blade Assembly 6 Front Wheel and Height-of-Cut Assembly 7 Transmission and Rear Wheel Drive Assembly 8 Upper Handle Assembly 9 Upper Handle Component Assembly 10 Attachments and Accessories 11
© 2011-The Toro® Company
Contact us at www.Toro.com.
8111 Lyndale Avenue...
Parts Catalog - Page 4

...-Cover
9 99-8445
2 Screw-HWH, Taptite
10 99-5291
1 Rod-Cover
11 99-5293
1 Spring-Torsion
12 115-8449
1 Deflector-Side
13 115-8447
1 Chute-Discharge, Side
14 114-7960
1 Deflector-Recycle...17 117-1031
1 Spring-Compression
18 32104-120
2 Screw-PPH
19 121-5776
1 Rear Door ASM
19:2 114-7982
1 Decal-Warning
20 115-2859
1 Spring-Torsion
21 114-7924
1 Spring-Torsion
22 112-6400
...
Parts Catalog - Page 9

...
1 Handle-Control
13 117-1019
1 Decal
14 99-1588
1 Bar-Control, Traction
15 3256-23
1 Washer-Flat
16 99-1589
1 Lever-Traction
17 104-8690
1 Spring-Torsion
20 99-5239
1 Anchor-Cable
21 115-8435
1 Cable-Traction
D3
9
3371-848A
Similar Questions

How Do I Re-install The Spring For Toro 20334 Side Deflector Flap?
The spring of my Toro 20334 side deflector flap came loose. How do I flex the spring and hold it aga...
The spring of my Toro 20334 side deflector flap came loose. How do I flex the spring and hold it aga...
(Posted by GJFavero 9 years ago)

How To Install A Side Shoot Spring On A Toro Mower
(Posted by angear 9 years ago)

Where Does Torsion Spring Go On Lawn Mower
(Posted by erijagan2 10 years ago)

How To Install Torsion Spring On A Toro Mower
(Posted by Yoavfrede 10 years ago)

How To Hook Rear Torsion Spring On Toro Push Mower Mod. # 20334.
(Posted by Anonymous-115045 10 years ago)