
Toro 20332 Support Question
Toro 20332 Support Question
Find answers below for this question about Toro 20332 - Recycler 190CC Personal Pace Lawn Mower.Need a Toro 20332 manual? We have 2 online manuals for this item!
Question posted by jesazi on November 22nd, 2013
How To Install Mower Defelector Chute Torsion Spring
The person who posted this question about this Toro product did not include a detailed explanation. Please use the "Request More Information" button to the right if more details would help you to answer this question.
Current Answers
Related Toro 20332 Manual Pages
Operation Manual - Page 1

... reproductive harm. This spark ignition system complies with a spark arrester muffler. 22in Recycler® Lawn Mower
Model No. 20332-Serial No. 312000001 and Up Model No. 20334-Serial No. 312000001 and Up... and serial numbers of your product ready. Figure 2 1. This rotary-blade, walk-behind lawn mower is intended to use or operate the engine on the product. Figure 1 identifies the location...
Operation Manual - Page 2

...responsible adults, who are a major factor related to potential personal injury hazards. Avoid discharging material against a wall or obstruction...Agency (EPA) and the California Emission Control Regulation of lawn mower will be thrown by the blade. never up and... supplied for proper operation and installation of alcohol or drugs.
• Never operate mower in wet grass. Keep clear...
Operation Manual - Page 3

..., spark, or pilot light such as necessary.
3
Service
Safe Handling of Gasoline
To avoid personal injury or property damage, use extra caution when servicing them .
• Keep children out ... or repairs with a portable container, rather than the operator.
• Be alert and turn mower off if a child enters the area.
• Never allow children to cool before refueling.
...
Operation Manual - Page 4

...as a part from the machine.
3. Cutting/dismemberment hazard of hand or foot, mower blade-remove the ignition key and read the instructions before leaving the operating position;... Replace damaged decals.
Lock
112-8867 2. Cutting/dismemberment hazard of hand or foot, mower blade-do not discard. 2. Manufacturer's Mark
1. Cutting/dismemberment hazard of potential danger. ...
Operation Manual - Page 5

... the crankcase capacity of oil into the oil fill tube, then remove the dipstick.
5. Figure 3
2. Max. Move the mower to the operating position. 3. Install and tighten the handle knobs that covers the engine.
1
Installing the Handle
No Parts Required
Procedure
WARNING
Folding or unfolding the handle improperly can damage the cables, causing an...
Operation Manual - Page 6

...-start handle
7. Washout port (not shown) 13. Bag-on the dipstick reads Full.
6. Recoil start models only Refer to Changing the Engine Oil. Side discharge chute
3.
Install the dipstick into the oil fill tube securely. Refer to Charging the Battery in the Maintenance section. Oil fill/dipstick
12. Important: Do not overfill...
Operation Manual - Page 7

... others.
• To prevent a static charge from igniting the gasoline, place the container and/or mower directly on the dipstick, slowly pour a small amount of SF, SG, SH, SJ, SL, ...or higher. 1.
Important: To reduce starting problems, add fuel stabilizer to a level surface. 2. Install the dipstick into the oil fill tube, then remove the dipstick.
5. Drain the excess oil until...
Operation Manual - Page 9

... under the personal pace handle to the metal handle and push the mower forward a couple of inches (centimeters) forward to Operating the Bag-on -Demand Lever).
Note: If the mower does not start models only).
Stop the engine and wait for all moving parts to recycle the grass and leaf clippings back into the lawn. Important...
Operation Manual - Page 10

... lever rearward until the button on -demand feature allows you to another. Install the grass bag, ensuring that the pins on the bag rest in the...mower. • For bagging the grass and leaf clippings, press the
button on the bag-on-demand lever and move the
• For recycling the grass and leaf clippings, press the button on the lever and move the bag-on -demand lever (in serious personal...
Operation Manual - Page 11

... the side discharge chute, lift up the side deflector and install the side discharge chute (Figure 17).
1. Clean here
Figure 16
Side-discharging the Clippings
Use the side discharge for all moving parts to Operating the Bag-on -demand lever is in serious personal injury. WARNING
The blade is on the mower and the bag...
Operation Manual - Page 12

....
- then mow again at a slower pace while mowing.
-
WARNING
Wet grass or leaves can cause the mower to plug or the engine to slow down your mower.
- Refer to stall.
• Mow... keep the mower free of the grass blade at the highest cutting height setting and walk slower; This helps disperse the clippings over the lawn for damage.
• For best performance, install a new blade...
Operation Manual - Page 14

Install the cover.
1. Tip the mower onto its side with the air filter up to settle. 8. Warm oil flows better and carries ...If the oil level is at a local recycling center.
14 Use a screw driver to a level surface. 2. Replace the air filter (Figure 19). 3. Dipstick
Figure 20
4. Move the mower to open the air filter cover
(Figure 19). 2. Install the dipstick into the oil fill tube, ...
Operation Manual - Page 15

... state lasts only a few minutes until the battery is charging the
battery.
2. Note: When the battery no longer holds a charge, recycle or dispose of the lead-acid battery according to the mower wire harness
located below the ignition key (Figure 22).
• A green light indicates that the charger is fully charged or...
Operation Manual - Page 16

...mower housing. 6. Install...Important: A bolt torqued to Preparing for Maintenance. 2. Install the new blade and all mounting hardware (Figure 25...mower onto its side with the screw that you removed in the battery compartment. 5. Fuse
Figure 24
G017398
2. Install... a torque wrench to tighten the blade bolt to install the blade properly.
Replacing the Blade
Service Interval: Yearly...
Operation Manual - Page 17

... Self-propel Drive Cable
Whenever you have completed mowing. 1. Pull down the cable jacket (toward the mower) until there are no slack in an enclosed area.
17
For best results, clean the mower soon after you install a new self-propel cable or if the self-propel drive is no more clippings that is...
Operation Manual - Page 18

... the outside of the handle knobs as you fold the handle. Loosely install the spark plug.
9. Tighten all nuts, bolts, and screws.
10...Disconnect the wire from Storage
1. Storage
Folding the Handle
Store the mower in the fuel tank is the leading cause of hard starting. Remove...prevent cylinder corrosion during the off-season.
8.
Recycle it in a heated area, you can explode.
• Do not...
Operation Manual - Page 20

... the following:
• Cost of purchase:
Products
22 in Recycler and 20 in Mulcher/Bagger and Attachments GTS (Guaranteed to the...coverage on the same lot as those found in early spring and late autumn
-
Countries Other than an Authorized
Toro ... repairs covered by an Authorized Toro Service Dealer is covered under "Lawn Mowers") or access our web site at 866-214-9808 (Canadian customers...
Parts Catalog - Page 1

Form No. 3371-846 Rev A
22in Recycler® Lawn Mower
Model No. 20332-Serial No. 312000001 and Up
Parts Catalog
Register at www.Toro.com.
Original Instructions (EN)
Parts Catalog - Page 4

...
10 99-5291
1 Rod-Cover
11 99-5293
1 Spring-Torsion
12 115-8449
1 Deflector-Side
13 115-8447
1 Chute-Discharge, Side
14 114-7960
1 Deflector-Recycle
15 114-7958
1 Knob-Recycle
Ref. Part Number Qty. Part Number Qty. Description
16 114-7959
1 Latch-Recycle
17 117-1031
1 Spring-Compression
18 32104-120
2 Screw-PPH
19 121-5776...
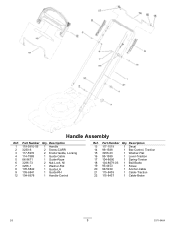
Parts Catalog - Page 9
...
Ref. Description
13 117-1019
1 Decal
14 99-1588
1 Bar-Control, Traction
15 3256-23
1 Washer-Flat
16 99-1589
1 Lever-Traction
17 104-8690
1 Spring-Torsion
18 104-8679-03 1 Bail-Brake
19 95-4453
1 Screw
20 99-5239
1 Anchor-Cable
21 115-8435
1 Cable-Traction
22 115-8437
1 Cable-Brake...
Similar Questions

How To Install A Broken Torsion Spring On Toro Personal Pace
(Posted by tomjv 9 years ago)

How Do I Install A Torsion Spring On Mulcher Door Toro Lawn Mower
(Posted by xperjd 9 years ago)

How To Install A Torsion Spring On A Toro Personal Pace Lawn Mower
(Posted by dambelfe3 10 years ago)

How To Replace Torsion Spring On Toro Personal Pace Mower
(Posted by nirCar 10 years ago)

How To Change Oil On A Toro Recycler (22 ) 190cc Personal Pace Lawn Mower
(Posted by tinaScamp1 10 years ago)