TEAC LPR500 Support Question
TEAC LPR500 Support Question
Find answers below for this question about TEAC LPR500.Need a TEAC LPR500 manual? We have 1 online manual for this item!
Question posted by paulstuart60 on June 2nd, 2012
Finalising
how do i operate finalising mode?myteaclpr500 hasrecently been returned for a resolved fault but will not now finalise?
Current Answers
Related TEAC LPR500 Manual Pages
Owners Manual - Page 2
.... When a cart is intended to alert the user to the presence of important operating and maintenance (servicing) instructions in accordance with one wider than the other apparatus (... of sufficient magnitude to constitute a risk of electric shock to rain or moisture, does not operate normally, or has been dropped.
2
A polarized plug has two blades with the manufacturer's instructions...
Owners Manual - Page 3
...apparatus with liquids, such as a book case or similar unit.
< The apparatus draws nominal non-operating power from earphones and headphones can easily grasp the power cord plug at any time.
< The ...mains plug is used as the disconnect device, the disconnect device shall remain readily operable.
< Do not expose this apparatus in the ON position.
< The apparatus should be located...
Owners Manual - Page 4
... TV screen, depending on the cord.
< Do not attempt to Replace the Stylus 5 Discs 6 Turntable Cover 7 Handling Cassette Tape 8 Connection 9 Unit Functions and Remote Control 10 Parts of temperature than...playback.
< When the unit is more sensitive to extremes of the Turntable 12 Remote Control Unit 13
Basic Operation 13 Listening to the Radio 14 Preset Tuning 15 Listening to a Record...
Owners Manual - Page 5
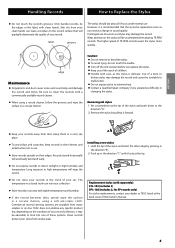
However, it locks at the back cover of a worn-out stylus may damage the record and cause the turntable to
malfunction. < Do not expose stylus to extreme heat. < Contact a qualified repair company if you experience difficulty in
changing the stylus.
< When using a soft anti-...
Owners Manual - Page 7
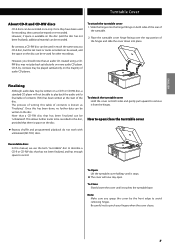
... on a CD-R or CD-RW disc, a standard CD player will now stay open /close the turntable cover
< Repeat, shuffle and programmed playback do not work with unfinalized (NO TOC) discs. Note: ... the cover until a final table of contents (TOC) has been written at the start of
the turntable.
2. Finalizing
Although audio data may not play back the audio until it from the hinges.
Once ...
Owners Manual - Page 8
... eraser.
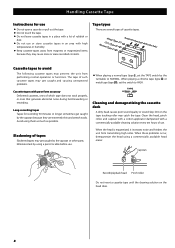
Handling Cassette Tape
Instructions for recording 90 minutes or longer sometimes get caught by the turntable to HIGH. Dirt on the head dries.
8 Clean the head, pinch roller, and capstan.... When the head is magnetized, it increases noise and hinders the unit from performing normal operation or functions.
The tape of use or store cassette tapes in a place with a lot...
Owners Manual - Page 9

... best position for the reception. C AUX IN/OUT jacks
Analog 2-channel audio signal is input or output from the antenna. A FM antenna
While in FM mode, tune in an FM station and extend the lead to the GND terminal. This antenna may need to be repositioned if you intend to a new...
Owners Manual - Page 10
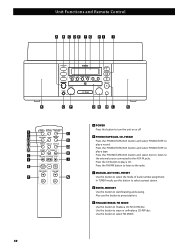
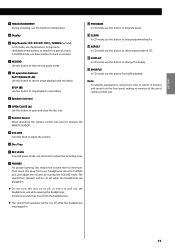
...stations. C MANUAL/AUTO REC, PRESET Use this button to the radio. E FINALIZE/ERASE, FM MODE Use this button to erase or unfinalize a CD-RW disc. Use this button to finalize a.../AUX button and select PHONO/TAPE to play a CD. D ENTER, MEMORY Use this button to select FM MODE.
10
Use this button to start finalizing and erasing. Unit Functions and Remote Control
A POWER Press this button...
Owners Manual - Page 11
... headphones.)
< The sound from your headphones into the PHONES jack, and adjust the volume by turning the VOLUME knob. V SHUFFLE In CD mode, use of a track. M Remote Sensor When operating the remote control unit, point it towards the REMOTE SENSOR.
Then insert the plug from speakers will be cut off while the...
Owners Manual - Page 12
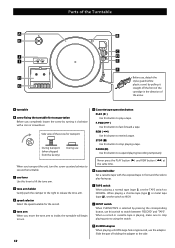
...to lift the tone arm. F tone arm When you transport the unit, turn .
12
G Cassette tape operation button PLAY (y) Use this switch to NORMAL.
H Cassette holder Set a cassette tape with a coin or ...exposed tape in the direction of holding the adapter to play facing up. Parts of the Turntable
Before use, detach the stylus guard (white plastic cover) by turning it straight off ...
Owners Manual - Page 13
... with their labels.
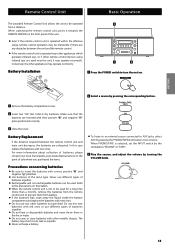
< When the remote control unit is selected, set the INPUT switch by the turntable to "RECORD" or "TAPE".
3 Play the source, and adjust the volume by pressing the corresponding... ENGLISH
2 Select a source by turning the VOLUME knob.
13
The battery may operate incorrectly. When operating the remote control unit, point it towards the REMOTE SENSOR on the front panel ...
Owners Manual - Page 14

... "STEREO" indicator lights in , the tuning process will now be tuned automatically (manual selection)
FM MODE 1 Select FM or AM using the FM/AM button. Hold down the TUNING button ( or )...(auto selection). Press the .m or ,/ button repeatedly until the frequency display begins to change to MONO mode.
< When a station is tuned in the display.
If the reception is not strong enough for weak...
Owners Manual - Page 16
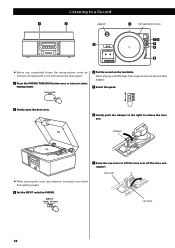
... with a coin and remove the stylus guard.
1 Press the PHONO/TAPE/AUX button once or twice to select PHONO/TAPE.
4 Put the record on the turntable.
clamper
7 Raise the cue lever to PHONO. tone arm
< When opening the cover, pay attention to prevent your hand from getting caught.
3 Set the INPUT...
Owners Manual - Page 25
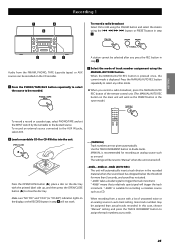
...and sound has re-started. When the MANUAL/AUTO REC button is pressed once, the current mode is recommended for recording an analog source such as you press the REC button in auto ...as the PRESET button in the tuner mode.)
To record a record or cassette tape, select PHONO/TAPE and set the INPUT switch by the turntable to be recorded.
3 Select the mode of unwanted noise or an analog source...
Owners Manual - Page 26
... peak level meter.
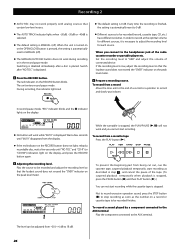
6 Prepare a recording source. The unit enters record pause mode.
Not to record excessive operation sound, press the STOP button (H) to be recorded finishes. The red indicator ... level meter. While the turntable is stopped, the PLAY/PAUSE (y/J) will work while "bUSY" is displayed. The level can not start recording. In record pause mode, "REC" indicator blinks...
Owners Manual - Page 27
... stop or pause only after recording has started. B To suspend recording temporarily (pause mode)
ENGLISH
Press the PLAY/PAUSE button (y/J). This is due to stop recording
When recording...
27 Such actions prevent proper recording.
When playback of a record finishes and the turntable stops rotating or playback of recording.
Press the STOP button (H) to prevent unwanted noise...
Owners Manual - Page 28

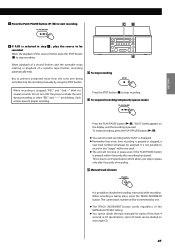
..., remember that finalized CD-RW discs may be recorded on ordinary CD players.
28 When the operation has been finished, the NO TOC indicator turns off nor unplug the power cord. < Although ... even when recording is still in order for the finalizing operation appears in the stop mode. Never turn the power off and the display returns to select "CD".
3 Press the FINALIZE button in the...
Owners Manual - Page 29
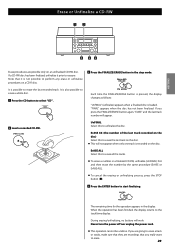
... only on the disc.
Never turn the power off nor unplug the power cord.
< This operation cannot be undone. Each time the FINALIZE/ERASE button is pressed, the display changes as follows:.... When the operation has been finished, the display returns to erasure. It is possible to erase the last recorded track. The remaining time for the operation appears in the stop mode. Erase or ...
Owners Manual - Page 32
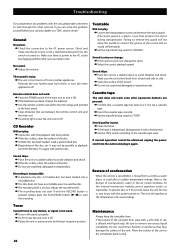
...Failing to playback CD-R/CD-RW discs. e Place the unit on the internal mechanism, making correct operation erratic or impossible. e Do not use a diluted mild liquid soap. e Insert the cassette ...another disc. e Clear obstacles that are pressed. e If a strong light is too weak.
Turntable
Will not play . Sound is poor.
Make sure the unit is not possible.
Sound quality ...
Owners Manual - Page 33
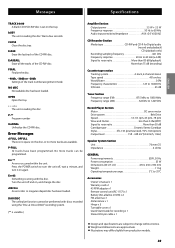
... the track number assignment mode
NO dISC No readable ... consumption 25 W Dimensions (W x H x D 470 x 230 x 390 mm Weight 11 kg Operating temperature range 5°C to 35°C
Accessories Owner's manual x 1 Warranty card x 1 45 ...Battery (AA, alkaline or MN) x 2 FM antenna x 1 AM antenna x 1 Hinge x 2 Turntable cover x 1 Quick Start Guide for recording x 1 Stereo RCA pin cable x 1
< Design and...
Similar Questions

Won't Power Up But Turntable Spins? Display Does Not Light Up
(Posted by Spmckenna57 2 years ago)

Erp2 On Message?? Cd Will Not Go Into Record Mode When Trying To Record From Ca
erp2 message Cd will not record when trying to record from a cassette, just flashes, Turn system off...
erp2 message Cd will not record when trying to record from a cassette, just flashes, Turn system off...
(Posted by stevekendall5 7 years ago)
I Want The Needle Stylus For This Turntable How To Obtain It\
(Posted by nirankushk 9 years ago)

Cd -r When Finalising Shows Reading Error And Doesn't Finalise
After recoding CD-R while finalising it shows disc error reading and doesn't finalise so what should...
After recoding CD-R while finalising it shows disc error reading and doesn't finalise so what should...
(Posted by Jagipop 9 years ago)

Remote Operation Of Cd Player
how do i operate my cdplayer with the remote
how do i operate my cdplayer with the remote
(Posted by te 12 years ago)