Singer SES2000 Support Question
Singer SES2000 Support Question
Find answers below for this question about Singer SES2000.Need a Singer SES2000 manual? We have 1 online manual for this item!
Question posted by baylady55 on February 14th, 2013
Usb Connection
when trying to open profram. it tells me to connect usb cord and turn on machine. both are done already. could my usb port not be stong enough on my lap top?
Current Answers
Related Singer SES2000 Manual Pages
Instruction Manual - Page 3
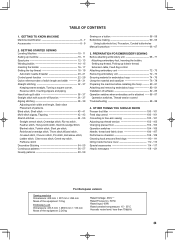
... a button 58 - 59 Buttonhole making 60 - 65
Using buttonhole foot, Procedure, Corded buttonholes Manual buttonhole 66 - 67
3. TABLE OF CONTENTS
1. PREPARATION FOR EMBROIDERY SEWING Before attaching embroidery unit 68 - 71
Attaching embroidery foot, Inserting the bobbin, Setting top thread, Picking up machine 10 - 11 Spool pins 12 - 13 Winding bobbin 14 - 15 Inserting...
Instruction Manual - Page 6
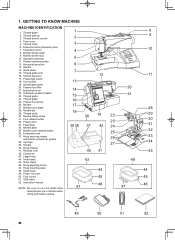
... bracket 41. Release lever 42. Outer frame 46. Bobbin winder shaft 9. Cord socket 19. Needle clamp screw 31. Foot release button 32. Needle plate ...USB cable 52. GETTING TO KNOW MACHINE
MACHINE IDENTIFICATION
1. Operation switches 11. Small hoop 49. Thread cutter 6. Handle 14. Power/light switch 18. Buttonhole lever 22. Hoop securing screws
with your machine when doing embroidery sewing...
Instruction Manual - Page 8
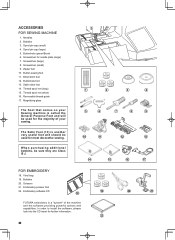
Buttonhole opener/Brush 6. Buttonhole foot 13. Removable thread guide 17. Magnifying glass
The Foot that comes on your sewing.
1
2
3
5
6
7
8
The Satin Foot (13) is a "system" of the machine and the software providing powerful options and capabilities. Screwdriver (large) 8. Button sewing foot 11. Thread spool net (long) 15. Scissors 21. Zipper foot 10. When purchasing ...
Instruction Manual - Page 10
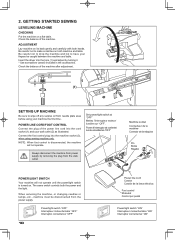
... not operate. Check the balance of the power line cord into the cord socket (1) and your fingers be disconnected from needle plate area before using sewing machine only.
Connect the foot control plug into the hole (1) and adjust by removing the plug from power supply by turning it. * Use screwdriver (small) included in the accessories. Set...
Instruction Manual - Page 24
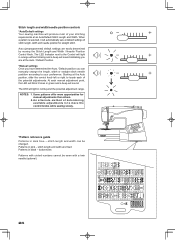
...Auto position, slide the control knob left or right to move the control knobs while sewing slowly.
*Pattern reference guide
Patterns in orange without blinking and a beep will sound ...in black - NOTES: 1. Stitch length and width/needle position controls
*Auto/Default settings Your sewing machine will produce most of your preference. When a pattern is to locate each manual adjustment point...
Instruction Manual - Page 26
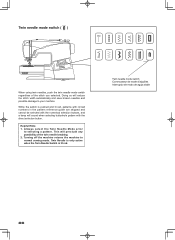
... so will reduce the stitch width automatically and save broken needles and possible damage to normal sewing mode. While the switch is lit red. Helpful Hints: 1. Turning off the machine returns the machine to your machine. A l w a y s s e l e c t t h e Tw i n N e e d l e M o d e p r i o r
to selecting a pattern.
Twin needle mode switch ( )
When using twin needles, push the twin needle...
Instruction Manual - Page 32
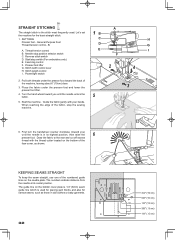
Reverse stitch switch D. Start/stop the sewing machine.
6. Feed dog control F. Guide the fabric gently with the thread cutter located on the needle plate. First turn the handwheel counter clockwise (toward you until the needle is used . KEEPING SEAMS STRAIGHT
To keep the seam straight, use one of the numbered guide ...
Instruction Manual - Page 36
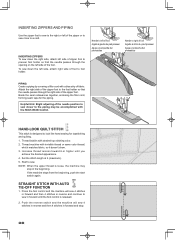
... presser foot holder so that the needle passes through the opening on the left of foot Aiguille à droite du pied presseur Aguja a la derecha del prensatelas
PIPING Create a piping by covering a filler cord with the Stitch Width Control.
Needle to sew. If the machine stops from the beginning, push the start switch again...
Instruction Manual - Page 52

... fabrics or for decoration especially of borders.
GREEK KEY STITCH
A traditional pattern suited for an open, airy appearance.
Another use for the ladder stitch is primarily used for sewing over narrow ribbon, yarn or elastic. After sewing, draw the thread out from within the ladder for decorative borders, hems and edge finishings.
It...
Instruction Manual - Page 58

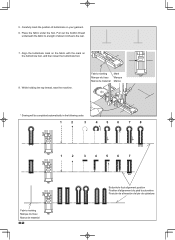
... pattern and continuous patterns. NOVELTY PATTERNS
SETTINGS :Presser foot - Sew 10 stitches across. S - Turn the handwheel to make sure needle clears both threads to the backside of the fabric and tie together.
58 Helpful Hint: To secure thread, pull both left and right openings of it. Position your fabric and button under the...
Instruction Manual - Page 60

Then try the buttonhole with the buttonhole foot. (Refer to match the size of the garment where buttonholes are ...can be sewn to "Changing presser foot" on a scrap of the fabric you are placed. It is helpful to remove the extension table when sewing a buttonhole, to "Using buttonhole foot" above.)
tab B Languette B Lengüeta B
4. Set the buttonhole lever (C) so that it drops...
Instruction Manual - Page 62
Place the fabric under the foot. Fabric marking Marque du tissu Marca de material
mark Marque Marca
* Sewing will be completed automatically in the following order.
1
2
3
4
5
6
7
8
1
2
3
4
5
6
7
Fabric marking Marque du... the mark on your garment. 6. While holding the top thread, start the machine.
5. Pull out the bobbin thread
underneath the fabric to the rear.
7.
Instruction Manual - Page 84
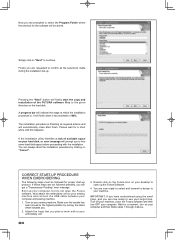
...Turn on your desktop to open the Futura software. Double click on the Futura Icon on your machine. IMPORTANT: If you have embroidered using the small hoop, and you are now ready to select and transmit a design to your sewing machine... abort the installation procedure by turning the Hand wheel towards you plan to your sewing machine and connect the USB cable between your computer. Next...
Instruction Manual - Page 104

... pour la jonction avec d'autres points Función de remate para terminación de otras puntadas.
104 The machine will continue to tie off of other stitches ( ) The sewing machine makes 4 tiny tacking stitches to sew in the pattern where the reverse/tacking stitch button is pushed. Needle stop position selector switch Touche de...
Instruction Manual - Page 110
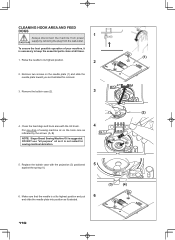
... by removing the plug from the wall-outlet. Make sure that the needle is not suited for removal.
3.
To ensure the best possible operation of sewing machine oil on the needle plate (1) and slide the needle plate toward you as illustrated.
(3)
(4)
110 Raise the needle to keep the essential parts clean at...
Instruction Manual - Page 112
... and lint before it is used frequently : It should be oiled periodically. Use of sewing machine oil to your machine.
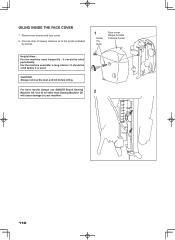
112 OILING INSIDE THE FACE COVER
1.
Remove two screws and face cover. 2. Put one drop of oil other than Sewing Machine Oil
2
will cause damage to the points indicated
by arrows.
1
Screw Vis Guia
Face...
Instruction Manual - Page 116
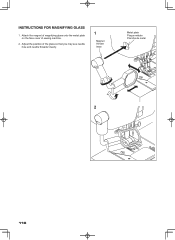
INSTRUCTIONS FOR MAGNIFYING GLASS
1. Adjust the position of sewing machine.
2. Attach the magnet of magnifying glass onto the metal plate on the face cover of the glass so that you may see needle hole and needle threader clearly.
1
Magnet Aimant Iman
Metal plate Plaque métale Plancha de metal
2
116
Instruction Manual - Page 118
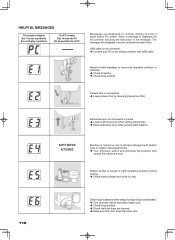
... lever is not connected. Connect your PC to the sewing machine with bobbin case or rotation interrupted forcibly. Turn off power switch and attach large hoop. Check hoop position. Check that
caused the machine to thread entangled with USB cable. USB cable is not lowered or raised. Lower buttonhole lever when sewing buttonholes. ...
Instruction Manual - Page 120
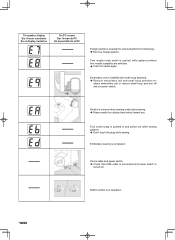
Twin needle mode switch is
turned on power switch.
Foot control plug is in and pulled out while sewing patterns. Don't touch the plug while sewing.
Check cable and power switch. Check that USB cable is connected and power switch is pushed, while patterns without twin needle capability are selected. Push the switch...
Instruction Manual - Page 124
... in the instruction manual." "IMPORTANT SAFETY INSTRUCTIONS"
"When using this sewing machine if it has a damaged cord or plug, if it is not working properly, if it has... in . "Never operate this sewing machine." "Do not operate where aerosol (spray) products are being administered." 8. "Switch the sewing machine off ("0") when making any opening." 6.
If the plug does not...
Similar Questions

I Get E7 Error Message On My Singer Model 7258 Sewing Machine. There Is No Refe
Error message E7 is up on my Singer Stylist model 7258 sewing machine. It is not working at all. I t...
Error message E7 is up on my Singer Stylist model 7258 sewing machine. It is not working at all. I t...
(Posted by ebellamybellamy9 5 years ago)

Ses2000
getting "connection error" check usb cable is connected and power switch on" all is correct but stil...
getting "connection error" check usb cable is connected and power switch on" all is correct but stil...
(Posted by hokeyhernandez 6 years ago)


Beeping From Singer Sewing Machine Stylist Ii 5625
My sewing machine will beep and stop sewing after three inches of sewing. I have taken it to be repa...
My sewing machine will beep and stop sewing after three inches of sewing. I have taken it to be repa...
(Posted by arusheria 9 years ago)

Bobbin Not Threading On Sears Superb 2010 Sewing Machine
I am having an issue with the bobbin not threading to meet the upper thread. I have threaded it on t...
I am having an issue with the bobbin not threading to meet the upper thread. I have threaded it on t...
(Posted by Bellaluna07 10 years ago)