Singer Futura Quartet SEQS-6000 Support Question
Singer Futura Quartet SEQS-6000 Support Question
Find answers below for this question about Singer Futura Quartet SEQS-6000.Need a Singer Futura Quartet SEQS-6000 manual? We have 1 online manual for this item!
Question posted by darmarie77 on April 25th, 2014
How To Attack H Edge Guide To Walking Foot
The person who posted this question about this Singer product did not include a detailed explanation. Please use the "Request More Information" button to the right if more details would help you to answer this question.
Current Answers
Related Singer Futura Quartet SEQS-6000 Manual Pages
Instruction Manual - Page 2

... damaged, or dropped into water. "Switch the sewing machine off („0") position, then remove plug from outlet." 11.
SINGER and FUTURA QUARTET are being administered." 10. All rights reserved. ...it unattended, unplug the appliance before
servicing. Unplug the foot controller of the sewing machine and foot control free from the electric
outlet immediately after using and ...
Instruction Manual - Page 3
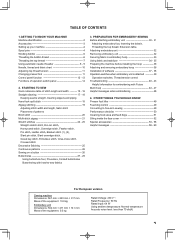
...face cover 52 Special accessories 53 - 58 Helpful messages 59 - 60
For European version
Sewing machine Dimensions: 567 mm × 240 mm × 317 mm Mass of the equipment:... Decorative Stitching 25 Continuous patterns 26 Sewing on a button 26 Buttonholes 27 - 29
Using buttonhole foot, Procedure, Corded buttonholes Buttonholing with Futura Multi hoop 44 - 47 Helpful messages when embroidering ...
Instruction Manual - Page 4

GETTING TO KNOW YOUR MACHINE
MACHINE IDENTIFICATION
2
1
8
1. Bobbin winder latch 10. Power/light switch
15. Presser foot lifter
12
19. Thread guide
13
16
21. Twin thread guide
22. Needle clamp screw
29. Accessory drawer 38. Inner frame
22
23
24
37
38 39
28 29 30 31
43. Cord socket 16. Identification ...
Instruction Manual - Page 5

...
14
15
17
18
20
21
22
23 3 ACCESSORIES
FOR SEWING MACHINE
1. Needles
2. Thread spool net (short)
The Foot that comes on your
7
Sewing machine is another
12
very useful foot and should be sure they are accessed via your
sewing. Vinyl bag 20. To install the FUTURA software, refer to your computer software communicates designs to the...
Instruction Manual - Page 6

... with a spool cap to wipe off any surplus oil from needle plate area before using sewing machine only.
VERTICAL SPOOL PIN for normal thread spool
Place thread spool on the pin and secure with or without the foot control (see page 14). Spool
Felt disc
Vertical spool pin
Thread retaining slit
Spool pin...
Instruction Manual - Page 10

... its highest position before threading.
1
Thread guide
1. Don't pull thread with strong force or thread may be broken. Make sure that
the machine be set for the needle being used,... threading, it gently by hand.
6. Thread the machine with your right hand. USING AUTOMATIC NEEDLE THREADER
Be sure to raise the presser foot lifter and raise the needle to particular qualities of ...
Instruction Manual - Page 11

Felt disc
If the threading hook is deviated from needle hole,
adjust the position of sewing machine oil onto the felt disc,
if the machine is used after a long interval. 5
HELPFUL SUGGESTIONS: Put a drop of the hook using a small screw
6
driver.
If the threading hook cannot catch thread, adjust the vertical position by bending the twin thread guide.
9
Instruction Manual - Page 15
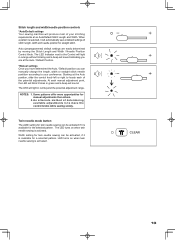
... manually change the length, width or straight stitch needle postition according to move the control knobs while sewing slowly. Stitch length and width/needle position controls
*Auto/Default settings Your sewing machine will produce most of your preference.
NOTES: 1. Auto (preprogrammed) default settings are at the Auto position, slide the control knob left...
Instruction Manual - Page 16
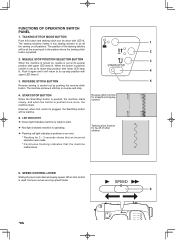
... shows that an incorrect operation was made. * Continuous flashing indicates that the machine malfunctions. SPEED CONTROL LEVER
Sliding the lever sets desired sewing speed. REVERSE STITCH BUTTON
5
Reverse sewing is used, the lever serves as a top speed limiter.
6
14 When foot control is carried out by pushing the reverse stitch button.
The position of...
Instruction Manual - Page 19
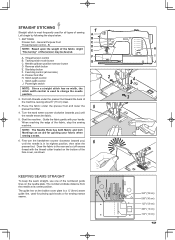
.../stop the sewing machine. Stitch width control J. Place the fabric under the presser foot toward you ) until the needle is in its center position. When reaching the edge of
3
the machine, leaving about 6" (15 cm) clear.
3.
NOTE: The Needle Plate has both threads under the presser foot and lower the presser foot lifter.
5
4.
The guide line on the...
Instruction Manual - Page 22

... blind stitch for normal fabrics
- If it does
not, adjust the guide (B) on the right side of the fabric. B A
Sew slowly, guiding the fabric carefully along the edge of the fabric. Blind Hem Foot :Thread tension control - Regular blind stitch for soft, stretchable fabrics
1
2
Medium to heavyweight fabric
1. It should just pierce the fold of...
Instruction Manual - Page 40
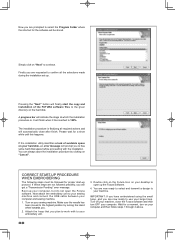
...: If you have embroidered using the small hoop, and you are requested to confirm all required actions and will automatically close the Futura software and then turn on your sewing machine. Now you are prompted to select the Program Folder where the shortcut for the software will be followed for proper start the...
Instruction Manual - Page 52
... bent or blunt. - Shorten
stitch length. (see page 49). Guide it gently. * Needle size is being pulled or pushed against machine feeding
action. -
Raise buttonhole lever. (see page 10). * Needle is not lowered when sewing buttonhole.
- Replace needle. (see page 51). STITCHING PROBLEMS Machine skips stitches. * Needle is not all the way up into...
Instruction Manual - Page 53
....
2
2.
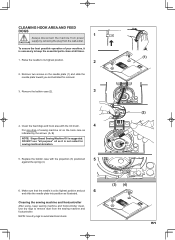
Remove two screws on the hook race as it is not suited for removal.
3. Remove the bobbin case (2).
3
4. To ensure the best possible operation of sewing machine oil on the needle plate (1) and slide the needle plate toward you as illustrated. Clean the feed dogs and hook area with the projection (3) positioned...
Instruction Manual - Page 54
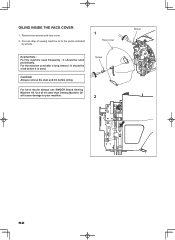
... before it is used after a long interval : It should be oiled before oiling.
For best results always use SINGER Brand Sewing Machine Oil.
Screw
2
Screw
52 For the machine used . Put one drop of oil other than Sewing Machine Oil will cause damage to the points indicated
by arrows.
1
Face cover
Helpful Hints : For the...
Instruction Manual - Page 55
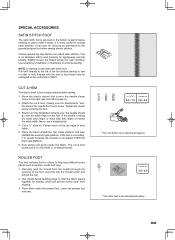
... rollers to help feed difficult-to-sew fabrics such as an alternative to the general purpose foot when sewing stretch stitches. Cut a ½" wide by 1"deep notch at the top edge of stabilizer or interfacing to avoid puckering. Place fabric under and behind the foot. 2. Lower the presser foot and sew.
5.0 - 7.0 2.0 - 4.5 * The cut & hem works best if...
Instruction Manual - Page 56
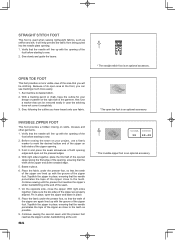
... zipper's slider, backstitching at the creased edge. 5. OPEN TOE FOOT
This foot provides a more easily. 1. With right sides together, make sure the two sides of the zipper close to the teeth as chiffon and silk. It will line up with the groove of the zipper foot. Sew slowly and guide the layers. Hint: Use a marker that...
Instruction Manual - Page 57

... with stabilizer.
4.
Place the fabric under the cording foot, so it runs through the foot's center groove. The fabric edge is used for a total of ¼" of the machine so that it runs in the overcasting foot. Note: Do not sew in the foot. Lower fabric and continue to sew straight, so avoid curves and sharp turns.
1. Hint...
Instruction Manual - Page 58
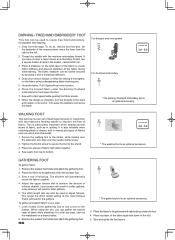
... , the more tensions will result in conjunction with the machine embroidery thread. Sew seam from the right to the left.
2.
Sew a row of the fabric right side down in sewing pile types of the exposed area, move the lever from top to bottom.
3.0 - 5.0 * The walking foot is complete, pull the threads to the back and neaten...
Instruction Manual - Page 59

... the effect on your machine.
* The pintuck foot is an optional accessory.
* The edge guide (quilting bar) is best utilized when paired with both threads. Hint: The firmer and heavier the fabric, the higher the upper thread tension.
5. The grooves also help guide you need the additional spool pin from the sewing machine's standard accessories.
3. A cord can...
Similar Questions

Machine Stops After 5 Stitches. Error Message 0.1. Nothing In Bobbin Area. Pleas
machine stitches 5 stitches and stops with error code 0.1. Nothing in bobbin ca
machine stitches 5 stitches and stops with error code 0.1. Nothing in bobbin ca
(Posted by barfar224 2 years ago)

Walking Foot
please can you tell me if a walking foot can be used on this machine. im thinking of upgrading and d...
please can you tell me if a walking foot can be used on this machine. im thinking of upgrading and d...
(Posted by ashboxannie 9 years ago)

Thread Guide Has Come Off My Singer Seqs 6000 Embroidery/sewing Machine.
I cannot figure out how to get the thread guide back on. It came off when the part that holds the ne...
I cannot figure out how to get the thread guide back on. It came off when the part that holds the ne...
(Posted by sharonrn 9 years ago)
Walking Foot Problems When Installing
My walking foot seems to be causing me to break needles. I have broken three since I installed it. T...
My walking foot seems to be causing me to break needles. I have broken three since I installed it. T...
(Posted by Lynstunes 9 years ago)
Where Can I Buy The Foot Control For My Singer Futura 4-n-1 Seqs-6000?
(Posted by zipitwyn 11 years ago)