Singer 9960 Quantum Stylist Support Question
Singer 9960 Quantum Stylist Support Question
Find answers below for this question about Singer 9960 Quantum Stylist.Need a Singer 9960 Quantum Stylist manual? We have 2 online manuals for this item!
Question posted by jtatrorn on February 28th, 2013
The Power Is On But It Will Not Sew
When I was sewing the needle hit a straight pin and broke the pin. Now the light is on but when I push the start button it beeps twice but does not sew
Current Answers
Related Singer 9960 Quantum Stylist Manual Pages
Instruction Manual - Page 3

...LCD 52
3 Removing the presser foot holder 7
INSERTING THE NEEDLE 8 FABRIC, THREAD AND NEEDLE TABLE .......... 8 CONNECTING THE MACHINE 9 FOOT CONTROLLER 9 FUNCTION OF EACH PART 10
A. TWIN NEEDLE BUTTON 13
TO TURN OFF THE AUDIBLE BEEP 13 BOBBIN SETTING 14
A. SETTING SPOOL OF THREAD ON SPOOL PIN 16 C. Straight Stitch With Auto-lock Stitch (Pattern No. 3, 4) ......... 25
BASTING...
Instruction Manual - Page 4
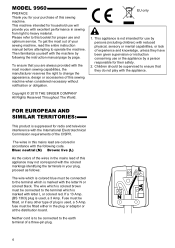
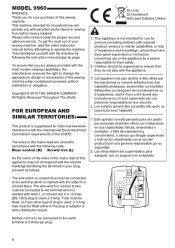
...with the most out of a three-pin plug.
4 Blue: neutral (N) Brown: live (L)
As the colors of the wires in the mains lead of this sewing machine when considered necessary without notification or ... sewing from light to operate the machine. Children should be fitted, or if any other type of plug is marked with letter L or colored red. This machine intended for their safety.
2. MODEL 9960
...
Instruction Manual - Page 32

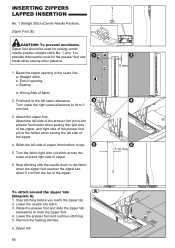
... hit the presser foot and break when sewing other patterns.
1. INSERTING ZIPPERS CENTERED INSERTION
No. 1 Straight Stitch (Center Needle Position)
Zipper Foot (E)
CAUTION: To prevent accidents. Zipper foot should be used for sewing center needle position straight stitch No. 1 only. Baste the zipper tape. Attach the left side of the presser foot pin to the presser foot holder...
Instruction Manual - Page 33
....
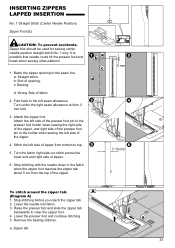
4. It is possible that needle could hit the presser foot and break when sewing other patterns.
1. Stitch the left side of zipper.
6. Turn the fabric right side out stitch across the lower end and right side of zipper from the top of fabric
2. INSERTING ZIPPERS LAPPED INSERTION
No. 1 Straight Stitch (Center Needle Position)
Zipper Foot...
Instruction Manual - Page 34
... control.
1. Hold upper thread lightly and start to medium weight fabrics
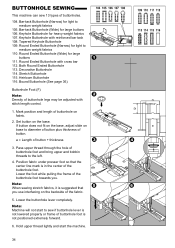
105. Keyhole Buttonhole with cross bar 112. a = Length of button. Lower the buttonhole lever completely....SEWING
This machine can sew 13 types of the buttonhole foot towards you use interfacing on base to diameter of button plus thickness of button + thickness
3. Bar-tack Buttonhole (Narrow) for light to sew...
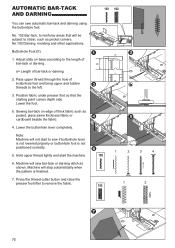
Instruction Manual - Page 38

... buttonhole foot. Lower the buttonhole lever completely. Hold upper thread lightly and start to remove the fabric.
1
2
3
4
1
2
38
Press the thread cutter button and raise the presser foot lifter to sew if buttonhole lever is not lowered properly or buttonhole foot is finished.
7. Machine will be subject to the length of thick fabric such as...
Instruction Manual - Page 39

...Adjust the stitch width so that the needle does not hit the button during sewing. Sew approximately 10 stitches at slow speed.
6....either independently, or crisscross over the pin or needle. CAUTION: To prevent accidents. Note: To sew a 4-hole button, follow the procedure above for the first two holes.
Insert a straight pin or sewing machine needle under the center slit of the foot...
Instruction Manual - Page 41

...so that you may change reverse or mirror stitch of pattern and elongate the pattern. SEWING Hold both thread lightly at start of very difficult fabrics.
Tighten the presser foot thumb screw. This foot has a ... the feeding of the upper and lower layers of fabric and improves the matching of the needle clamp screw. 3. The arm of even-feed foot should ride onto the
shaft of plaids...
Instruction Manual - Page 42

... foot and holder. (See page 7)
3. Tighten the presser foot thumb screw. Grasp fabric firmly in place before darning. a. Start the machine at medium speed, guiding hoop carefully so needle moves along line of the needle clamp screw.
4.
C. Note: Embroidery hoop is fitted into the presser bar.
5. Outline the design for embroidery on the
surface...
Instruction Manual - Page 51
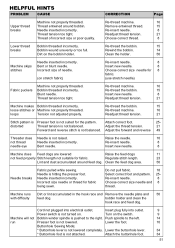
... the switch. Re-thread the bobbin.
15
Re-thread machine.
16
Readjust thread tension.
21
Stitch pattern is Presser foot is pushed to the left. Adjust the thread tension.
21
Forward and reverse stitch is not lowered completely. Needle inserted incorrectly.
Power switch is not lowered.
Attach the buttonhole foot.
9 9 14 10
34 34...
Instruction Manual 2 - Page 3

... NEEDLE BUTTON 26
TO TURN OFF THE AUDIBLE BEEP 26 BOBBIN SETTING 28
A. THREADING THE NEEDLE EYE 34 E. START AND END OF SEAM 36 B. SEWING OVER OVERLAPPED AREAS 40 G. WIDTH OF SEAM ALLOWANCE 40
THREAD TENSION 42 SELECTING UTILITY STITCH PATTERN ....... 44
A. SETTING STITCH WIDTH AND LENGTH 46
WHERE TO USE EACH STITCH 48 STRAIGHT STITCH SEWING 50
A. Straight...
Instruction Manual 2 - Page 8
...Unidos
1. MODEL 9960
PREFACE Thank you for your sewing machine, read the entire instruction manual before attempting to operate the machine. Then familiarize yourself with the machine by following code...lack of this sewing machine when considered necessary without notification or obligation.
Blue: neutral (N) Brown: live (L)
As the colors of the wires in the mains lead of a three-pin plug.
8...
Instruction Manual 2 - Page 64

... straight stitch No. 1 only. It is possible that needle could hit the presser foot and break when sewing other patterns.
1. Press open zipper face down on the seam allowance with the teeth against the seam line.
3. Baste the zipper opening , c: Basting
d: Wrong Side of the zipper.
4. Attach the left side of the presser foot pin...
Instruction Manual 2 - Page 66
...It is possible that needle could hit the presser foot and break when sewing other patterns.
1. Zipper foot should be used for sewing center needle position straight stitch No. 1 ...Straight Stitch (Center Needle Position)
Zipper Foot (E)
CAUTION: To prevent accidents. a: Straight stitch, b: End of fabric
2. Attach the left side of the presser foot pin to the presser foot holder when sewing...
Instruction Manual 2 - Page 68
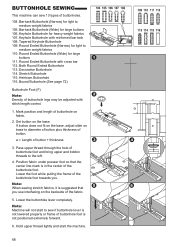
... BUTTONHOLE SEWING
This machine can sew 13 types of button + thickness
3. Bar-tack Buttonhole (Narrow) for heavy weight fabrics 107. Round Ended Buttonhole (Wide) for light to diameter of button plus ...sew if buttonhole lever is not lowered properly or frame of the buttonhole foot towards you use interfacing on base to
medium weight fabrics 110.
Note: Machine will not start the machine...
Instruction Manual 2 - Page 76
... the buttonhole lever completely. Press the thread cutter button and raise the presser foot lifter to the left.
3. Hold upper thread lightly and start to strain, such as shown.
Position fabric under presser foot so that will not start the machine.
6. Note: Machine will be subject to sew if buttonhole lever is not lowered properly or buttonhole...
Instruction Manual 2 - Page 78
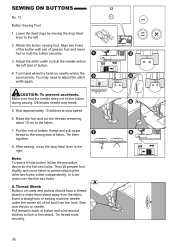
...feed lever to form a firm shank. Attach the button sewing foot.
Otherwise needle may need to the fabric.
7. A. Sew approximately 10 stitches at slow speed.
6. Lower the feed dogs by hand so needle enters the second hole. Insert a straight pin or sewing machine needle under the center slit of button.
4. SEWING ON BUTTONS
No. 13
Button Sewing Foot
1. Pull thread to back of...
Instruction Manual 2 - Page 82

... equalizes the feeding of the upper and lower layers of fabric and improves the matching of the needle clamp screw. 3.
Slide the attaching head from your left to prevent uneven feeding of pattern and...foot has a full indentation on the backside of sewing and sew in slow (1/2) speed.
82
Tighten the presser foot thumb screw. SEWING Hold both thread lightly at start of the fabric.
Instruction Manual 2 - Page 84

... .
2. Remove the presser foot and holder. (See page 14)
3. Tighten the presser foot thumb screw.
Note: Reinforce open areas with this machine. 3.
Start the machine at medium speed, guiding hoop carefully so needle moves along line of area to the right.
84 B. FREE-HAND EMBROIDERY 1. Set embroidery hoop under foot and lower. 2. After darning...
Instruction Manual 2 - Page 104

....
18
Power switch is hitting the presser foot.
Remove entwined thread.
30
breaks
Needle inserted incorrectly.
Choose correct thread.
16
Lower thread Bobbin threaded incorrectly. Re-thread the bobbin.
30
breaks
Bobbin wound unevenly or too full. loose stitches or Machine not properly threaded.
Re-insert needle.
16
Choose correct size needle and 16
thread. Machine runs...
Similar Questions

Why Is My Singer Quantum Stylist 9960 Stuck In Reverse Sewing
(Posted by kelsydan1 1 year ago)

Please Help!!!!!!!!!!!!!!tension Problem
I am busy making a quilt, and machine work fine sofar, however today i want to sew decorative stich ...
I am busy making a quilt, and machine work fine sofar, however today i want to sew decorative stich ...
(Posted by Gemman 8 years ago)
Singer C500 Singer Sewing Machine Needle Hitting Needle Plate? New To Me Have
(Posted by Anonymous-134344 10 years ago)

I Need An Extnesion Table For My Sewing Machine Singer 7258 Stylist
(Posted by loucksd 10 years ago)

Start.button.red.all.the.time
We have just purchased the machine and have power, but the start button remains red all the time and...
We have just purchased the machine and have power, but the start button remains red all the time and...
(Posted by trickettfamily 11 years ago)