Singer 5625 Stylist II Sewing Machine Support Question
Singer 5625 Stylist II Sewing Machine Support Question
Find answers below for this question about Singer 5625 Stylist II Sewing Machine.Need a Singer 5625 Stylist II Sewing Machine manual? We have 1 online manual for this item!
Question posted by Anonymous-134344 on April 14th, 2014
Singer C500 Singer Sewing Machine Needle Hitting Needle Plate? New To Me Have
The person who posted this question about this Singer product did not include a detailed explanation. Please use the "Request More Information" button to the right if more details would help you to answer this question.
Current Answers
Related Singer 5625 Stylist II Sewing Machine Manual Pages
Instruction Manual - Page 2
... Canada only)
Use Model YC-485 EC or Model JF-1000 with a damaged needle plate as this sewing machine from the electric
outlet immediately after using and before
servicing.
Do not modify the ...sewing machine with any maintenance." "To disconnect, turn switch to the nearest authorized dealer or service center for use of The Singer Company Limited or its affiliates. ©2010 The Singer...
Instruction Manual - Page 5
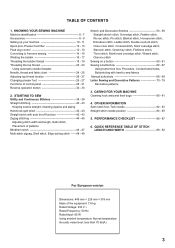
... KNOWING YOUR SEWING MACHINE Machine identification 6 - 7 Accessories 8 - 9 Setting up your machine 10 - 11 Spool pins, Presser foot lifter 12 - 13 Feed dog control 12 - 13 Converting to -sew fabrics Manual buttonhole 68 - 69 Letter Sewing and Decorative Patterns 70 - 79 Decorative patterns
3. OTHER INFORMATION Satin stitch foot, Twin needle 82 - 83 Straight stitch needle position 84...
Instruction Manual - Page 8

KNOWING YOUR SEWING MACHINE
MACHINE IDENTIFICATION
1. Threading lever 5. Face cover 6. Bobbin winder stop 10. Hand wheel 14. Identification plate 17. Feed dog control 19. Needle clamp screw 29. Bobbin winder shaft 9. Power/light switch 15. Cord socket 16. Buttonhole lever 20. Bobbin cover plate 25. General purpose foot 30. Needle plate 32. Bobbin cover release button 33. ...
Instruction Manual - Page 10

... feed foot 23. Pintuck foot 25. Spool pin felt discs (2) 5. Zipper foot 11. Wing needles
The Foot that comes on your Sewing machine is another very useful foot and should be used for needle plate 10. Cording foot 21. Gathering foot 24. Open toe foot 27. Spool pin cap (large) 8. Buttonhole opener/brush/seam ripper...
Instruction Manual - Page 12
... moteur/lumière "ON" Interruptor corriente/luz "ON"
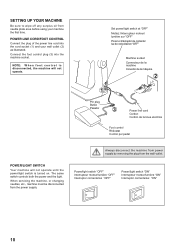
10 SETTING UP YOUR MACHINE
Be sure to wipe off any surplus oil from needle plate area before using your wall outlet (2) as illustrated. When servicing the machine, or changing needles, etc., machine must be disconnected from the wall-outlet.
Power line cord/FOOT CONTROL
Connect the...
Instruction Manual - Page 14
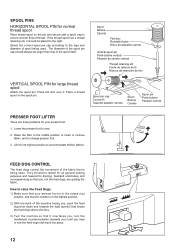
...is in the highest position.
2) With the back of the machine facing you, push the feed dog lever down and towards the right (...into place.
12 They should be larger than that the needle is being used. The diameter of spool being sewn.
Raise the...has a thread retaining slit, it should always be raised for all general sewing purposes and lowered for your presser foot is in the raised (up)...
Instruction Manual - Page 20

... on top of the bobbin, pull the
5
thread until it is snipped with
cutter on the needle plate until it stops in the slot (B). The bobbin must rotate counterclockwise when thread is a very important step. NOTE: Sewing can be started without picking up sufficiently to
2
allow you pull the thread.
3
NOTE: This is...
Instruction Manual - Page 26
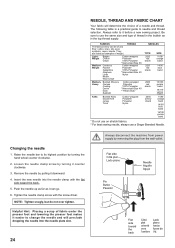
...turning the hand wheel counter clockwise.
2. Be sure to use a Singer Branded Needle. Corduroy Weight Flannel
Gabardine Gingham Linen Muslin Wool Crepe
Cotton-wrapped ...sewing results, always use the same size and type of a needle and thread.
Remove the needle by turning it can be of weight.
Insert the new needle into the needle plate slot.
24
Always disconnect the machine...
Instruction Manual - Page 28
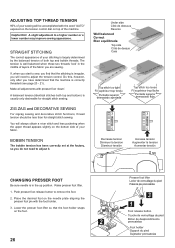
...the factory, so you have determined that the foot holder snaps
on top of the machine.
Push presser foot release button to adjust it.
A balanced tension (identical stitches both...on the needle plate aligning the
presser foot pin with presser foot 'down'. Raise presser foot lifter. 1. ADJUSTING TOP THREAD TENSION
90% of your sewing will be less than for straight stitch sewing. Helpful...
Instruction Manual - Page 30
...
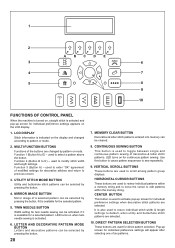
FUNCTIONS OF CONTROL PANEL
When the machine is turned on, straight stitch is selected and pop-up screen for individual preference settings appears on when twin needle sewing is activated.
6. Function 1 (Button A to E) - Function 3 (Button A) - MIRROR IMAGE BUTTON
Mirror image of decorative & letter stitch patterns. CONTINUOUS SEWING BUTTON
This button is also used to...
Instruction Manual - Page 32
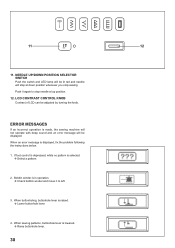
...red and needle will be adjusted by turning the knob. When an error message is lowered. Raise buttonhole lever.
30 Bobbin winder is made, the sewing machine will ...not operate with beep sound and an error message will stop sewing.
When buttonholing, buttonhole lever is selected. Select a...
Instruction Manual - Page 34

... for tie-off of other stitches ( ) The sewing machine makes 4 tiny tacking stitches to tie off the sewing pattern to avoid raveling at the exact spot in reverse as long as the reverse button is pushed.
The position of the tacking stitches will continue to sew in the pattern where the reverse/tacking stitch...
Instruction Manual - Page 36
...61664;
(1)
(2) (3)
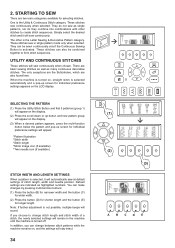
ABCDE When the machine is turned on the display.
(2) Press the scroll down or up button and new pattern group will remain in single pattern mode only ...and needle position. One is the Letter Sewing & Decorative Pattern category. These stitches sew in the machine until the machine is turned off. Note: If further adjustment is activated. STARTING TO SEW
...
Instruction Manual - Page 38
... pressing the mirror image button, if the mirror image icon appears on the display. Doing so will reduce the stitch width automatically and save broken needles and possible damage to normal sewing mode.
36 MIRROR IMAGE SETTING
Mirror image of a selected pattern can be selected by pressing the twin...
Instruction Manual - Page 42
... toward the back of the machine, leaving about 6" (15cm) clear.
3. C
2
4
3
NOTE: The Needle Plate has both threads under the presser foot and lower the presser foot lifter.
5
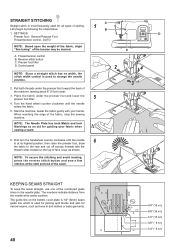
4. KEEPING SEAMS STRAIGHT
To keep the seam straight, use one of the fabric, stop the sewing machine. The numbers indicate distance from the needle at its highest position, then...
Instruction Manual - Page 44
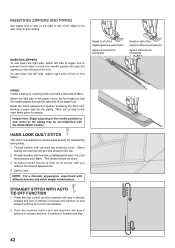
... right side of the zipper foot to the foot holder so that the needle passes through the right side of foot to foot holder.
When
sewing the machine will sew 4 stitches in reverse and then 4 stitches in reverse and continue to sew forward until you
acheive the desired appearance. 4. Increase thread tension a little bit at...
Instruction Manual - Page 46
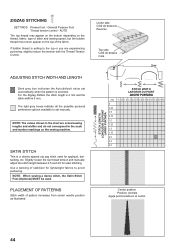
... Use a backing of stitch and sewing speed, but the bobbin thread must never appear on the sewing machine. AUTO
The top thread may appear... automatically when the pattern is pulling to the scale and number markings on the top of pattern increases from center needle position as illustrated.
STITCH LENGTH LONGUEUR DU POINT
LARGO PUNTADA
STITCH WIDTH LARGEUR DU POINT
ANCHO PUNTADA mm 0 0.5...
Instruction Manual - Page 54
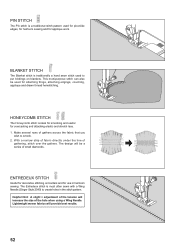
... gathers across the fabric that you
wish to create holes in heirloom sewing.
Make several rows of the hole when using a Wing Needle. With a narrow strip of fabric directly under the line of small... diamonds. The Entredeux stitch is most often sewn with a Wing Needle (Singer Style 2040) to smock. 2. HONEYCOMB STITCH
The Honeycomb stitch is ideal for smocking and...
Instruction Manual - Page 82
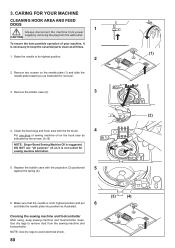
... needle plate toward you as illustrated. Replace the bobbin case with the lint brush.
4
Put one drop of your machine, it is at all times.
(1)
1. Use dry rags to keep sewing machine and footcontroller clean. CARING FOR YOUR MACHINE
CLEANING HOOK AREA AND FEED DOGS
1
Always disconnect the machine from power CAUTION supply by the arrows. (A, B)
NOTE: Singer...
Instruction Manual - Page 84

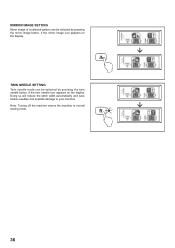
... foot to the back of stabilizer or interfacing to the General Purpose Foot when sewing stretch stitches. TWIN NEEDLE
A twin-needle produces two rows of the twin needle breaking. 2.
Always select the Twin Needle Mode prior to normal sewing mode. Check with your Singer retailer.
This will preclude any possibility of parallel stitches for pin tucks, double...
Similar Questions

Needle Hitting The Plate
Hi, please l have singer 3221 and it's giving me problems off late. The needle keeps hitting the pla...
Hi, please l have singer 3221 and it's giving me problems off late. The needle keeps hitting the pla...
(Posted by thessyobeng80 1 year ago)

My Machine Keeps Breaking Needles. It Is Hitting The Plate
(Posted by Jaihill 4 years ago)

Beeping From Singer Sewing Machine Stylist Ii 5625
My sewing machine will beep and stop sewing after three inches of sewing. I have taken it to be repa...
My sewing machine will beep and stop sewing after three inches of sewing. I have taken it to be repa...
(Posted by arusheria 9 years ago)
