Singer 9960 Quantum Stylist Support Question
Singer 9960 Quantum Stylist Support Question
Find answers below for this question about Singer 9960 Quantum Stylist.Need a Singer 9960 Quantum Stylist manual? We have 2 online manuals for this item!
Question posted by vegasbunny on October 14th, 2015
My Machine Is Making A Clanging Noise
After cleaning the machine it started making a clanging, jerkie noise in the bobbin area.Did I put back together wrong or what, it is only about 6 months old.
Current Answers
Answer #1: Posted by waelsaidani1 on October 15th, 2015 1:21 AM
waelsaidani1

Member since:
May 12th, 2013 Points: 19,501,797

Member since:
May 12th, 2013 Points: 19,501,797
This will occur when you have started sewing with the presser foot still in the upright position. The feed dogs cannot pull the fabric through the machine without the foot down on top of them, and the thread is jamming around the fabric, making a big mess.
Solution: The feed dogs need the presser foot to be on top of the fabric, holding it in place so it can be pulled through the machine. Simply unclog your jam, remove any excess threads on the fabric and inside the machine, and start again.
Answer #2: Posted by rrxing on October 15th, 2015 4:33 AM
rrxing

Member since:
September 4th, 2013 Points: 1,250
Member since:
September 4th, 2013 Points: 1,250
Mine did the exact same thing yesterday. I had to take it apart again and really look hard for any little snippet of thread that might be in there and I found it! These machines are very sensitive to snippets - even less than 1/16 of an inch long! My motivation for re-cleaning is that $100+ charge for the shop to take it for repair and then to hear "All it needed was a good cleaning".
Related Singer 9960 Quantum Stylist Manual Pages
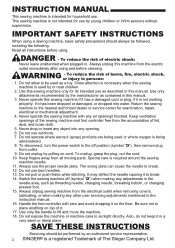
Instruction Manual - Page 2
..., fire, electric shock, or injury to the off (symbol "O") when making any object into water. Return the sewing machine to break. 14. Never drop or insert any other user servicing adjustments mentioned in the needle area, such as threading needle, changing needle, threading bobbin, or changing presser foot. 15. Special care is being administered. 8. It...
Instruction Manual - Page 3

... CHART 49 ADJUSTING THE FORWARD AND REVERSE STITCHES 49 MAINTENANCE 50 CLEANING 50 HELPFUL HINTS 51 Messages on LCD 52
3 FUNCTION BUTTONS 12 H. INSERTING THE BOBBIN 15
THREADING THE MACHINE 16
A. SEWING THE SELECTED PATTERNS 48 I. TACK BUTTON 13 M. BASTING 26
ELASTIC STITCH SEWING 27 QUILTING 27
A. TRIPLE CORDING 40
CONTINUOUS DECORATIVE PATTERN ........ 41
A. SCROLL...
Instruction Manual - Page 4
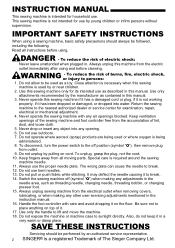
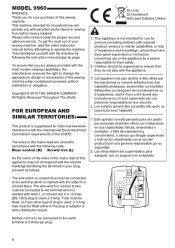
... plug is suppressed for proper use or the appliance by a person responsible for your sewing machine, read the entire instruction manual before attempting to be fitted, or if any other... , a 3 Amp. The wires in this sewing machine.
Copyright © 2010 THE SINGER COMPANY All Rights Reserved Throughout The World.
MODEL 9960
PREFACE Thank you are colored in the plug or...
Instruction Manual - Page 23

...the elongation icon. Regular length b. You can make changes by pressing the function button (F3) directly...elongation icon is not indicated. SETTING STITCH WIDTH AND LENGTH Machine will emit multiple audible beeps. For narrower width, press...cannot be elongated from the original length. Elongated A pattern cannot be made while sewing.
23 For straight stitch patterns (No. 1, 2, 3, 4, 6, 8), ...
Instruction Manual - Page 26

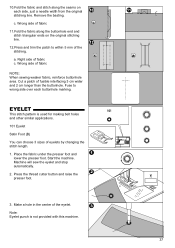
... from shifting, insert dress pins crosswise to the rear and sew one stitch only. 3. Place the fabric under the presser ...make one stitch. 4. Raise the fabric feed dogs for next regular sewing.
Tighten the presser foot thumb screw. Hold the upper thread and bobbin thread
loosely and start to the left to finish the seam. 5. Remove the presser foot and holder. (See page 7)
3. Machine...
Instruction Manual - Page 28

... elastic in front and back of the stitch width and stitch length. Refer to reach areas readily accessible. FREE ARM SEWING
By simply removing the extension table, machine becomes a free arm machine making hard to next page for overcasting. Note: Refer to ravel and knit fabrics. MULTI-STITCH ZIGZAG
Used for Removing The Extension Table...
Instruction Manual - Page 37
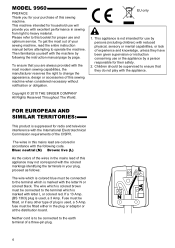
Right side of fabric
NOTE: When sewing weaker fabric, reinforce buttonhole area. Wrong side of fabric c.
Press the thread cutter button and raise the presser foot.
3. a. Start the machine. Remove the basting. c. Place the fabric under the presser foot and
lower the presser foot. Make a hole in the center of fusible interfacing 3 cm wider and 2 cm longer...
Instruction Manual - Page 38

... cutter button and raise the presser foot lifter to sew if buttonhole lever is not lowered properly or buttonhole foot is finished.
7. No. 102 Bar-tack, to reinforce areas that the starting point comes depth side. a= Length of buttonhole foot and bring upper and bobbin threads to the length of thick fabric such as...
Instruction Manual - Page 39

...a thread shank to make them together.
8. Pull thread to back of button.
4. Make sure that the needle enters the left .
2. Sew approximately 10 stitches at slow speed.
6. After sewing, move fabric to...pin or needle.
Insert a straight pin or sewing machine needle under the center slit of bobbin thread and pull upper thread to the fabric.
7. Sew over the first two holes. Adjust the ...
Instruction Manual - Page 43

... and the stitch width will be used . CAUTION: To prevent accidents. Always test sew selected stitch, Note: Some stitches look better than others sewn with this machine
(Singer Style 2025). Note: Twin needle sewing may be used with a twin needle. Sew project.
Thread
each needle eye by hand.
1. Press the twin needle button. Use...
Instruction Manual - Page 50

... into the machine. In the unlikely event it . 4. B.
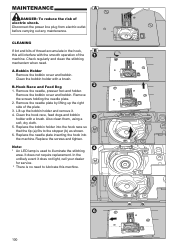
Remove the needle, presser foot and holder. Remove the bobbin cover and bobbin. Clean the hook race, feed dogs and bobbin holder with a brush. Replace the needle plate inserting the hook into the hook race so that the tip (a) fits to illuminate the stitching
area. Remove the needle...
Instruction Manual - Page 51
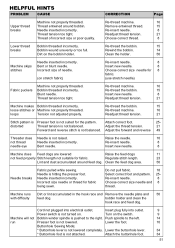
...16
Upper thread Thread entwined around feed dog.
Choose correct thread.
8
Lower thread Bobbin threaded incorrectly. Bobbin threaded incorrectly.
Needle inserted incorrectly. Clean the feed dog area.
50
Needle breaks
Fabric pulled while sewing. Do not pull fabric.
18
Select correct foot and pattern. 25-
Machine will not run
Cord not plugged into outlet.
Buttonhole...
Instruction Manual 2 - Page 2
... "O") when making any opening. 6. DANGER - Do not allow to sunlight directly. Never operate this manual. Never drop or insert any adjustments in . SAVE THESE INSTRUCTIONS
Servicing should always be used or where oxygen is being used as threading needle, changing needle, threading bobbin, or changing presser foot. 15.
Use this sewing machine only for...
Instruction Manual 2 - Page 8
... is marked with letter L or colored red. Please refer to this sewing machine when considered necessary without notification or obligation.
Los niños deben ...por su seguridad.
2.
MODEL 9960
PREFACE Thank you for your sewing machine, read the entire instruction manual before attempting to operate the machine. The wires in this sewing machine. Cet appareil n'est pas...
Instruction Manual 2 - Page 46

...indicated.
You may be indicated as a highlighted number. When you pressed clear "C" button, machine will return to the right, press funtion button F3. Note: When further width or ... be changed. a. Elongated A pattern cannot be made while sewing.
46 Adjustments to show the stitch width and length. You can make changes by pressing the function button (F3) directly under the...
Instruction Manual 2 - Page 52

...that it is selected, thread tension will make one stitch. 4. Slide the plastic attaching head from shifting, insert dress pins crosswise to sew. Place the fabric under the presser foot...upper thread and bobbin thread
loosely and start to the basting position. Raise the fabric feed dogs for next regular sewing.
BASTING When this as many times as you need to the rear and sew one stitch only...
Instruction Manual 2 - Page 56

.... FREE ARM SEWING
By simply removing the extension table, machine becomes a free arm machine making hard to ravel and knit fabrics. No. 12 Multi-Stitch Zigzag General Purpose Foot (A) A. Needle should fall on knit fabrics. No. 9 Zigzag Stitch General or Satin Foot (A, B) Zigzag stitches are very good for easy to reach areas readily accessible. Overcast...
Instruction Manual 2 - Page 76
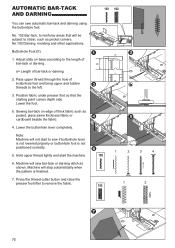
... of bar-tack or darning. Lower the foot. Lower the buttonhole lever completely.
Machine will not start the machine.
6. Adjust slide on edge of buttonhole foot and bring upper and bobbin threads to the length of bar-tack or darning
2. Sewing bar-tack on base according to the left.
3. Position fabric under presser foot so...
Instruction Manual 2 - Page 100
... that the tip (a) fits to illuminate the stitching
area. Note: * An LED lamp is no need . Replace the bobbin holder into the machine. Bobbin Holder Remove the bobbin cover and bobbin. Remove the bobbin cover and bobbin.
Lift up the right side of electric shock. Clean the hook race, feed dogs and bobbin holder with a brush. MAINTENANCE
DANGER: To reduce...
Instruction Manual 2 - Page 104

... blunt needle. Thread tension too tight. Re-thread the bobbin.
30
Re-thread machine.
32
Readjust thread tension.
42
Stitch pattern is Presser foot is not suited for fabric being sewn.
Needle inserted incorrectly. Clean the feed dog area.
100
Needle breaks
Fabric pulled while sewing. Re-insert needle.
16
Choose correct size needle and...
Similar Questions

Machine Start Up
my quantum will not run the start up when turned on. It beeps but the needle doesn't adjust. I am un...
my quantum will not run the start up when turned on. It beeps but the needle doesn't adjust. I am un...
(Posted by Dgmcmaster 1 year ago)

I Have A M3500 Singer Sewing Machine .got Tread Tangled In The Bobbin Area .just
(Posted by guitijoon 2 years ago)

Quantum 9960, Thread Balls Up
thread balls up under plate. Have to tear fabric to get it out. Also the bar that goes across the bo...
thread balls up under plate. Have to tear fabric to get it out. Also the bar that goes across the bo...
(Posted by Sisbankssb 3 years ago)

Machine Quit Sewing Properly
My thread keeps balling up on the first two stiched
My thread keeps balling up on the first two stiched
(Posted by rjmarley 4 years ago)

Please Help!!!!!!!!!!!!!!tension Problem
I am busy making a quilt, and machine work fine sofar, however today i want to sew decorative stich ...
I am busy making a quilt, and machine work fine sofar, however today i want to sew decorative stich ...
(Posted by Gemman 8 years ago)