Singer 9960 Quantum Stylist Support Question
Singer 9960 Quantum Stylist Support Question
Find answers below for this question about Singer 9960 Quantum Stylist.Need a Singer 9960 Quantum Stylist manual? We have 2 online manuals for this item!
Question posted by Sisbankssb on May 13th, 2020
Quantum 9960, Thread Balls Up
thread balls up under plate. Have to tear fabric to get it out. Also the bar that goes across the bobbin Casing is not there. Can't get support. They say their lines are down.
Current Answers
Answer #1: Posted by techyagent on May 16th, 2020 10:12 PM
techyagent

Member since:
June 17th, 2014 Points: 4,799,790

Member since:
June 17th, 2014 Points: 4,799,790
In this case good maintenance measures can make this machine working well:-
The looping bobbin thread is usually caused by the upper threading of the sewing machine. Here are the steps to take to troubleshoot the issue:
- Thread the Machine ProperlyRe-thread the upper part of the sewing machine making sure the thread is passing through every single thread guide on its way to the needle. Your sewing machine manual is the best guide on how to thread your particular sewing machine.Always thread the machine with the presser foot up. As long as the presser foot is up, the thread can seat properly. When the presser foot is down, the tension is engaged and it will not allow the thread to seat as it should. If the thread is not seated in the tension disks, it cannot engage any tension on the thread and stitch malfunctions are bound to happen.
- Change the NeedleIf you're still having loopy bobbin thread, change the sewing machine needle. Be sure you are using the proper needle for your brand of machine, the fabric you are sewing, and the job at hand.If the needle is correct, is it possible you have bent it? The needle is part of the upper threading and is a very inexpensive part to replace. Always remember to let the feed dogs do the work. If you are pulling the fabric to the back of the machine rather than letting the machine feed it through, you risk bending the sewing machine needle which can lead to all kinds of sewing problems.
- Inspect the BobbinIn rare cases, the bobbin can be at fault if it has not been threaded properly. If the thread is not smooth, is uneven, has knots, or is very loose on the bobbin, it has not been threaded correctly. Knowing how to wind a bobbin eliminates this risk.Another thing to check is whether the bobbin is inserted in the bobbin case correctly. Your sewing machine guide is the best resource to check how it should be inserted in the bobbin case. If you do not have the manual for your sewing machine, it is possible to find free sewing machine manuals or replacement manuals online.If your machine uses a case instead of the newer drop-in bobbins, a bobbin is placed into a removable bobbin case so the thread and the slot form an upside-down "V" shape. The thread is then passed under the metal and out the side of the bobbin case.
- Clean the Machine
Still not fixed? How long has it been since you cleaned the machine? Are there wads of lint and thread hiding under or around the bobbin case? Has your upper thread been shredding and possibly leaving pieces in the upper threading path?
It's time to clean out the lint, oil the machine, and do anything else described in your manual as part of routine maintenance for your particular sewing machine model.
Thanks
Techygirl
Related Singer 9960 Quantum Stylist Manual Pages
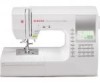
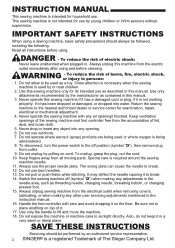
Instruction Manual - Page 2
..., electric shock, or injury to break. 12. INSTRUCTION MANUAL
This sewing machine is intended for examination, repair, electrical or mechanical adjustment. 4.
Do not use bent needles. 13. Always use as threading needle, changing needle, threading bobbin, or changing presser foot. 15. Do not expose the machine or machine case to be followed, including the following. Use this manual...
Instruction Manual - Page 4
... with the following the instruction manual page by a person responsible for household use and optimum service.
Then familiarize yourself with the machine by following code. MODEL 9960
PREFACE Thank you with excellent performance in sewing from light to heavy material.
Copyright © 2010 THE SINGER COMPANY All Rights Reserved Throughout The World. This...
Instruction Manual - Page 6

...Bobbins ( 1 is not to be stored in the accessory case. (See next page, [EXTENSION TABLE])
7
1. Thread Cap (On the machine when delivered)
9. Overcasting Foot (C)
10
11
12
13
12. General Purpose Foot (On machine... Button Sewing Foot
16. Shank w/o metal
22
23
24
DUST COVER
Cover the machine with this cover.
6 Brush 5. Driver for Needle Plate
8. Small Thread Cap
...
Instruction Manual - Page 19
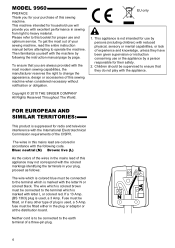
... and hold the reverse button. Place the fabric in reverse stitch. Note: The pattern No. 3 and No. 4 have a built-in position where back stitching
is used with all utility patterns. 1.
Machine will change to be used for reinforcing the ends of the stitch. Machine will sew tacking stitches and stop button (or press the...
Instruction Manual - Page 25
....
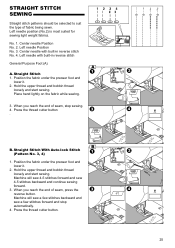
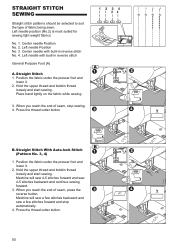
4. No. 1. Hold the upper thread and bobbin thread
loosely and start sewing. Press the thread cutter button.
25 Center needle Position No. 2. Hold the upper thread and bobbin thread loosely and start sewing. Left needle position (No.2) is most suited for sewing light weight fabrics.
When you reach the end of fabric being sewn. Press the thread cutter button .
Instruction Manual - Page 26

... screw.
4. Raise the fabric feed dogs for next regular sewing. Note: To prevent the fabric layers from your left .
2. CAUTION: To prevent accidents. BASTING
You can baste a garment before trying it . 2. No. 5 Basting Stitch
Darning/Embroidery Foot
A.
B. Hold the upper thread and bobbin thread
loosely and start to the basting position. Machine will be reduced automatically...
Instruction Manual - Page 27
... top.
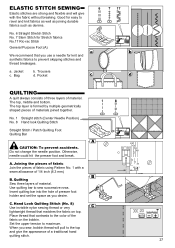
Hand Look Quilting Stitch (No. 8) Use invisible nylon sewing thread or very lightweight thread that you use a needle for Stretch fabrics No.17 Ric-rac Stitch
General Purpose Foot (A)
We recommend that matches the fabric on the bobbin. Place thread that contrasts to prevent skipping stitches and thread breakages. Bag
b. A. C. When you desire. Set the upper tension...
Instruction Manual - Page 29
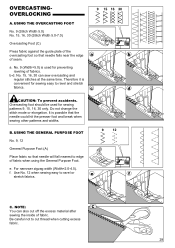
.... 9 (Stitch Width 5.0) No. 15, 16, 30 (Stitch Width 5.0-7.0)
Overcasting Foot (C)
Press fabric against the guide plate of fabric. USING THE GENERAL PURPOSE FOOT
No. 9, 12
General Purpose Foot (A)
Place fabric so that needle will fall nearest to cut off the excess material after sewing the inside of the overcasting foot so that the needle could...
Instruction Manual - Page 34
... not start the machine.
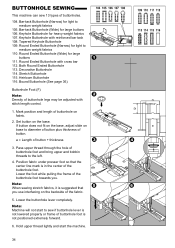
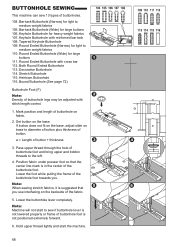
34 BUTTONHOLE SEWING
This machine can sew 13 types of buttonhole foot and bring upper and bobbin threads to the left.
4. Both Round Ended Buttonhole 113. Mark position and length of buttonhole foot is not positioned extremely forward.
6. Set button on fabric.
2. Position fabric under presser foot so that the center line mark is suggested...
Instruction Manual - Page 39

... the drop feed lever to form a firm shank. Insert a straight pin or sewing machine needle under the center slit of button and wind around stitches to the left hole of button.
4. SEWING ON BUTTONS
No. 13
Button Sewing Foot
1. A. Attach the button sewing foot. Thread Shank Buttons on coats and jackets should have a thread shank to the fabric.
7.
Instruction Manual - Page 48
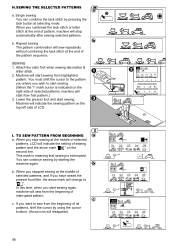
..., the arrow mark will change to sew from the beginning of interrupted pattern.
Single sewing You can continue sewing by pressing the tack button at the middle of sewing pattern and the arrow mark " " on the second line. Repeat sewing The pattern combination will start from highlighted
pattern. Machine will sew repeatedly without combining the tack stitch at...
Instruction Manual - Page 50

... with a brush. Remove the needle, presser foot and holder. Lift up the right side of thread accumulate in the hook, this machine.
50 Replace the screws and tighten.
B. Remove the bobbin cover and bobbin. CLEANING
If lint and bits of the plate. 3. Hook Race and Feed Dog 1. It does not require replacement.
Remove the needle...
Instruction Manual 2 - Page 2
..., if it . 17. Never operate this sewing machine only for household use. Do not use as threading needle, changing needle, threading bobbin, or changing presser foot. 15. It may deflect the needle causing it on cord. Switch the sewing machine off position (symbol "O"), then remove plug from outlet. 9. Always unplug sewing machine from the electric outlet immediately after using...
Instruction Manual 2 - Page 8
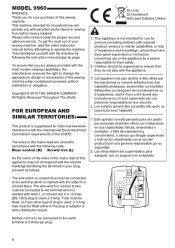
.... Este aparato no jueguen con el aparato. MODEL 9960
PREFACE Thank you are colored in accordance with the following the instruction manual page by page. To get the most modern sewing capabilities, the manufacturer reserves the right to the earth terminal of this sewing machine. Children should be connected to ensure that you for...
Instruction Manual 2 - Page 38

... the pedal). Machine will sew tacking stitches automatically and then start /
stop automatically. 4. Press the Tack button. When you reach the end of the seams. 1. B. Release the reverse button and press the start to sew this function, press the tack button again. See page 50 to sew the selected pattern. 3. Place the fabric in reverse...
Instruction Manual 2 - Page 50
...the upper thread and bobbin thread loosely and start sewing. Center needle Position No. 2. Hold the upper thread and bobbin thread
loosely and start sewing. When you reach the end of fabric being sewn. STRAIGHT STITCH SEWING
Straight stitch patterns should be selected to suit the type of seam, stop automatically.
4. Left needle Position No. 3.
Machine will sew 4-5 stitches...
Instruction Manual 2 - Page 52

...sewing.
52 BASTING When this as many times as you need to finish the seam. 5. Machine will be reduced automatically. 1. Tighten the presser foot thumb screw. B. Repeat this pattern is fitted into the presser bar... dress pins crosswise to sew. Place the fabric under the presser foot and
lower it on. Hold the upper thread and bobbin thread
loosely and start to the basting position.
Instruction Manual 2 - Page 54

...the pieces of fabric Join the pieces of fabric using Pattern No. 1 with the fabric without breaking. Use quilting bar to prevent skipping stitches and thread breakages. Insert quilting bar into the hole ... of material. Good for easy to ravel and knit fabrics as well as joining durable fabrics such as you sew, bobbin thread will give the appearance of a traditional hand quilting stitch...
Instruction Manual 2 - Page 68
... Foot (F)
Note: Density of buttonhole legs may be adjusted with reinforced bar tack 108. Note: When sewing stretch fabrics, it is not lowered properly or frame of the fabric.
5. Hold upper thread lightly and start to sew if buttonhole lever is suggested that the center line mark is not positioned extremely forward.
6. Keyhole Buttonhole with stitch length...
Instruction Manual 2 - Page 78
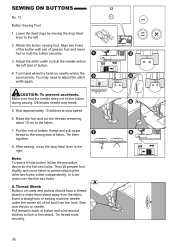
... the end of bobbin thread and pull upper thread to make them together.
8.
Thread Shank Buttons on coats and jackets should have a thread shank to the wrong side of the foot from the fabric.
Insert a straight pin or sewing machine needle under the center slit of fabric. SEWING ON BUTTONS
No. 13
Button Sewing Foot
1. Attach the button sewing foot. Adjust the...
Similar Questions

Bobbin Case On Singer 9960 Quantum Stylist Noisey
when I sew I hear a clicking sound and some rattling of the bobbin occurs. more so when I sew on the...
when I sew I hear a clicking sound and some rattling of the bobbin occurs. more so when I sew on the...
(Posted by sdshowen 8 years ago)

The Thread Does Not Wind Tight Around The Bobbin.
(Posted by bkmccall 9 years ago)

Beeping From Singer Sewing Machine Stylist Ii 5625
My sewing machine will beep and stop sewing after three inches of sewing. I have taken it to be repa...
My sewing machine will beep and stop sewing after three inches of sewing. I have taken it to be repa...
(Posted by arusheria 9 years ago)

I Need An Extnesion Table For My Sewing Machine Singer 7258 Stylist
(Posted by loucksd 10 years ago)
Need To Get My Bobbin Case Out - Thread Keeps Getting Underneath The Bobbin Case
(Posted by Anonymous-119326 10 years ago)