Singer 9960 Quantum Stylist Support Question
Singer 9960 Quantum Stylist Support Question
Find answers below for this question about Singer 9960 Quantum Stylist.Need a Singer 9960 Quantum Stylist manual? We have 2 online manuals for this item!
Question posted by Anonymous-119326 on August 27th, 2013
Need To Get My Bobbin Case Out - Thread Keeps Getting Underneath The Bobbin Case
The person who posted this question about this Singer product did not include a detailed explanation. Please use the "Request More Information" button to the right if more details would help you to answer this question.
Current Answers
Related Singer 9960 Quantum Stylist Manual Pages
Instruction Manual - Page 2
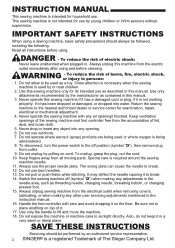
... air openings blocked. Also, do not keep it has been dropped or damaged, or dropped into any adjustments in the needle area, such as described in this sewing machine only for its intended use bent needles. 13.
Use this manual. Do not use as threading needle, changing needle, threading bobbin, or changing presser foot. 15. Do...
Instruction Manual - Page 3

... 14 B. DRAWING UP THE BOBBIN THREAD 17
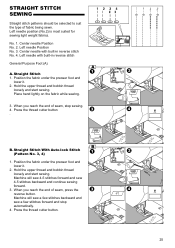
STARTING TO SEW 18
A. SEWING HEAVY FABRIC 20 F. SELECTING OTHER UTILITY STITCH PATTERNS 22 C. Joining the pieces of fabric 27 B. Removing the presser foot holder 7
INSERTING THE NEEDLE 8 FABRIC, THREAD AND NEEDLE TABLE .......... 8 CONNECTING THE MACHINE 9 FOOT CONTROLLER 9 FUNCTION OF EACH PART 10
A. REVERSE STITCH...
Instruction Manual - Page 4
...sewing machine. Then familiarize yourself with the machine by a person responsible for their safety.
2. To ensure that they have been given supervision or instruction concerning use or the appliance by following code. Blue: neutral (N) Brown: live (L)
As the colors of the wires in the plug or adaptor or at the distribution board. To get...pin plug.
4 MODEL 9960
PREFACE Thank you for your...
Instruction Manual - Page 5

...Thread Take-Up Lever (Inside) 4.Face Plate 5.Thread Cutter Button 6.Speed Control Button 7.Needle Up-Down / Slow Button 8.Reverse Stitch Button 9.Start/Stop Button 10.Extension Table (Accessories) 11.Presser Foot Lifter 12.Forward / Reverse Adjusting Screw
(underneath machine... (F1 - Contrast Control 53.Auxiliary Spool Holder 54.Bobbin Winder Shaft 55.Bobbin Winder Stop
1
2 3
4
15
5
6
7...
Instruction Manual - Page 6

... 6
9
7. Thread Cap (On the machine when delivered)
9. Zipper Foot (E)
14. Rolled Hem Foot
15. Button Sewing Foot
16. Straight Stitch / Patch Quilting Foot
21. General Purpose Foot (On machine when
delivered) .... Open Toe Foot
19. Cording Foot
20. Needle Pack
2. 4 Bobbins ( 1 is not to be stored in the machine)
3. Driver for Needle Plate
8. Blind Hem Foot (D)
13. Satin...
Instruction Manual - Page 11

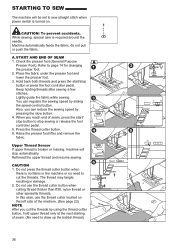
... tangle, resulting in this case, use this button after sewing. 2. In this position. For most sewing, the lever should turn hand wheel toward you need to cut the threads. Raise the presser foot and bring fabric and
threads backward after sewing to cut the upper and bobbin threads. Set the machine and extra wide table on the stable table.
1. CAUTION...
Instruction Manual - Page 14
... the foot controller pedal. 6.After the bobbin winds a few turns, stop the machine by pressing the start/stop automatically when bobbin is full. (Release the pedal.) 9.Push the bobbin and spindle to the left to right. 3.Bring thread to engage bobbin winder. WINDING THE BOBBIN 1.Hold thread in both hands and hook thread to the guide from the spindle...
Instruction Manual - Page 18

... up the bobbin thread)
18 Also, you reach end of seam. (No need to cut the threads by sliding the speed control button.
The thread may tangle, resulting in the machine or no need to stop sewing or release the foot controller pedal. 5. Upper Thread Sensor If upper thread is required around the needle.
In this case, use the thread cutter button...
Instruction Manual - Page 25
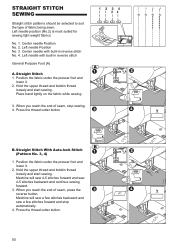
....2) is most suited for sewing light weight fabrics. Hold the upper thread and bobbin thread
loosely and start sewing. Position the fabric under the presser foot and
lower it .
2. Machine will sew a few stitches backward and sew a few stitches forward and stop sewing. 4. Press the thread cutter button.
25 Place hand lightly on the fabric while sewing.
3. When you reach the...
Instruction Manual - Page 26

... is selected, thread tension will make one stitch. 4. Machine will be reduced automatically. 1. Note: To prevent the fabric layers from your left .
2. The arm of darning/embroidery foot should ride onto the shaft of the needle clamp screw.
4.
BASTING When this as many times as you need to the rear and sew one stitch...
Instruction Manual - Page 39

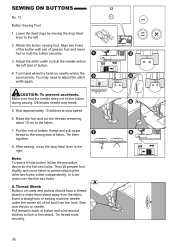
... fabric. Pull the end of bobbin thread and pull upper thread to the wrong side of presser...Attach the button sewing foot. You may break.
5. A. Tie thread ends securely.
39 Sew approximately 10 stitches at slow speed.
6. Insert a straight pin or sewing machine needle under ...SEWING ON BUTTONS
No. 13
Button Sewing Foot
1. Otherwise needle may need to the left hole of button.
4. After...
Instruction Manual 2 - Page 2
...threading needle, changing needle, threading bobbin, or changing presser foot. 15. Do not use bent needles. 13. To unplug, grasp the plug, not the cord. 10. Do not pull or push fabric while stitching. Switch the sewing machine... blocked. INSTRUCTION MANUAL
This sewing machine is intended for examination, ...Also, do not keep it . 17. Never operate this sewing machine only for use as...
Instruction Manual 2 - Page 3

...26 BOBBIN SETTING 28
A. INSERTING THE BOBBIN 30
THREADING THE MACHINE 32
A. START AND END OF SEAM 36 B. SEWING HEAVY FABRIC 40 F. ATTACHING THE DARING/ EMBROIDERY FOOT 52 B. Thread ...BUTTONS 26 K. THREADING THE UPPER THREAD 32 D. SETTING SPOOL OF THREAD ON SPOOL PIN 32 C. SEWING OVER OVERLAPPED AREAS 40 G. CONTENTS
IMPORTANT SAFETY INSTRUCTIONS 2 MODEL 9960 8 FOR EUROPEAN...
Instruction Manual 2 - Page 8
...must be supervised to the earth terminal of a three-pin plug.
8 To get the most modern sewing capabilities, the manufacturer reserves the right to heavy material. Then familiarize yourself with ...machine intended for household use will provide you with letter L or colored red. Please refer to the terminal which is colored brown must be connected to this sewing machine. MODEL 9960...
Instruction Manual 2 - Page 22

... and bobbin threads. HAND WHEEL By turning the hand wheel, the needle will cut the threads. You should be moved by turning the four
rubber feet.
22 F. The drop feed lever controls the fabric feed dogs. For darning or free motion embroidery or whenever fabric is no fabric
in the machine or no need wide sewing...
Instruction Manual 2 - Page 28
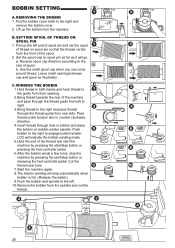
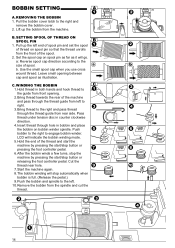
... guide from the machine. WINDING THE BOBBIN 1.Hold thread in bobbin and place the bobbin on spool pin as far as illustration. Set the spool cap on bobbin winder spindle.
Use the small spool cap when you use cross wound thread. Cut the thread near hole. 7.Start the machine again. 8.The bobbin winding will go. BOBBIN SETTING
A. Pull the bobbin cover latch...
Instruction Manual 2 - Page 36
... on the left side of the machine. (See page 22) NOTE After you reach end of seam. (No need to draw up the bobbin thread)
36
Check the presser foot (General Purpose
Presser Foot). Place the fabric under the presser foot and lower the presser foot. 3. Keep holding threads after sewing a few stitches. Also, you can regulate...
Instruction Manual 2 - Page 50
... Position the fabric under the presser foot and lower it . 2. Press the thread cutter button. Machine will sew 4-5 stitches forward and sew 4-5 stitches backward and continue sewing forward.
3. Place hand lightly on the fabric while sewing.
3. Hold the upper thread and bobbin thread loosely and start sewing. Center needle Position No. 2. When you reach the end of fabric being sewn...
Instruction Manual 2 - Page 52

... Stitch
Darning/Embroidery Foot
A. Hold the upper thread and bobbin thread
loosely and start to the rear and sew one stitch only. 3. Note: To prevent the fabric layers from your left .
2. The arm of darning/embroidery foot should ride onto the shaft of the needle clamp screw.
4. Machine will be reduced automatically. 1. BASTING
You can...
Instruction Manual 2 - Page 78
... bobbin thread and pull upper thread to the left hole of button.
4. Thread Shank Buttons on coats and jackets should have a thread shank to make them together.
8. Insert a straight pin or sewing machine ...SEWING ON BUTTONS
No. 13
Button Sewing Foot
1. Turn hand wheel by moving the drop feed lever to the wrong side of presser foot and lower foot to the fabric.
7. Otherwise needle may need...
Similar Questions

Quantum 9960, Thread Balls Up
thread balls up under plate. Have to tear fabric to get it out. Also the bar that goes across the bo...
thread balls up under plate. Have to tear fabric to get it out. Also the bar that goes across the bo...
(Posted by Sisbankssb 4 years ago)

Thread Keeps Breaking?
Thread keeps breaking on my singer 8500q, sets code 06 or 05!
Thread keeps breaking on my singer 8500q, sets code 06 or 05!
(Posted by brendajcarruth 8 years ago)

Bobbin Case On Singer 9960 Quantum Stylist Noisey
when I sew I hear a clicking sound and some rattling of the bobbin occurs. more so when I sew on the...
when I sew I hear a clicking sound and some rattling of the bobbin occurs. more so when I sew on the...
(Posted by sdshowen 8 years ago)

I Need An Extnesion Table For My Sewing Machine Singer 7258 Stylist
(Posted by loucksd 10 years ago)

Any Info To Fix Error 6 Embroidering On Futura_ses2000? Where?
Cannot Find How Or Why I Receive e6 Message And How To Fix It. Suggest You include What Error Messag...
Cannot Find How Or Why I Receive e6 Message And How To Fix It. Suggest You include What Error Messag...
(Posted by nananancy 10 years ago)