Singer 8500Q MODERN QUILTER Support Question
Singer 8500Q MODERN QUILTER Support Question
Find answers below for this question about Singer 8500Q MODERN QUILTER.Need a Singer 8500Q MODERN QUILTER manual? We have 1 online manual for this item!
Question posted by madison66008 on May 1st, 2018
Error Code 9 On 8500q Modern Quilter
Keep getting a Code 9 Error on my Modern Quilter 8500Q...How to fix, Please
Current Answers
Answer #1: Posted by waelsaidani1 on May 1st, 2018 10:10 PM
waelsaidani1

Member since:
May 12th, 2013 Points: 19,501,797

Member since:
May 12th, 2013 Points: 19,501,797
This is a manufacturer error, I suggest you contact Singer for troubleshooting or replacement.
Email us: [email protected]
Call us: 1-800-474-6437
Related Singer 8500Q MODERN QUILTER Manual Pages
Instruction Manual - Page 2
³,03257$176$)(7
Instruction Manual - Page 5
...accessories 72 - 81 Helpful messages 82 - 83 Programming the memory 84 - 89
For European version
Sewing machine Dimensions: 567 mm × 240 mm × 317 mm Mass of patterns Blind stitch 42... level: less than 70 db(A)
3 TABLE OF CONTENTS
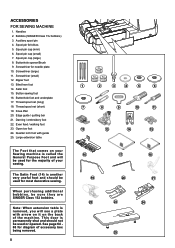
1.GETTING TO KNOW YOUR MACHINE 0DFKLQHLGHQWL¿FDWLRQ 6 - 7 Accessories 8 - 9 Set up your machine 10 - 11 Spool pins 10 - 11 Winding bobbin 12...
Instruction Manual - Page 10
... 21. Darning / embroidery foot 22.
Note: When extension table is permanently shut and should be used for most decorative sewing. Blind hem foot 14. Knee lifter 20. Quarter inch foot with arrow on it on your Sewing machine is another very useful foot and should not be used for the majority of your...
Instruction Manual - Page 12

... area EHIRUHXVLQJ\RXUPDFKLQHWKH¿UVWWLPH
POWER LINE CORD/FOOT CONTROL
Connect the plug of the power line cord into the machine socket (3), when using sewing machine only. Set power/light switch at "OFF"
Mettez l'interrupteur moteur/ lumière sur "OFF". Place felt disc over it. SET UP YOUR...
Instruction Manual - Page 24
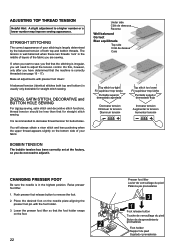
...foot 'down'. STRAIGHT STITCHING
The correct appearance of the fabric you are sewing.
,IZKHQ\RXVWDUWWRVHZ\RX¿QGWKDWWKHVWLWFKLQJLV...sewing.
It is usually only desirable for straight stitch sewing.
ZIGZAG, SATIN STITCH, DECORATIVE and BUTTON HOLE SEWING
For zigzag sewing, satin stitch and decorative stitch functions, thread tension should be less than that the machine...
Instruction Manual - Page 26
The information on the machine straight stitch number 00, is selected. For regular sewing, the LCD display shows the number of the selected stitch, an image of ... information about programming under 4 and 5 below.
24 See page 26 - 27 for regular sewing and programming. PROGRAM MODE BUTTON
Press this button to select that stitch.
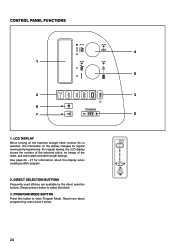
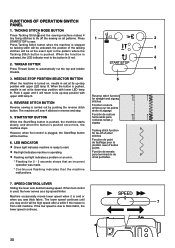
3. CONTROL PANEL FUNCTIONS
4 1
5
2
3
6
7
8
1.
Instruction Manual - Page 28
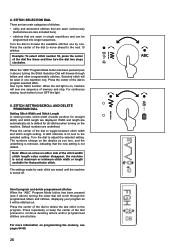
...an arrow on either side of the stitch width/ stitch length value number disappear, the machine is on the display as it will browse through the programmed letters and stitches, displaying...programmable stitches. For more information on the machine. STITCH SETTING/SCROLL AND DELETE PROGRAM DIAL
Setting Stitch Width and Stitch Length In sewing mode, stitch width (needle position for each ...
Instruction Manual - Page 30
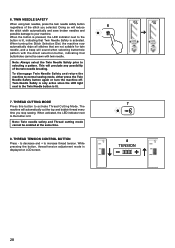
... is pressed, the LED indicator next to the Twin Needle button is lit.
THREAD TENSION CONTROL BUTTON
Press - to decrease and + to normal sewing mode, either press the Twin Needle Safety button again or turn the machine off. This will automatically cut the top and bobbin thread every time you selected. The...
Instruction Manual - Page 32
...sewing is used, the lever serves as a top speed limiter. Machine occasionally moves lower speed when it is
7
from cold machine. Press Tacking Stitch button when the machine is stopped
so tacking stitch will return to start. ¿ Red light indicates machine is operating. ¿ Flashing red light indicates a problem or an error... Tacking Stitch and the sewing machine makes 4
WLQ\ ¿...
Instruction Manual - Page 38
Tacking stitch mode button C. Start/stop the sewing machine. Presser foot lifter H. Draw the fabric to change the needle position. The guide line on the bobbin cover plate is a ¼" (6mm) seam guide line, used for piecing quilt blocks or for all types of sewing. Needle up/down position selector button D. Pull both Metric...
Instruction Manual - Page 40
... be accomplished with the Stitch Width Control. Press the foot control and the machine will sew 4 stitches in reverse and then 4 stitches in reverse and continue to look like hand sewing for the piping. Press the reverse button and the machine will sew 4 stitches forward and then 4 stitches in forward and stop.
38 INSERTING ZIPPERS...
Instruction Manual - Page 56
While holding the top thread, start the machine. Align the buttonhole mark on the fabric with the mark on your garment. 6. Fabric marking Marque du tissu Marca de material
Mark Marque Marca
* Sewing will be completed automatically in the following order.
1
2
3
4
5
6
7
8
1
2
3
4
5
6
7
Fabric marking Marque du tissu Marca de material
54
Buttonhole foot alignment...
Instruction Manual - Page 66
... remove fabric.
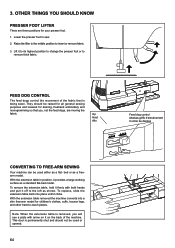
3. Raise the lifter to the middle position to remove thick fabric. They should be raised for all general sewing purposes and lowered for your presser foot. 1.
Lower the presser foot to sew. 2. 3. Up Haut Alto
Feed dog control Abaisse-griffe d'entraînement Control de dientes
CONVERTING TO FREE-ARM...
Instruction Manual - Page 68
... - 15). * Lint accumulates in bobbin case or hook. - Remove lint
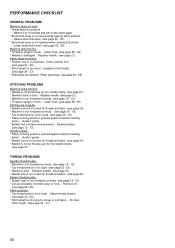
(see page 21). PERFORMANCE CHECKLIST
GENERAL PROBLEMS Machine does not sew. * Power switch is damaged. - Lower presser foot.
(see page 21). Replace needle. (see page 21). * Machine is not threaded correctly. (see page 22 - 23). * Stitch length is too long for 5 to 10...
Instruction Manual - Page 70
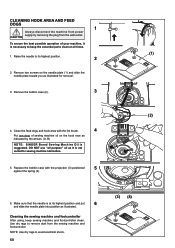
... wall-outlet. NOTE: Use dry rags to its highest position and put
6
and slide the needle plate into position as illustrated for sewing machine lubrication.
5. Remove the bobbin case (2).
3
4.
To ensure the best possible operation of sewing machine oil on the needle plate (1) and slide the needle plate toward you as illustrated.
Cleaning the...
Instruction Manual - Page 72
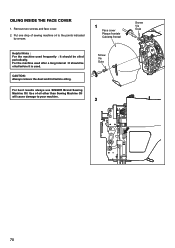
... damage to the points indicated
by arrows.
1
Face cover Plaque frontale Cubierta frontal
Helpful Hints : For the machine used after a long interval : It should be oiled before oiling. Use of sewing machine oil to your machine. For the machine used frequently : It should be oiled periodically. Screw Vis Guia
2
Screw Vis Guia
70
OILING INSIDE...
Instruction Manual - Page 76
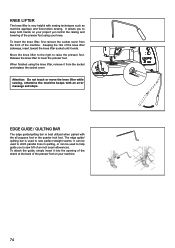
...Attention: Do not touch or move the knee lifter while sewing, otherwise the machine beeps with the all purpose foot or the quarter inch...error message and stops. To attach the guide, simply insert it ends. Move the knee lifter to the right to lower the presser foot. :KHQ¿QLVKHGXVLQJWKHNQHHOLIWHUUHPRYHLWIURPWKHVRFNHW and replace the socket cover. Keeping the ribs of the machine...
Instruction Manual - Page 78
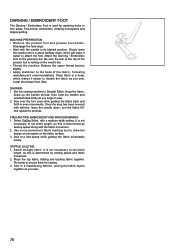
... fabric as this is resting on the fabric surface. 3. DARNING / EMBROIDERY FOOT
The Darning / Embroidery Foot is determined by sewing speed and fabric movement. 2. MACHINE PREPARATION ‡ 5 H P R Y H W K H S U H V V H U I R R W D Q G S U H V V H U... process. Place fabric in even movements. DARNING 1. Set the sewing machine to attach the foot. Draw up the bobbin thread, then hold...
Instruction Manual - Page 80
... the presser bar screw. Note: If desired, lines can be drawn onto the fabric using a screwdriver.
4. Set machine to aid the movement of the fabric, right sides together, under the presser foot.
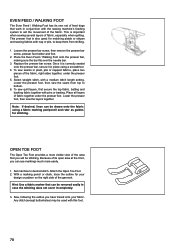
EVEN FEED / WALKING FOOT
The... remove the presser bar screw, presser foot holder and foot.
2. To sew seams in conjunction with the sewing machine's feeding system to desired stitch.
Instruction Manual - Page 82
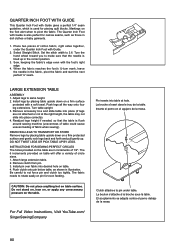
... not attached or not at hole. Adjust legs to make sure that the table is flush around sewing machine (unevenness of table could cause uneven feeding of cotton fabric, right sides together, under table. Turn...on the foot alert when to pin under the Quarter Inch Foot with the foot's right edge.
4. Sew, keeping the fabric's edge even with Guide.
2. DO NOT TWIST LEGS OR PICK TABLE UP BY...
Similar Questions

What Is Error Code C 09
My Singer modern quilter keeps showing error code C 09. I do know what the problem is
My Singer modern quilter keeps showing error code C 09. I do know what the problem is
(Posted by karenkawycz 10 months ago)

Error C1 Code On Singer Modern Quilter 8500q.
my machine has started to show the error code c1 almost constantly when I start to sew. It bleeps an...
my machine has started to show the error code c1 almost constantly when I start to sew. It bleeps an...
(Posted by Aegillt 11 months ago)

I Get E7 Error Message On My Singer Model 7258 Sewing Machine. There Is No Refe
Error message E7 is up on my Singer Stylist model 7258 sewing machine. It is not working at all. I t...
Error message E7 is up on my Singer Stylist model 7258 sewing machine. It is not working at all. I t...
(Posted by ebellamybellamy9 5 years ago)

I Keep Getting Error Po1 On My Modern Quilter
I keep getting error po 1 on my modern quilter and the hand wheel seems very tight how do I fix this...
I keep getting error po 1 on my modern quilter and the hand wheel seems very tight how do I fix this...
(Posted by Mryharvey 6 years ago)
Beeping From Singer Sewing Machine Stylist Ii 5625
My sewing machine will beep and stop sewing after three inches of sewing. I have taken it to be repa...
My sewing machine will beep and stop sewing after three inches of sewing. I have taken it to be repa...
(Posted by arusheria 9 years ago)