Get support for Singer 7469Q Confidence Quilter

Singer 7469Q Confidence Quilter Support Question

Singer 7469Q Confidence Quilter Support Question

Find answers below for this question about Singer 7469Q Confidence Quilter.
Need a Singer 7469Q Confidence Quilter manual? We have 1 online manual for this item!
Question posted by cathyuk38 on November 28th, 2021

Timing

Hello, the timing was out I have sorted I think it is ok when bobbin plate is off but when put back on top thread does not catch hook or bobbin thread. Take plate off again thread catches hook fine.

Current Answers

Answer #1: Posted by SonuKumar on November 28th, 2021 7:44 AM
This answer was accepted by the poster of the original question.
SonuKumar

Member since:
May 9th, 2021

Points: 16,568,330
1,100
points
Why does the timing keep going out on my sewing machine?

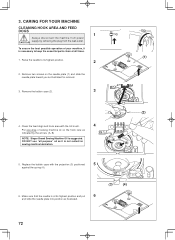
This usually means that your machine's internal parts are not synchronized. This can be verified by removing your switch plate and slowly advancing the sewing machine by the hand wheel. ... The hooks are the most common issue concerning sewing machine's timing. The second most common issue is related to the needle.

How do I know if my sewing machine timing is off?

Image result for Singer 7469Q Confidence Quilter timing issue

If your hook tip is passing through or below the needle eye, then the timing of the sewing machine is off. On the other hand, if the hook tip is passing above the needle eye, but extends past the needle more than a couple of millimeters when the needle eye meets the radius of the hook, then the timing is also off.

https://www.youtube.com/watch?v=OWBgMJ8cLCo

https://www.youtube.com/watch?v=OWBgMJ8cLCo&t=141

https://www.youtube.com/watch?v=OWBgMJ8cLCo&t=168

https://www.youtube.com/watch?v=OWBgMJ8cLCo&t=250

https://www.youtube.com/watch?v=OWBgMJ8cLCo&t=377

https://www.youtube.com/watch?v=OWBgMJ8cLCo&t=414

https://designmycostume.com/fix-sewing-machine-timing/

https://www.youtube.com/watch?v=w8DQxsOZimY


Please respond to my effort to provide you with the best possible solution by using the "Acceptable Solution" and/or the "Helpful" buttons when the answer has proven to be helpful.

Regards,
Sonu
Your search handyman for all e-support needs!!

Related Singer 7469Q Confidence Quilter Manual Pages

Instruction Manual - Page 3

...1. CARING FOR YOUR MACHINE Cleaning hook area and feed dogs 72 - 73 4. KNOWING YOUR SEWING MACHINE Machine identification 6 - 7 Accessories 8 - 9 Setting up your machine 10 - 11 Spool pins, Presser foot lifter 12 - 13 Feed dogs control 12 - 13 Converting to free-arm sewing 14 - 15 Winding the bobbin 16 - 17 Threading the bobbin thread 18 - 19 Threading the top thread 20 - 23 Using...
Instruction Manual - Page 6

...cord 35. KNOWING YOUR SEWING MACHINE MACHINE IDENTIFICATION 1. Needle threader Thread Guide 22. Thread cutter 6. Hand wheel 14. Automatic needle threader 21. Needle 25. Bobbin winder shaft 8. Reverse stitch switch 10. Foot release button 29. Bobbin winder stop 9. Pattern reference guide 11. Handle 13. Identification plate 17. Alternate Thread Cutter 28. Feed dogs...
Instruction Manual - Page 8

... plate 10. Spool pin felt discs (2) 5. Spool pin cap (small) 7. ACCESSORIES 1. Spool pin cap (mini) 6. Screwdriver for most of your decorative sewing. 1 2 3 4 5 6 7 8 9 10 11 12 13  Auxiliary spool pin 4. Satin stitch foot 12. Zipper foot 11. Buttonhole opener/Seam Ripper and Brush 9. Blind stitch foot 13. Needles 2. Bobbins (4 total - 1 in machine...
Instruction Manual - Page 10

.... Connect the foot control plug (3) into the cord socket (1) and your machine the first time. Set power/light switch at "OFF" Mettez l'interrupteur moteur/ lumière sur "OFF". SETTING UP YOUR MACHINE Be sure to wipe off any surplus oil from needle plate area before using your wall outlet (2) as illustrated. NOTE: W h e n f o o t c o n t r o l i s disconnected...
Instruction Manual - Page 14

... the extension table in position, it clicks. With the extension table removed the machine converts into place until it provides a large working surface as a flat- To replace, slide the extension table back into a slim free-arm model for sewing children's clothes, cuffs, trouser legs, and other awkward places. 14 To remove the...
Instruction Manual - Page 20

... the bottom of the groove. * Do a U-turn around the inside of plate (2). You should detect a considerable amount of 5 resistance and much more deflection of the machine. THREADING THE TOP THREAD A. This time you do this simple check: 1.) With the presser foot raised, pull the thread towards the the back of the needle. If you should detect...
Instruction Manual - Page 24

...and will determine the choice of thread in the bobbin as in the top thread supply. Corduroy Weight Flannel Gabardine ...sewing results, always use the same size and type of a needle and thread. Always disconnect the machine from power supply by pulling it before a new sewing... needle into the needle plate slot. 24 Flat side toward you . 2. NEEDLE, THREAD AND FABRIC CHART Your fabric...
Instruction Manual - Page 26

... on top of the machine. A balanced tension (identical stitches both top and bobbin threads. You will always obtain a nicer stitch and less puckering when the upper thread appears on the needle plate aligning the presser foot pin with the foot holder. 3. ZIG ZAG and DECORATIVE SEWING For zigzag sewing and decorative stitch functions, thread tension should be accomplished...
Instruction Manual - Page 28

CONTROL PANEL FUNCTIONS Direct selection buttons Frequently used patterns are for reference only and do not represent actual sewing parameters of machine. 28 Numerical selection buttons Use the buttons located at left of number display to select left digit and the buttons at right to select right ...
Instruction Manual - Page 30

...range. When a pattern is to locate each manual adjustment point, the LED will blink 3 times in pink - The LED will light in dark blue - stitch length and width are ...the potential adjustments. Stitch length and width/needle position controls *Auto/Default settings Your sewing machine will produce most of your preference. Some patterns offer more opportunities for straight stitch....
Instruction Manual - Page 32

... width automatically and save broken needles and possible damage to stop sewing. Twin needle mode switch ( ) When using twin needles, push... c t t h e Tw i n N e e d l e M o d e p r i o r to normal sewing mode. Push it again to your machine. Twin needle mode switch Commutateur de mode d'aiguilles Interruptor de modo de aguja doble Needle stop position selector switch Touche de position...
Instruction Manual - Page 34

...;re interruptor de puntadas hacia atrás * Reverse stitch function for tying off the sewing on all patterns except straight and zigzag stitches. The position of the tacking stitches will... for tie-off of sewing. 34 The machine will be at the start and end of other stitches ( ) The sewing machine makes 4 tiny tacking stitches to tie off the sewing pattern to sew in the pattern where ...
Instruction Manual - Page 40

... threads with your fabric when sewing a seam. 6. KEEPING SEAMS STRAIGHT To keep the seam straight, use one of the numbered guide lines on the bobbin cover plate ...used to sew following the steps below. 1. Start the machine. The guide line on the needle plate. Let's learn how to change the needle 3 position. 2. General Purpose Foot G Thread tension control...
Instruction Manual - Page 42

Thread bobbin with different tension and stitch length combinations. This thread should not show. 3. Increase thread tension a little at a time and continue until the foot control...the top. 2. Push the reverse switch and the machine will pull this thread to foot holder so that matches your fabric. When sewing the machine will sew 4 stitches in reverse and then 4 stitches in forward...
Instruction Manual - Page 44

... interfacing for satin stitching. Slightly loosen the top thread tension and manually adjust the stitch length between 0.5 and 2.0 for sheer materials to the scale and number markings on the top of the fabric. General Purpose Foot :Thread tension control - Use a backing of stitch and sewing speed, but the bobbin thread must never appear on the sewing machine.
Instruction Manual - Page 60

...the edge. This is enough thread wound onto the bobbin to make sure that the thread will not run out during sewing. * Slightly loosen top thread tension. Satin stitch foot :Thread tension control - Arrowhead on..., and also for table linen edges, first sew the stitch and then trim the edge of the fabric along the edge of this time. Following are available. Pyramid on top of ...
Instruction Manual - Page 68

... Marca de material Marca * Sewing will be completed automatically in the center of about 4 inches to the rear. 7. Align the buttonhole mark on the fabric with the mark on your garment. 6. 5. While holding the top thread, start the machine. Place the fabric under the foot. Pull out the bobbin thread underneath the fabric to cut...
Instruction Manual - Page 70

... set the stitch length at the beginning of the buttonhole. CORDED BUTTONHOLES Hook filler cord (crochet thread or buttonhole twist) over the spur and pull both ends of the cord...When completed, release the cord from foot and snip off the stitches. Start the machine to complete buttonhole. 4. Sew second bartack and stitch backward until needle reaches beginning of buttonhole. 2. Place the...
Instruction Manual - Page 72

... all times. (1) 1. Make sure that the needle is necessary to its highest position and put 6 and slide the needle plate into position as indicated by removing the plug from power supply by the arrows. (A, B) NOTE: Singer Brand Sewing Machine Oil is not suited for removal. 3. Remove the bobbin case (2). 3 4. 3. Remove two screws on the hook race...
Instruction Manual - Page 82

Use only attachments recommended by the manufacturer as threading needle, changing needle, threading bobbin, or changing presser foot, etc." 15. ...or its intended use , or equivalent." If the plug does not fit fully in any adjustments in this sewing machine only for examination, repair, electrical or mechanical adjustment." 4. This equipment is a registered trademark of injury, ...

Similar Questions

I Get E7 Error Message On My Singer Model 7258 Sewing Machine. There Is No Refe
Error message E7 is up on my Singer Stylist model 7258 sewing machine. It is not working at all. I t...
(Posted by ebellamybellamy9 5 years ago)
Singer Model 7469q Quilter Sewing Machine Disassembly
After pulling the screws all out from the plastic case . how do you split the cases?please no addres...
(Posted by sdeiter544 9 years ago)
Singer # 7469q Sewing Machine
After pulling the screws all out from the plastic case . how do you split the cases?
(Posted by sdeiter544 9 years ago)
Beeping From Singer Sewing Machine Stylist Ii 5625
My sewing machine will beep and stop sewing after three inches of sewing. I have taken it to be repa...
(Posted by arusheria 9 years ago)
How To Use Stitching On The Machine 7469q
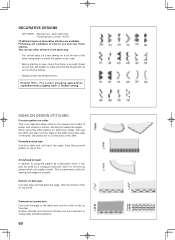
I need to know how to use the designer stitches on the machine
(Posted by Anonymous-130396 10 years ago)
Ask a New Question
Use the box below to post a new question about this Singer product .
Points & Prizes
  • You can earn points for nearly everything you do on HelpOwl.com
  • You can trade in those points for gift cards at leading retailers such as Amazon.com and Walmart
  • It's that simple!
See How it Works
Create a Free Account

Singer Manuals

Find free Singer 7469Q Confidence Quilter manuals and user guides available at ManualOwl.com. Try out our unique manual viewer allowing you to interact with manuals from directly within your browser!

Singer Reviews

View thousands of Singer user reviews and customer ratings available at ReviewOwl.com.

Contact Information

Complete Singer customer service contact information including steps to reach representatives, hours of operation, customer support links and more from ContactHelp.com.

Scoreboard Ratings

See detailed Singer customer service rankings, employee comments and much more from our sister site.