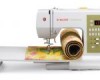
Singer 7469Q Confidence Quilter Support Question
Singer 7469Q Confidence Quilter Support Question
Find answers below for this question about Singer 7469Q Confidence Quilter.Need a Singer 7469Q Confidence Quilter manual? We have 1 online manual for this item!
Question posted by sharflem1 on January 12th, 2015
Not Sewing Basting Stitches
what am I doiing wrong I need to do some basting stitches. my machine is only 1 month old and I am new to sewing
Current Answers
Answer #1: Posted by Autodiy on January 25th, 2015 6:43 AM
Autodiy

Member since:
May 23rd, 2014 Points: 815,136

Member since:
May 23rd, 2014 Points: 815,136
watch the video on the link below carefully, it carries the instructions
Www.autodiy.co.za
Related Singer 7469Q Confidence Quilter Manual Pages
Instruction Manual - Page 3
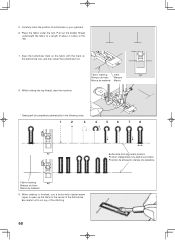
... overedge stitch, Slant pin stitch, Greek key stitch, Fishbone stitch, Thorn stitch, Reinforced overedge stitch Decorative designs 60 - 61 Ideas on design stitching Continuous patterns 62 - 63 Novelty patterns 64 - 65 Sewing on a button 64 - 65 Buttonhole making 66 - 71 Automatic buttonhole, Corded buttonholes, Manual buttonhole
3. KNOWING YOUR SEWING MACHINE Machine...
Instruction Manual - Page 6
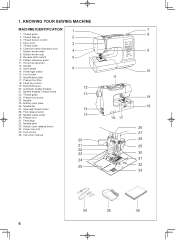
Thread guide 2. Face cover 5. Reverse stitch switch 10. Horizontal spool pin 12. Handle 13. Feed dog ...29 30 31 32 33
34
35
36
Buttonhole lever 20. Needle 25. Needle bar 27. 1. KNOWING YOUR SEWING MACHINE
MACHINE IDENTIFICATION
1. Thread tension control 4. Extension table (Accessory box) 7. Bobbin winder shaft 8. Hand wheel 14. Identification plate...
Instruction Manual - Page 8
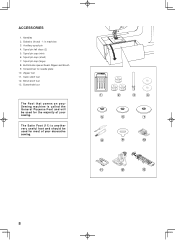
... General Purpose Foot and will be used for the majority of your sewing. Buttonhole opener/Seam Ripper and Brush 9. Blind stitch foot 13. Bobbins (4 total - 1 in machine) 3. Spool pin cap (large) 8. Zipper foot 11. Buttonhole foot
The Foot that comes on your Sewing machine is another very useful foot and should be used for needle...
Instruction Manual - Page 26
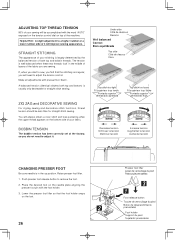
... middle of layers of the fabric you will need to remove the foot. 2. If, when you start to sew, you find that the foot holder snaps
on top of the machine. Make all adjustments with presser foot 'down'. ZIG ZAG and DECORATIVE SEWING
For zigzag sewing and decorative stitch functions, thread tension should be accomplished with...
Instruction Manual - Page 28
... buttons
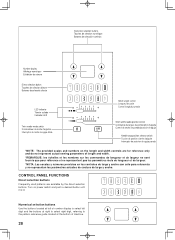
Frequently used patterns are for reference only and do not represent actual sewing parameters of machine.
28 Numerical selection buttons Touches de sélection numérique Botones... de mode d'aiguilles Interruptor de modo de aguja doble
Stitch length control Longueur de point Control longitud puntada
Stitch width/needle position control Commande de largeur de point/position...
Instruction Manual - Page 30
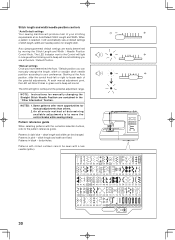
... have determined the Auto / Default position you can be sewn with a twin needle (option).
30 stitch length and width can manually change the length, width or straight stitch needle postition according to the pattern reference guide. Stitch length and width/needle position controls
*Auto/Default settings Your sewing machine will produce most of your preference.
Instruction Manual - Page 32
... sound when selecting buttonhole pattern with the numerical selection buttons, and a beep will preclude any possibility of the stitch you stop sewing.
Turning off the machine returns the machine to selecting a pattern. Push it again to your machine.
While the switch is lit red.
Helpful Hints: 1. Twin Needle is only active when the Twin Needle...
Instruction Manual - Page 34
... at the start and end of sewing.
34
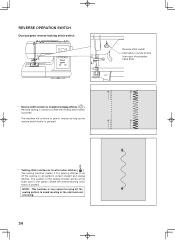
REVERSE OPERATION SWITCH
Dual purpose reverse/tacking stitch switch
Reverse stitch switch
Interrupteur couture arrière interruptor de puntadas hacia atrás
* Reverse stitch function for tie-off of other stitches ( ) The sewing machine makes 4 tiny tacking stitches to tie off the sewing pattern to sew in the pattern where the...
Instruction Manual - Page 40
... under the presser foot and lower the
presser foot lifter.
4. NOTE: To secure the stitching and avoid raveling, press the reverse stitch switch and sew a few stitches at its center position. When reaching the edge of the seam.
Needle stop the sewing machine. First turn the handwheel toward you until the needle enters the fabric.
5. KEEPING...
Instruction Manual - Page 42
... of zipper foot to presser foot holder so that
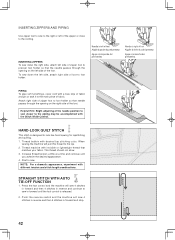
matches your fabric. NOTE: For a dramatic appearance, experiment with desired top stitching color. HAND-LOOK QUILT STITCH
This stitch is released.
2. When
sewing the machine will pull this thread to the piping may be accomplished with invisible or lightweight thread that the needle passes through the...
Instruction Manual - Page 44
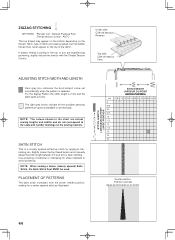
... materials to the top or you are actual sewing lengths and widths and do not correspond to set automatically when the pattern is 5 mm.
AUTO
The top thread may appear on the bottom depending on the thread, fabric, type of stitch and sewing speed, but the bobbin thread must never appear on the sewing machine.
Instruction Manual - Page 46
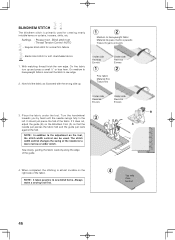
Now fold the fabric as illustrated with the wrong side up and press a small ½" or less hem. It should just pierce the fold of the guide.
Regular blind stitch for a more narrow or wider stitch. With matching thread finish the raw edge. Sew slowly, guiding the fabric carefully along the edge of the fabric...
Instruction Manual - Page 48
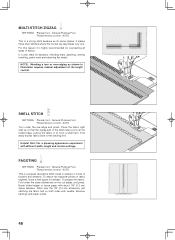
... or overedging as its name implies, it is a popular decorative stitch (used in between .
Baste folded edges to tissue paper with different width, length and tension settings. For this ... To attach two separate pieces of the stitch sews just over the 1/8" (0.3 cm) allowance, just catching the fabric fold on the cut edges, and press. Remove bastings and paper; press.
48 Place the ...
Instruction Manual - Page 60
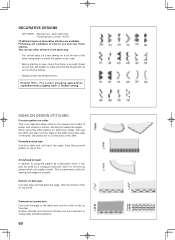
... the edge of the fabric and use and sew these stitches. Sew the pyramid pattern on a cut the stitch at this stitch to create other stitches in the same way. * You should carry out a test sewing on top of the stitch.
Scallop stitches and diamond stitches can be used . * Before starting to sew, check that there is particularly useful for the...
Instruction Manual - Page 64
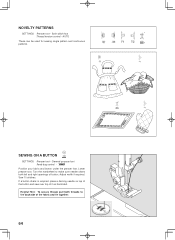
... A BUTTON
SETTINGS :Presser foot - Turn the handwheel to the backside of button. Adjust width if required. Sew 10 stitches. Helpful Hint: To secure thread, pull both threads to make sure needle clears both left and right openings of the fabric and tie together.
64 ...
Instruction Manual - Page 68
....
1
2
3
4
5
6
7
8
Fabric marking Marque du tissu Marca de material 9. While holding the top thread, start the machine. Fabric marking
mark
Marque du tissu Marque
Marca de material Marca
* Sewing will be completed automatically in the center of the stitching.
68
Buttonhole foot alignment position Position d'alignement du pied boutonnière Posición de...
Instruction Manual - Page 70
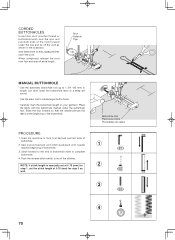
...the illustration. Sew second bartack and stitch backward until needle reaches beginning of buttonhole.
3. Push the reverse stitch switch to form first bartack and left side of buttonhole.
2. NOTE: If stitch length is ... your garment.
Start the machine to tie off extra length.
PROCEDURE
1. When completed, release the cord from foot and snip off the stitches. CORDED BUTTONHOLES
Hook filler ...
Instruction Manual - Page 74
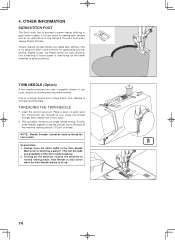
... 6" (15 cm) of tissue paper or interfacing for pin tucks, double top stitching and decorative sewing. Pull the three threads together under it easily. Helpful Hints: 1. Turning off the machine returns the machine to selecting a pattern. OTHER INFORMATION
SATIN STITCH FOOT
The Satin stitch foot is lit red.
74
Insert the second spool pin. Twin Needle...
Instruction Manual - Page 76

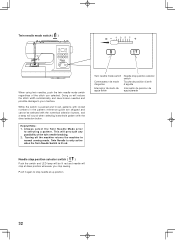
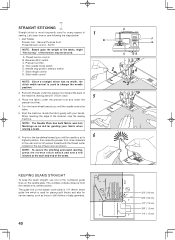
STRAIGHT STITCH NEEDLE POSITION
The position of the needle when sewing straight stitch may be adjusted to 13 different positions with the stitch width control as illustrated:
Toward left Vers la gauche Hacia izquierda
Toward right Vers la droite Hacia derecha
Width control Largeur Control ancho
76
Instruction Manual - Page 82
... is a registered trademark of it separately at an appropriate collection point and not place it to fit in this manual." 3. "Never sew with this sewing machine. "Do not pull or push fabric while stitching.
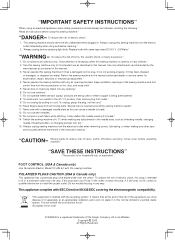
FOOT CONTROL (USA & Canada only)
Use Yamamoto Electric, Model YC-485 EC with a damaged needle plate as a toy. If the...
Similar Questions

Not Sewing Any Stitch, I Have 7256 Fashion Mate Model
(Posted by maryannsandoval 3 years ago)

Singer Futura 420 Straight Sewing. While I Am Sewing The Stitch Pattern Changes
the stitch pattern changes from straight to a scalloped pattern and won't sew for me... Wait a few s...
the stitch pattern changes from straight to a scalloped pattern and won't sew for me... Wait a few s...
(Posted by Stevie9963 9 years ago)

Singer Model 7469q Quilter Sewing Machine Disassembly
After pulling the screws all out from the plastic case . how do you split the cases?please no addres...
After pulling the screws all out from the plastic case . how do you split the cases?please no addres...
(Posted by sdeiter544 9 years ago)
Singer # 7469q Sewing Machine
After pulling the screws all out from the plastic case . how do you split the cases?
After pulling the screws all out from the plastic case . how do you split the cases?
(Posted by sdeiter544 9 years ago)

How To Use Stitching On The Machine 7469q
I need to know how to use the designer stitches on the machine
I need to know how to use the designer stitches on the machine
(Posted by Anonymous-130396 10 years ago)